Skip to content
The Recipe Hatch
  • Home
  • Appetizers
  • Desserts
  • Salads
  • Breakfast
  • Dinner
  • Privacy Policy
  • Contact
  • About

Chef Owen

Air Fryer Garlic Butter Salmon Bites Flavorful Treat

October 3, 2025 by Chef Owen
- 1 lb fresh salmon fillet, skin removed and cut into bite-sized cubes - 3 tablespoons unsalted butter, melted - 4 cloves garlic, minced - 1 tablespoon fresh parsley, chopped - 1 teaspoon lemon zest - 1/2 teaspoon paprika - Salt and black pepper to taste - Lemon wedges, for serving The main ingredients for this dish are fresh salmon, butter, garlic, and parsley. Fresh salmon gives the bites a soft texture. I love using unsalted butter for a rich flavor. Minced garlic adds a nice punch, while fresh parsley brightens up the dish. The seasonings are simple yet effective. Lemon zest adds a fresh kick, and paprika brings warmth. Salt and black pepper enhance all the flavors. Finally, serving the salmon bites with lemon wedges adds a zesty touch that balances richness. Gathering these ingredients is the first step to making your air fryer garlic butter salmon bites. You can find them at any grocery store. Use the freshest salmon you can find for the best taste. Happy cooking! First, melt the butter in a bowl. Add minced garlic, chopped parsley, lemon zest, paprika, salt, and black pepper. Mix everything well to create a flavorful marinade. This garlic butter mix will make your salmon bites taste amazing. Next, take the salmon fillet and cut it into bite-sized cubes. Add these cubes to the bowl with the marinade. Toss gently until each piece is well coated. Let the salmon marinate for 15 to 20 minutes. This wait adds flavor to the fish. While the salmon marinates, preheat your air fryer to 380°F (190°C). This step is important for even cooking. It will take about five minutes to reach the right temperature. After preheating, place the marinated salmon bites in the air fryer basket. Make sure they are in a single layer and not touching. This helps them cook evenly. Air fry the salmon for 8 to 10 minutes. Flip the bites halfway through to ensure they cook on all sides. You want the salmon to be cooked through and lightly golden outside. Once the salmon bites are done, carefully remove them from the air fryer. For garnish, sprinkle extra chopped parsley on top. Add lemon wedges on the side for a fresh touch. Serve the salmon bites right away for the best flavor. Enjoy this delicious treat! To get the best flavor from your salmon bites, marination is key. Letting the salmon soak in the garlic butter mix for 15-20 minutes brings out its rich taste. This time allows the garlic and herbs to soak into the fish. The more time you give it, the tastier it becomes. For seasoning, use fresh ingredients. Fresh parsley adds a burst of color and flavor. Lemon zest brightens up the dish, making it fresh and zesty. Don’t skip the salt and pepper; they enhance all the flavors. Mix them well with the marinade to ensure even coverage. Monitoring the cooking time is essential. Set your air fryer to 380°F (190°C). Cook the salmon bites for 8-10 minutes. Flip them halfway through to ensure even cooking. The salmon should be golden on the outside and tender inside. To avoid overcooking, keep an eye on them. If the pieces are smaller, they may cook faster. Use a fork to test for doneness. The fish should flake easily when fully cooked. If it feels firm, give it a bit more time. Enjoy those perfectly cooked garlic butter salmon bites! {{image_2}} You can mix things up with different herbs and spices. Try dill or thyme instead of parsley for a new taste. You can also add a pinch of cayenne for some heat. If you want a different flavor, use garlic powder instead of fresh garlic. You can switch the salmon for other fish too. Cod or trout works great. These fish will soak up the garlic butter well. Just make sure they are cut into bite-sized pieces like the salmon. To make a complete meal, pair your salmon bites with tasty sides. A fresh salad with lemon dressing makes a great match. You might also enjoy roasted vegetables or rice on the side. For dipping sauces, consider a tangy tartar sauce or a creamy garlic aioli. You can also serve them with a zesty yogurt sauce. These dips will add even more fun to your meal. Don't be afraid to experiment! To keep your salmon bites fresh, store them in an airtight container. This helps seal in flavor and moisture. You can keep them in the fridge for up to three days. If you want to save them longer, you can freeze the bites. Wrap them tightly in plastic wrap and then place them in a freezer bag. They will stay good for about two months in the freezer. When it's time to enjoy your leftovers, the air fryer is the best choice. Preheat your air fryer to 350°F (175°C). Place the salmon bites in a single layer in the basket. Heat them for about 5-7 minutes until they are warm and crispy. This method keeps the texture just right. Avoid using the microwave, as it can make the salmon too soggy. Enjoy your tasty bites as if they were just made! To cut salmon for bites, start with a fresh fillet. Place the fillet on a cutting board. Use a sharp knife for clean cuts. Cut the salmon into even cubes, about one inch each. This size helps the salmon cook evenly. Make sure to remove any skin before cutting. Always remember to wash your hands after handling raw fish. Yes, you can use frozen salmon. Just make sure to thaw it first. Place the frozen salmon in the fridge overnight. If you're short on time, you can thaw it in cold water. Once thawed, pat it dry with paper towels. This helps the garlic butter marinade stick better. To know when salmon is done, check its color. Cooked salmon should be opaque and flaky. Use a fork to test it; it should easily flake apart. The internal temperature should reach 145°F (63°C). A meat thermometer is a great tool for this. If you see any raw-looking areas, give it a bit more time in the air fryer. This blog post shared how to make delicious salmon bites using simple steps. We explored key ingredients like fresh salmon, butter, and garlic. I also detailed the process, from marinating the fish to air frying it perfectly. Remember to experiment with flavors and serve them with tasty dips. With these tips, you can enjoy great salmon bites anytime. Now, you’re ready to create a dish that impresses!

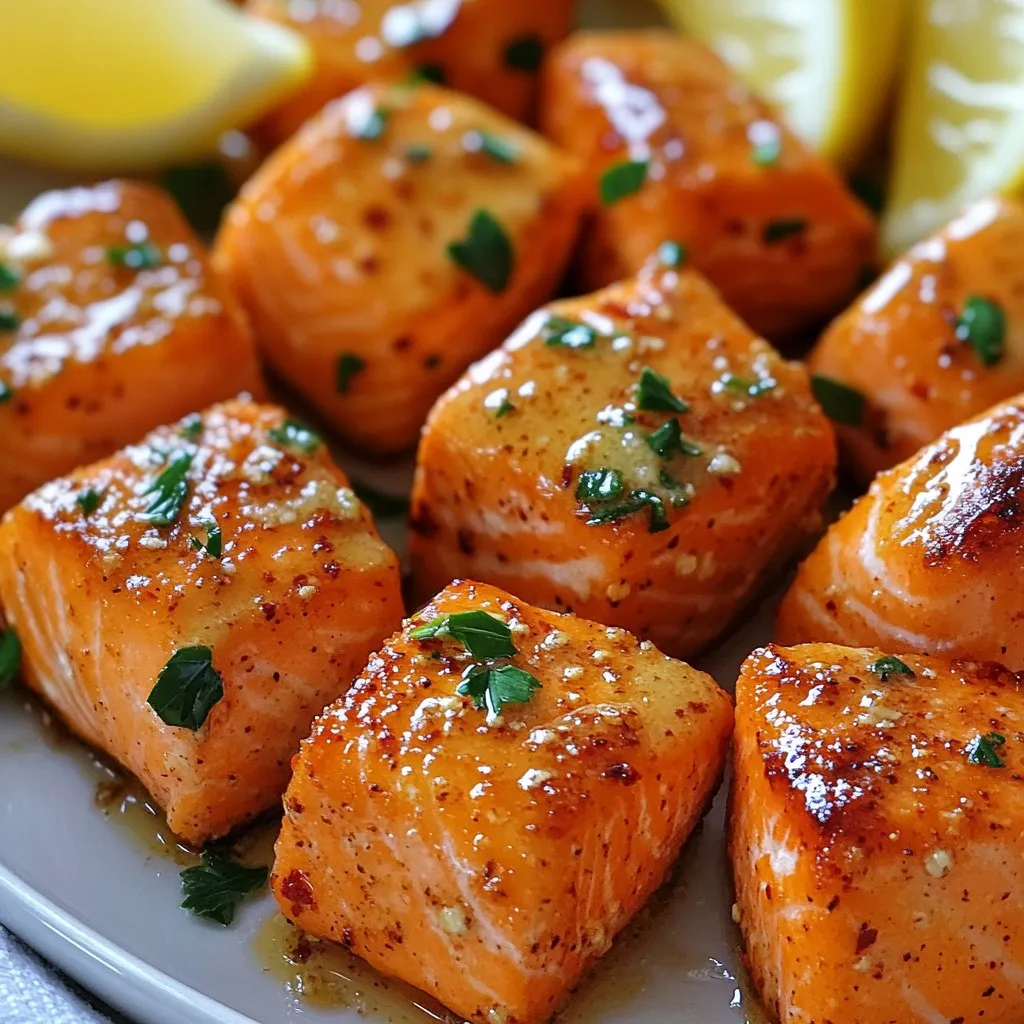
Are you looking for a quick and tasty dinner idea? Try my Air Fryer Garlic Butter Salmon Bites! These flavorful treats are easy to make and packed with rich garlic …

Read more

Categories Dinner

Brown Sugar Pecan Pie Blondies Decadent Dessert Recipe

October 3, 2025 by Chef Owen
- 1 cup unsalted butter, melted - 1 cup packed brown sugar - 1/2 cup granulated sugar - 2 large eggs - 1 teaspoon vanilla extract - 2 cups all-purpose flour - 1 teaspoon baking powder - 1/2 teaspoon salt - 1 cup pecans, roughly chopped - 1/2 cup semi-sweet chocolate chips (optional) For these Brown Sugar Pecan Pie Blondies, you need simple ingredients that pack a lot of flavor. The butter gives richness, while the brown sugar adds a deep, caramel taste. The granulated sugar balances the sweetness. You will use two large eggs to help bind the mix. A teaspoon of vanilla extract brings warmth to the dessert. The flour provides structure, and the baking powder helps them rise. Salt enhances all the flavors, so don’t skip it! Pecans add a crunchy texture and nutty flavor. If you like, toss in some semi-sweet chocolate chips for extra sweetness and a fun twist. This combo creates a dessert that is rich, chewy, and oh-so-decadent. - Mixing bowls - Whisk and spatula - 9x13 inch baking pan - Measuring cups and spoons To make these blondies, gather a few tools. You need mixing bowls to combine your ingredients. A whisk is perfect for mixing the wet ingredients. A spatula helps fold in the pecans and chocolate chips. Use a 9x13 inch baking pan to give the blondies their shape. Measuring cups and spoons will ensure you have the right amounts for each ingredient. Having these tools on hand will make your baking process smooth and fun! - Preheat oven to 350°F (175°C). - Grease a 9x13 inch baking pan. Start by preheating your oven. This step ensures even baking. Greasing the pan prevents the blondies from sticking. Use a little butter or cooking spray for best results. - Combine melted butter with both sugars. - Incorporate eggs and vanilla extract. - Whisk dry ingredients and combine with wet ingredients. In a large bowl, mix the melted butter with brown sugar and granulated sugar. Stir until smooth. Then add eggs, one at a time, mixing well. Next, pour in the vanilla extract for flavor. In another bowl, whisk together flour, baking powder, and salt. Gradually mix this dry blend into your wet mixture. Be careful not to overmix; just combine until smooth. - Fold in pecans and chocolate chips. - Bake the batter in the oven. - Cooling time before cutting. Now it’s time to fold in the chopped pecans. If you want extra sweetness, add chocolate chips too. Spread the batter in the greased pan evenly. Bake for 25 to 30 minutes. You know they’re done when the top is golden brown. A toothpick should come out clean. Let the blondies cool in the pan for at least 15 minutes before cutting them into squares. This cooling step helps them set properly, making for easier serving. To make the best blondies, avoid overmixing the batter. When you add the dry ingredients, mix until just combined. Overmixing can make the blondies tough. You want them to be soft and chewy. To check for doneness, use a toothpick. Insert it into the center of the blondies. If it comes out clean or with a few crumbs, they are ready. If the toothpick has wet batter, bake for a few more minutes. Serve your blondies warm or at room temperature. Warm blondies taste great and have a soft texture. Room temperature blondies are easier to slice and serve. For a special touch, pair them with ice cream. Vanilla ice cream is a classic choice. You can also add toppings like whipped cream or caramel sauce. These extras make your dessert even more enjoyable! {{image_2}} You can swap out pecans for other nuts. Walnuts add a nice crunch. They have a strong flavor that pairs well with brown sugar. Almonds are another great choice. They give a lighter taste and a different texture. Just chop them roughly, just like the pecans. This helps them blend well into the batter. Want to make your blondies stand out? Add spices like cinnamon or nutmeg. These warm spices bring a cozy vibe to your dessert. They blend well with the sweetness of brown sugar. You can also change the chocolate chips. Try using white chocolate or butterscotch chips. These will add a creamy sweetness. Just remember to adjust the amount to your taste. Each of these changes makes the recipe yours. Enjoy experimenting! To store your Brown Sugar Pecan Pie Blondies at room temperature, follow these steps: - Once cool, cut the blondies into squares. - Place them in an airtight container. - Keep the container in a cool, dry spot. These blondies will stay fresh for up to three days. The sweet smell will fill your kitchen! For longer storage, refrigeration is a great option. - Wrap the blondies tightly in plastic wrap. - Place the wrapped blondies in an airtight container. - Store them in the fridge for up to a week. This helps maintain their rich flavor and moist texture. If you want to freeze them, here's how: - Cut the blondies into squares. - Wrap each piece in plastic wrap. - Place them in a freezer-safe bag or container. - Label the bag with the date. You can freeze them for up to three months. When you're ready to enjoy, let them thaw at room temperature or warm them in the oven. Can I use light brown sugar instead of dark brown sugar? Yes, you can. Light brown sugar has less molasses than dark brown sugar. This change will make your blondies a bit lighter in flavor. The texture will stay the same. If you want a richer taste, stick with dark brown sugar. How do I know when the blondies are done baking? To check for doneness, insert a toothpick into the center. If it comes out clean or with a few moist crumbs, they are done. The top should look golden brown. Remember, they will continue to cook a bit after you take them out. Can I make these blondies ahead of time? Yes! You can prepare the batter and store it in the fridge for up to two days. Just cover it well. When you're ready to bake, let it sit at room temperature for about 30 minutes before pouring it into the pan. Enjoy fresh blondies anytime! Now you know how to make delicious blondies from scratch. We covered the main ingredients, necessary equipment, and step-by-step instructions. Remember the tips to avoid overmixing and to check for doneness. You can also try different nuts and flavors. Lastly, I explained how to store them properly. Enjoy making these treats and share them with friends. With a few simple steps, you'll create a sweet snack everyone will love. Happy baking!

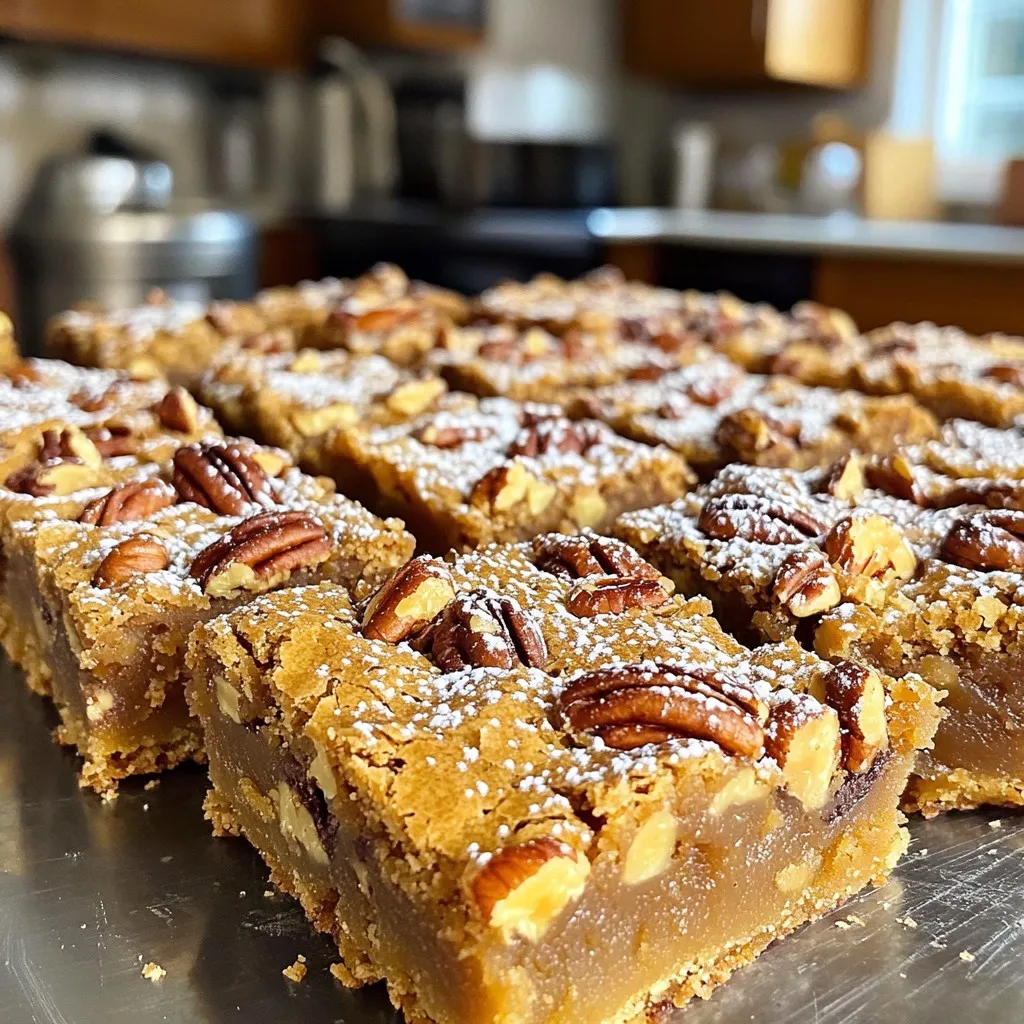
If you love rich, chewy desserts, you’ll adore these Brown Sugar Pecan Pie Blondies. They mix the sweet flavors of classic pecan pie with the softness of blondies. You can …

Read more

Categories Desserts

Quick Homemade Butter Chicken Simple and Tasty Recipe

January 9, 2026October 3, 2025 by Chef Owen
- Chicken and Marinade Components - 500g boneless chicken thighs, cut into bite-sized pieces - 1 cup plain yogurt - Spice Mix for Flavor - 2 tablespoons garam masala - 1 teaspoon ground turmeric - 1 teaspoon chili powder - Additional Cooking Ingredients - 2 tablespoons vegetable oil - 1 medium onion, finely chopped - 3 cloves garlic, minced - 1-inch piece of fresh ginger, grated - 1 can (400g) crushed tomatoes - 1 tablespoon sugar - 1 cup heavy cream - Salt, to taste - Fresh cilantro, chopped, for garnish Gather these items, and you’re ready to start! The chicken thighs give a juicy bite. Yogurt makes the chicken tender and tasty. The spices bring rich flavor. You can adjust the chili powder for more heat. The cream adds a lovely richness to the dish. Fresh cilantro adds color and freshness, making your meal pop! {{ingredient_image_2}} To start, we need to marinate the chicken for maximum flavor. In a mixing bowl, combine 500g of boneless chicken thighs with 1 cup of plain yogurt, 2 tablespoons of garam masala, 1 teaspoon of ground turmeric, 1 teaspoon of chili powder, and a pinch of salt. Mix well to coat the chicken pieces. The recommended marination time is at least 30 minutes. However, if you have the time, let it marinate for a few hours. This helps the spices soak in and makes the chicken taste amazing. Next, we will sauté the onions. Heat 2 tablespoons of vegetable oil in a large skillet over medium heat. Add 1 medium onion, finely chopped, and sauté for about 5-7 minutes. You want them to turn a nice golden brown color. Stir them occasionally to cook them evenly. Adding garlic and ginger is very important in butter chicken. After the onions are golden, add 3 cloves of minced garlic and 1-inch piece of grated fresh ginger to the skillet. Stir-fry for about 2 minutes. This will make your kitchen smell wonderful! Now it’s time to cook the chicken. Add the marinated chicken to the skillet. Spread it out evenly. Cook for about 6-8 minutes, turning occasionally. You want the chicken to be browned on all sides. This step is crucial for flavor. Once the chicken is browned, it's time to add the tomatoes. Pour in 1 can of crushed tomatoes and add 1 tablespoon of sugar. Stir everything together to combine. Bring this mixture to a gentle simmer. Let it simmer for about 10 minutes. This helps all the flavors develop nicely. Now, we will make the sauce creamy. Lower the heat and slowly stir in 1 cup of heavy cream. Make sure it blends well into the sauce. Let it cook for an extra 5 minutes. This step makes the sauce luscious and rich. Taste the sauce and adjust the seasoning with salt as needed. It’s important to make sure the flavors are just right! For garnishing, sprinkle fresh chopped cilantro on top. This adds color and flavor. Serve the butter chicken over fluffy basmati rice or with warm naan bread. For a stunning finish, drizzle a little cream over the top. Enjoy your meal with a smile! Quick Cooking Techniques You can save time by using boneless chicken thighs. They cook faster and stay moist. Also, cut your chicken into small pieces. This helps them cook evenly and quickly. Prepping Ingredients Ahead of Time Chop your onions, garlic, and ginger the night before. You can also marinate the chicken a few hours or even a day early. This lets the flavors soak in. Ready ingredients make cooking much faster. Using Fresh vs. Dried Spices Fresh spices give a brighter taste. Use fresh ginger and garlic when you can. Dried spices are great too, but fresh adds a punch. Try to use both for a deeper flavor. Marination and Its Impact on Taste Marinating chicken in yogurt and spices is key. It makes the chicken tender and full of flavor. A longer marination time means more taste. Aim for at least 30 minutes; however, a few hours is best. Customizing Heat to Suit Preferences You can control how spicy your butter chicken is. Use less chili powder for mild flavor. If you want more heat, add extra chili powder or fresh chilis. Taste as you go for the best balance. Balancing Flavors in the Sauce If the sauce is too spicy, add sugar or cream. This helps mellow the heat. Always taste before serving. Adjust salt and sugar to make the dish just right for your taste. Pro Tips Marinate Longer for Depth: For the best flavor, marinate the chicken thighs for a few hours or overnight. This allows the spices to penetrate the meat more deeply, resulting in a richer taste. Adjust Spice Levels: If you prefer a milder dish, reduce the chili powder and garam masala. Conversely, if you like it spicier, consider adding fresh chopped green chilies or a pinch of cayenne. Use Homemade Garam Masala: For an authentic taste, consider making your own garam masala blend using whole spices. Toasting and grinding your spices will significantly enhance the flavor profile of the dish. Finish with Fresh Herbs: Always garnish with fresh cilantro just before serving. This not only adds a pop of color but also a burst of freshness that complements the rich flavors of the butter chicken. {{image_4}} Using Chicken Breast vs. Thighs I prefer chicken thighs for butter chicken. They stay juicy and tender. Chicken breast can work, but it may dry out. If you want a leaner option, use chicken breast. Just watch the cooking time to keep it moist. Plant-Based Options for Vegetarian Versions For a tasty vegetarian butter chicken, use tofu or chickpeas. Firm tofu absorbs flavors well. Cut it into cubes and use the same marinade. Chickpeas add protein and a nice texture. You can also try cauliflower for a veggie twist, or lentils for heartiness. Instant Pot Butter Chicken The Instant Pot makes this dish quick and easy. Start by marinating the chicken as usual. Sauté the onions, garlic, and ginger in the pot. Then add the marinated chicken and crushed tomatoes. Cook on high pressure for about 10 minutes. Stir in cream after releasing the pressure for a creamy finish. Slow Cooker Method for Convenience For a set-it-and-forget-it option, use a slow cooker. Marinate the chicken and place it in the cooker. Add the sautéed onions, garlic, ginger, tomatoes, and spices. Cook on low for 6-8 hours or high for 3-4 hours. Stir in the cream at the end for richness. Incorporating Different Spices You can change the flavor with different spices. Try adding cumin for warmth or cinnamon for sweetness. A bit of cardamom can add a nice touch, too. Adjust spices according to what you enjoy most. Adding Vegetables or Legumes Feel free to add veggies to your butter chicken. Spinach or peas brighten up the dish. You can also mix in lentils for added protein. This keeps the meal balanced and nutritious while boosting flavor. - Best Containers for Storage: Use airtight containers to keep your butter chicken fresh. Glass containers work well and are easy to clean. You can also use plastic containers that seal tightly. Make sure they are food-safe. - Refrigeration vs. Freezing: Store leftovers in the fridge for up to 3 days. If you want to keep it longer, freeze it for up to 3 months. Just remember to thaw it in the fridge before reheating. - Maintaining Creaminess When Reheating: When reheating, add a splash of heavy cream or milk. This keeps the sauce creamy and smooth. Stir well to blend the cream into the sauce. - Suggested Methods for Flavor Retention: The best way to reheat is on the stove over low heat. Stir often to prevent burning. You can also use the microwave, but cover it to keep moisture in. Heat in short bursts, stirring in between to keep it even. Butter chicken is a popular Indian dish. It features tender chicken cooked in a rich and creamy tomato sauce. The dish uses spices like garam masala, turmeric, and chili powder for flavor. You can serve butter chicken with rice or naan. The creamy sauce makes it comforting and delicious. Yes, you can make this recipe gluten-free. Use gluten-free yogurt instead of regular yogurt. Make sure to check the spices for any hidden gluten. You can also serve it with rice instead of naan. This way, everyone can enjoy it without worry. To make butter chicken spicier, add more chili powder to the marinade. You can also use fresh green chilies for extra heat. Consider adding a dash of cayenne pepper while cooking. Taste the sauce as you go and adjust the spice to match your liking. You can use store-bought curry sauce for a quicker option. It saves time, but the flavor may differ from homemade. Always check the ingredients for quality. If you want a richer taste, add fresh cream and spices to the sauce. This way, you can enjoy a balance of convenience and flavor. Butter chicken lasts for about 3 to 4 days in the fridge. Store it in an airtight container to keep it fresh. If you want to keep it longer, consider freezing it. When reheating, do so on low heat to avoid separating the cream. This ensures your meal stays delicious. In this blog post, we explored how to make delicious butter chicken from scratch. We covered key ingredients, marinating techniques, and cooking steps for the best flavor. I shared tips on adjusting spices and saving time in the kitchen. You learned about different cooking methods and variations to keep it fresh. Don’t forget to store leftovers properly and reheat them to keep the creaminess. Enjoy your cooking journey and make this dish your own!

Craving a rich and creamy butter chicken but short on time? You’re in the right place! This quick homemade butter chicken recipe delivers all the flavor you love without the …

Read more

Categories Dinner

Skinny Chicken Broccoli Alfredo Easy and Healthy Dish

January 7, 2026October 3, 2025 by Chef Owen
- 2 boneless, skinless chicken breasts, thinly sliced - 4 cups broccoli florets, fresh or frozen - 2 cups whole wheat fettuccine - 1 cup low-sodium chicken broth - 1 cup unsweetened almond milk - 2 tablespoons light cream cheese - 2 cloves garlic, minced - 1 teaspoon Italian seasoning blend - 1 tablespoon olive oil - Salt and black pepper, to taste - 1/4 cup grated Parmesan cheese (for added richness) - Fresh parsley, chopped, for garnish - Large pot for boiling pasta - Large skillet for cooking chicken and sauce - Colander for draining pasta - Whisk for stirring sauce - Measuring cups and spoons With these ingredients and tools, you can make a tasty Skinny Chicken Broccoli Alfredo. This dish is not just easy, but it’s also healthy. You control what goes in. Each ingredient adds its own flavor, making this meal both satisfying and wholesome. Enjoy the process of cooking and let the rich flavors come together! {{ingredient_image_2}} Start by filling a large pot with water. Add salt and bring it to a boil. Once boiling, add the whole wheat fettuccine. Cook it for about 8-10 minutes. For the last 3 minutes of cooking, gently add the broccoli florets. This way, they cook perfectly together. After cooking, drain the pasta and broccoli. Save a little pasta water in case you need it later. Grab a large skillet and heat some olive oil over medium heat. Take your sliced chicken breasts and season them with salt, pepper, and Italian seasoning. Add the chicken to the hot skillet. Cook for 5-7 minutes, stirring now and then. Once the chicken turns white and is no longer pink, take it out of the skillet and place it on a plate. In the same skillet, add minced garlic. Sauté it for around 30 seconds until it smells great. Then, pour in the low-sodium chicken broth and almond milk. Stir this mixture well and bring it to a gentle simmer. Once the sauce simmers, lower the heat. Add light cream cheese and whisk it in. Keep stirring until the sauce is smooth and creamy. Let it simmer for about 5 minutes to thicken. If the sauce is too thick, add a splash of reserved pasta water. After that, return the cooked pasta, broccoli, and chicken to the skillet. Toss everything gently to coat in the sauce. If you want a richer taste, sprinkle in some grated Parmesan cheese. Taste the dish and adjust salt and pepper to your liking. Serve the chicken and broccoli Alfredo hot. For a nice touch, garnish each plate with fresh chopped parsley. This adds color and flavor. Serve it in shallow bowls, twirling the fettuccine to create a lovely nest. Enjoy your healthy, delicious meal! To boost the creaminess of your Skinny Chicken Broccoli Alfredo, use a bit more light cream cheese. You can also add a splash of heavy cream if you're not worried about calories. If you want a richer flavor, sprinkle in some grated Parmesan cheese when mixing everything. This adds taste and makes the sauce smooth and velvety. You can cut more calories by using less oil or even cooking spray. Swap the whole wheat fettuccine for zucchini noodles for a low-carb option. Unsweetened almond milk is a great choice for creaminess, but you can use low-fat milk if that’s what you have. If you want to skip the cheese, try nutritional yeast for a cheesy flavor. Store leftovers in an airtight container in the fridge. They will last for about three days. When reheating, add a splash of chicken broth or almond milk. This keeps the sauce creamy and prevents it from drying out. You can microwave it or heat it on the stove over low heat, stirring often. Enjoy it warm for a quick meal! Pro Tips Use Fresh Ingredients: Whenever possible, opt for fresh broccoli and chicken to enhance the flavor and texture of your dish. Customize Your Sauce: Feel free to experiment with different herbs and spices to personalize your Alfredo sauce to your taste. Keep it Creamy: If you find your sauce thickening too much, add a splash of reserved pasta water to maintain a creamy consistency. Leftover Storage: Store any leftovers in an airtight container in the fridge for up to 3 days. Reheat gently on the stove with a little extra almond milk. {{image_4}} To make this dish vegetarian, you can skip the chicken. Replace it with 1 can of drained chickpeas or sautéed mushrooms. These options add protein and flavor without meat. You can keep the other ingredients the same. The creamy sauce pairs well with veggies, making it a hearty meal. To make this dish gluten-free, use gluten-free pasta. Many brands offer pasta made from rice or quinoa. Just cook it as directed on the package. You can also use spiralized zucchini or spaghetti squash for a lighter option. The rest of the recipe stays the same. Enjoy a creamy Alfredo without the gluten! Feel free to add more veggies to your Skinny Chicken Broccoli Alfredo. Peas, spinach, or bell peppers work great. You can toss them in when you add the broccoli. This boosts nutrition and color. The more veggies, the better! Mix and match as you like for a fun twist. In this Skinny Chicken Broccoli Alfredo, the calories come mostly from the chicken and pasta. A serving has about 350-400 calories. Using whole wheat pasta lowers the calorie amount while adding fiber. The light cream cheese and almond milk keep the sauce creamy but light, adding only a few calories. Each ingredient plays a role in keeping this dish tasty and healthy. This dish is high in protein and fiber. The chicken breasts offer around 26 grams of protein per serving. Whole wheat fettuccine adds about 7 grams of fiber, making this meal filling and satisfying. Broccoli also adds fiber and vitamins. Together, these ingredients help you feel full longer and keep your energy up. This recipe is great for various diets. It is low in calories and fat, making it suitable for those watching their weight. The use of almond milk makes it dairy-free. If you need gluten-free options, you can swap the whole wheat fettuccine for gluten-free pasta. This dish is flexible and can fit different dietary needs without losing flavor. Yes, you can use regular pasta. Whole wheat is healthier, but any pasta works. Just remember that regular pasta may have more carbs. Cook it the same way as the whole wheat. If you don’t have almond milk, use low-fat milk or oat milk. These options will also work well. They keep the dish creamy without adding too many calories. To add heat, try red pepper flakes or cayenne pepper. You can also use a spicy garlic sauce. Start with a small amount, then taste and add more if needed. Yes, you can make the sauce ahead. Store it in an airtight container in the fridge for up to three days. When ready, just reheat it on low heat, stirring often, to bring back its creaminess. This blog post shared a simple way to make a tasty pasta dish with chicken and broccoli. We covered the key ingredients, helpful kitchen tools, and easy step-by-step instructions. You learned tips for creaminess and how to make healthy swaps. We also explored variations, nutritional facts, and answered common questions. Remember, cooking is about enjoying food. Try your own twists and share your creations!

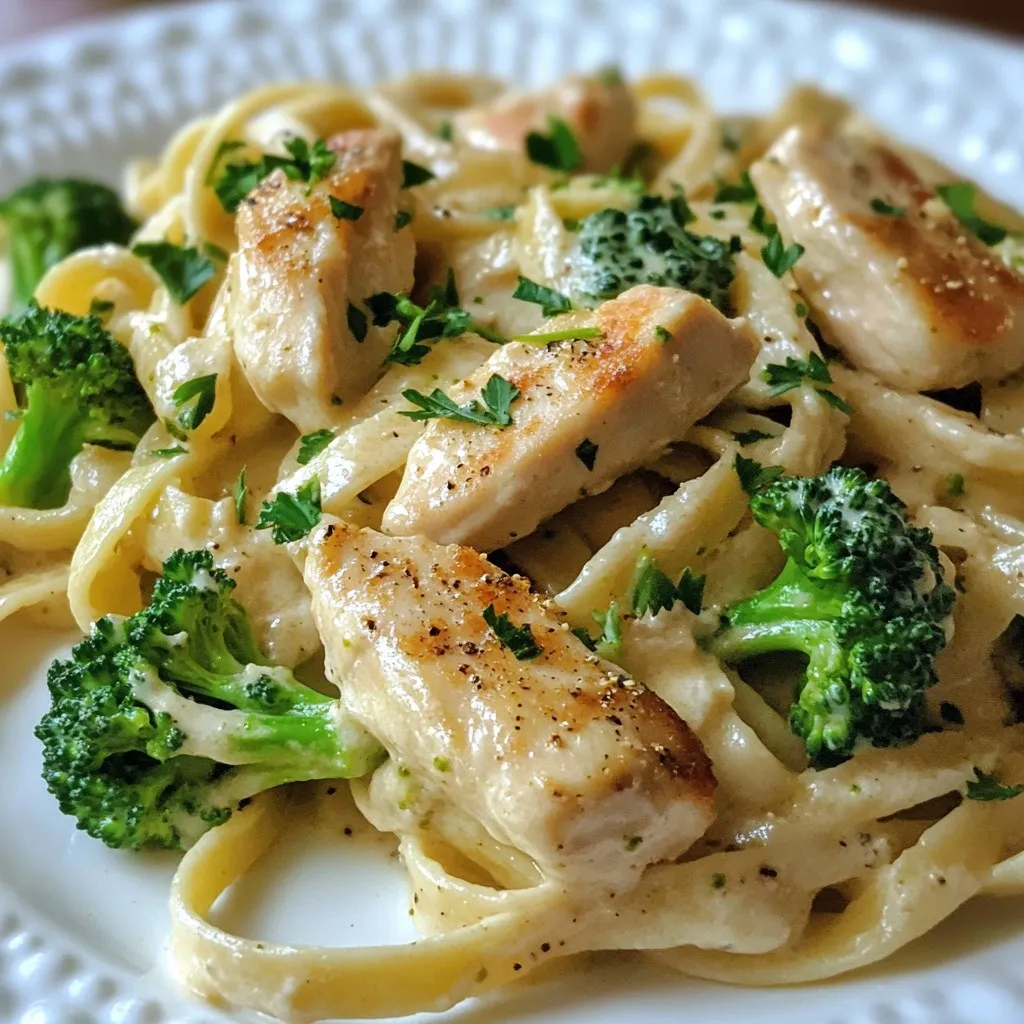
Looking for a delicious yet healthy meal? I’ve got just the dish for you! This Skinny Chicken Broccoli Alfredo is not only easy to make but also packed with flavor. …

Read more

Categories Dinner

Creamy Tuscan Sun Dried Tomato Shrimp Skillet Delight

October 2, 2025 by Chef Owen
- Large shrimp (1 pound) - Olive oil (1 tablespoon) - Garlic (3 cloves, minced) - Sun-dried tomatoes (1 cup, chopped) - Heavy cream (1 cup) - Fresh spinach (1 cup) - Grated Parmesan cheese (1/2 cup) - Italian seasoning (1 teaspoon) - Red pepper flakes (1/2 teaspoon, optional) - Salt and pepper to taste - Fresh basil for garnish When making Creamy Tuscan Sun-Dried Tomato Shrimp Skillet, having quality ingredients is key. Start with large shrimp, about one pound. You want them fresh, peeled, and deveined. Next, grab some olive oil. This will add flavor and help cook the garlic. Speaking of garlic, you’ll need three cloves, minced. This adds a fragrant aroma. Then, use sun-dried tomatoes, chopped into one cup. They bring a rich, tangy taste that pairs perfectly with shrimp. For the creamy texture, heavy cream is a must. You’ll need one cup for this dish. Now, for the greens! Fresh spinach is essential. One cup will wilt down nicely in the skillet. Grated Parmesan cheese adds a cheesy bite. Half a cup is perfect here. Don’t forget Italian seasoning for that classic flavor, just one teaspoon will do. If you like a little heat, add red pepper flakes. A half teaspoon is optional, but it can spice things up! Lastly, season with salt and pepper to taste. For garnish, fresh basil adds a lovely touch. This colorful ingredient list makes a delicious dish that’s sure to impress! First, grab a large skillet. Heat 1 tablespoon of olive oil over medium heat. Once hot, add 3 cloves of minced garlic. Sauté the garlic for about 1 minute. You want it fragrant but not burnt. Next, toss in 1 cup of chopped sun-dried tomatoes. Cook these for 2 minutes. This step allows the flavors to blend well. Now, increase the heat to medium-high. Add 1 pound of peeled and deveined shrimp to the skillet. Season with salt, pepper, and 1 teaspoon of Italian seasoning. Cook the shrimp for about 2-3 minutes. They should turn pink and opaque. This tells you they are ready. Reduce the heat to medium-low. Pour in 1 cup of heavy cream. Let it simmer for about 2-3 minutes. Stir occasionally to mix everything well. After that, add in 1 cup of fresh spinach. Cook it until it wilts, which takes about 2 minutes. Finally, stir in 1/2 cup of grated Parmesan cheese. Mix until it melts. Taste and adjust the seasoning if needed. For some heat, you can add 1/2 teaspoon of red pepper flakes. Serve it hot, garnished with fresh basil for a touch of color and flavor. - To check if shrimp are done, look for a pink color. They should be opaque. - When adding cream, keep the heat low to avoid curdling. Stir often to blend. - For a kick, add red pepper flakes to the cream sauce. Start with a pinch. - Fresh herbs like parsley or thyme can deepen the flavor. Try mixing in a teaspoon. - Garnish with fresh basil leaves for a pop of color. - Serve over pasta or rice for a complete meal. A nice bowl adds style. {{image_2}} You can easily switch the shrimp for chicken or tofu. Chicken breast works well; just cook it until it's done. Tofu is great for a vegan twist. Use firm tofu and sauté until golden. For cream, you can try coconut cream for a rich taste. Almond milk or cashew cream also work for dairy-free options. Want a spicier dish? Add more red pepper flakes or a dash of hot sauce. You can also toss in seasonal veggies like zucchini or bell peppers. They add color and nutrients. Just sauté them with the garlic for a few minutes before adding shrimp. This dish is great with pasta or rice. Serve it over fettuccine for a classic touch. You can also pair it with crusty bread to soak up the sauce. It’s perfect as a main course. If you want a lighter option, serve it as an appetizer. Just use smaller portions. To store your creamy Tuscan sun-dried tomato shrimp skillet, let it cool first. Place leftovers in an airtight container. This method helps keep flavors fresh. The dish will last in the fridge for about 3 days. Make sure to label your container with the date. If you want to freeze the skillet, portion it into smaller containers. This makes it easier to thaw later. Seal them tightly to avoid freezer burn. To thaw, place the container in the fridge overnight. When reheating, warm it slowly on low heat. Stir often to keep the sauce creamy. Adding a splash of cream can help restore its texture. Enjoy your delicious meal again without losing the flavor! Can I use frozen shrimp for this recipe? Yes, you can use frozen shrimp. Just remember to thaw them first. This will help them cook evenly. Frozen shrimp can be a great time-saver, too. How can I make this dish dairy-free? You can replace heavy cream with coconut cream or a dairy-free cream. Also, omit the Parmesan cheese or use a dairy-free cheese. This keeps the flavor rich without dairy. What type of sun-dried tomatoes are best? Sun-dried tomatoes packed in oil are best. They add moisture and flavor. Look for ones that are soft and not too dry. This helps balance the cream in the dish. Can I use fresh spinach instead of wilted? Yes, you can use fresh spinach. Just add it to the pan a bit earlier. It will take a little longer to wilt, but it will taste great. What can I serve with creamy Tuscan shrimp? You can serve this dish with pasta, rice, or crusty bread. Each side will soak up the creamy sauce well. A fresh salad makes a nice light complement too. Is it possible to adjust this recipe for larger servings? Absolutely! Just double the ingredients as needed. Make sure your skillet is large enough to hold all the shrimp and sauce. This way, you can serve more people without losing flavor. This blog post shared how to make a delicious creamy Tuscan shrimp dish. We covered the key ingredients, step-by-step cooking instructions, and tips to enhance your meal. You saw how to swap ingredients and adjust flavors for your preferences. Remember, this dish can be stored or frozen easily. Experiment with variations to keep it exciting. Enjoy crafting your perfect creamy shrimp and impress your family or friends!

Are you ready to impress your dinner guests with a dish that bursts with flavor? My Creamy Tuscan Sun Dried Tomato Shrimp Skillet is quick, easy, and packed with savory …

Read more

Categories Dinner

Air Fryer Buffalo Cauliflower Bites Flavorful Snack

October 2, 2025 by Chef Owen
- 1 medium head of cauliflower, cut into bite-sized florets - 1 cup all-purpose flour - 1 cup water - 1 teaspoon garlic powder - 1 teaspoon onion powder - 1 teaspoon paprika - Salt and pepper to taste - 1 cup buffalo sauce (prepared) - 2 tablespoons olive oil - Fresh parsley, chopped (for garnish) You can swap all-purpose flour for gluten-free flour if needed. For a lighter option, use almond flour. Instead of buffalo sauce, you can try barbecue sauce for a milder flavor. If you want it spicy, add cayenne pepper to the batter. For a vegan take, use a plant-based milk instead of water in the batter. Each serving of these buffalo cauliflower bites has about: - Calories: 180 - Protein: 5g - Fat: 8g - Carbohydrates: 22g - Fiber: 3g This snack is a great choice for a healthy appetizer. It’s rich in flavor and low in calories. Plus, the cauliflower adds vitamins and minerals. Enjoy these bites guilt-free! First, grab a medium head of cauliflower. Cut it into bite-sized florets. This will help them cook evenly. Next, preheat your air fryer to 400°F (200°C). This step is key for getting crispy bites. While the air fryer heats, you can make the batter. In a large bowl, mix 1 cup of all-purpose flour, 1 cup of water, 1 teaspoon of garlic powder, 1 teaspoon of onion powder, and 1 teaspoon of paprika. Add salt and pepper to taste. Whisk the mixture until it is smooth. The batter should be thick enough to coat the cauliflower well. Dip each cauliflower floret into the batter. Make sure it is well coated but let the extra batter drip off. Spray the air fryer basket lightly with olive oil. This will help prevent sticking. Place the cauliflower bites in a single layer. Do not overcrowd the basket. Cook for 12-15 minutes. Shake the basket halfway to ensure even cooking. They should turn golden brown and crispy. Once the cauliflower bites are cooked, take them out of the air fryer. In a separate bowl, toss them with 1 cup of buffalo sauce. Make sure each piece is well coated in the spicy goodness. For added flavor, return the sauced bites to the air fryer for another 3-4 minutes. This helps the sauce set. Finally, take them out and garnish with chopped parsley for a fresh touch. To get the best crunch, make sure your batter is smooth. A lumpy batter can stick to the cauliflower and create soggy spots. I like to dip each floret well. Let the excess batter drip off before cooking. This step helps the bites get crispy in the air fryer. When cooking, shake the basket halfway through. This ensures all sides brown evenly. Clumping can ruin the look of your bites. To avoid this, mix your batter well. Use a whisk to blend flour, water, and spices until smooth. If it gets thick, add a little water. Dip your florets quickly. Don’t let them sit too long in the batter. This keeps the coating light and crispy. For a fun presentation, serve your cauliflower bites on a large platter. Add celery and carrot sticks for crunch. These veggies balance the heat of the buffalo sauce. Don't forget the dips! A small bowl of ranch or blue cheese dressing pairs perfectly. You can also sprinkle fresh parsley on top for color. {{image_2}} If you crave more heat, you can spice up your buffalo cauliflower bites. Start by adding more buffalo sauce to your batter. You can also mix in cayenne pepper or chili powder. This will kick the heat up a notch. Toss your cooked cauliflower in a blend of hot sauce and melted butter for that extra kick. Adjust the spice level to suit your taste buds. For a rich and savory twist, try Parmesan garlic cauliflower bites. Add grated Parmesan cheese and minced garlic to your batter. This adds a deep flavor to each bite. After air frying, toss the cauliflower in more Parmesan cheese. You can also sprinkle fresh garlic and parsley on top for extra zest. These bites are perfect for those who love cheesy snacks. If you want a vegan-friendly version, it’s easy to swap out ingredients. Use chickpea flour instead of all-purpose flour for a protein boost. You can mix it with water and spices just as you would with normal batter. This option keeps the bites crispy and tasty. Ensure your buffalo sauce is vegan too. Many brands offer great plant-based options. Enjoy these bites guilt-free! You can store leftover buffalo cauliflower bites in the fridge. Place them in an airtight container. They will stay fresh for about 3-4 days. Make sure to let them cool completely before sealing. This helps keep them crispy longer. When you’re ready to enjoy your leftovers, reheating is key. I recommend using the air fryer again for the best results. Preheat the air fryer to 350°F (175°C). Place the cauliflower bites in a single layer. Heat them for about 5-7 minutes. This method keeps them crispy and restores their flavor. If you want to save some for later, freezing is an option. After cooking, let the bites cool completely. Then, place them in a freezer-safe bag or container. They can last for up to 2 months in the freezer. When you’re ready to eat, just reheat from frozen in the air fryer. This will help them regain their crunch and taste. Yes, you can use frozen cauliflower. Just make sure to thaw it first. This helps the batter stick better. Pat the florets dry with a towel to remove excess moisture. This step is key for a crispy bite. Making buffalo sauce is easy! Here’s what you need: - ½ cup hot sauce (like Frank’s RedHot) - ¼ cup unsalted butter - 1 tablespoon white vinegar - ¼ teaspoon garlic powder 1. Melt the butter in a small pot over low heat. 2. Stir in the hot sauce and vinegar. 3. Add garlic powder and mix well. 4. Cook for 2-3 minutes until heated through. Now you have a tasty, homemade buffalo sauce! These bites are great with many sides. Here are some ideas: - Celery sticks for crunch. - Carrot sticks for sweetness. - A bowl of ranch or blue cheese dressing for dipping. - A fresh salad for a light touch. These pairings enhance the flavors and make your meal more fun. Enjoy! You’ve learned about making tasty Air Fryer Buffalo Cauliflower Bites. We discussed ingredients, steps, and helpful tips. You can easily customize flavors with spicy or garlic options. Remember, keeping bites crispy is key, and proper storage helps them last. Try serving them with your favorite dip. With these insights, you can create a delicious snack that anyone will love. Enjoy making your bites!

Looking for a tasty snack that checks all the boxes? Air Fryer Buffalo Cauliflower Bites are here to satisfy your cravings! They’re spicy, crispy, and packed with flavor. Best of …

Read more

Categories Appetizers

Apple Cider Doughnut Baked Oatmeal Flavorful Delight

October 2, 2025 by Chef Owen
- 2 cups rolled oats - 2 cups apple cider - 1/2 cup unsweetened applesauce - 1/4 cup maple syrup - 1 teaspoon vanilla extract - 1 teaspoon baking powder - 1 teaspoon cinnamon - 1/4 teaspoon nutmeg - 1/4 teaspoon salt - 1/2 cup diced apples (preferably Granny Smith) - 1/4 cup chopped walnuts or pecans (optional) When preparing for your Apple Cider Doughnut Baked Oatmeal, gather all your ingredients first. This method makes the cooking process much smoother. You will use rolled oats as the base. They give the dish a hearty texture. Apple cider adds sweetness and a rich apple flavor. Unsweetened applesauce helps keep the oatmeal moist. Maple syrup adds a natural sweetness that pairs well with the spices. The spices are key! Cinnamon and nutmeg provide warmth and depth. Baking powder helps the oatmeal rise and become fluffy. Salt balances the sweetness and enhances the flavors. Diced apples add freshness and a slight crunch. If you choose to add nuts, walnuts or pecans give a nice crunch and healthy fats. - Melted butter or coconut oil - Brown sugar mixture - Extra maple syrup - Powdered sugar - Extra apple slices - Whipped cream or yogurt Toppings can elevate your baked oatmeal experience. Melted butter or coconut oil adds richness. A sprinkle of brown sugar gives a sweet crunch. Drizzle extra maple syrup for a touch of sweetness. You can dust powdered sugar on top for a doughnut-like look. Fresh apple slices not only look great but also add flavor. Finally, a dollop of whipped cream or yogurt creates a creamy finish. Enjoy customizing your dish with these toppings! First, preheat your oven to 350°F (175°C). Next, grease an 8x8-inch baking dish with some butter or oil. This helps the oatmeal not stick. In a large bowl, combine 2 cups of rolled oats, 1 teaspoon baking powder, 1 teaspoon cinnamon, 1/4 teaspoon nutmeg, and 1/4 teaspoon salt. Mix these dry ingredients well and set them aside. In another bowl, whisk together 2 cups of apple cider, 1/2 cup unsweetened applesauce, 1/4 cup maple syrup, and 1 teaspoon vanilla extract. Make sure it's well mixed. This blend adds rich flavor to your oatmeal. Now, pour the wet mix into the dry mix. Stir until everything combines well. Gently fold in 1/2 cup of diced Granny Smith apples and 1/4 cup of chopped walnuts or pecans, if you like. Spread this oatmeal mixture evenly in your greased baking dish. For the topping, mix 2 tablespoons of melted butter or coconut oil with 1/4 cup brown sugar and 1 teaspoon cinnamon. Drizzle this topping over the oatmeal mixture. Bake for 30-35 minutes. Check if the top is set and lightly browned. Once done, let it cool for a few minutes before slicing into squares. To get the best texture in your Apple Cider Doughnut Baked Oatmeal, keep these tips in mind: - Moisture retention: Use unsweetened applesauce and apple cider. They add moisture and flavor. - Ingredient temperatures: Make sure your apple cider is at room temperature. This helps the oats absorb moisture well. Cold ingredients can make the mixture dense. Want to boost the flavor? Here are some ideas: - Additional spices: Try adding ginger or allspice for extra warmth. Just a pinch can make a big difference. - Alternative sweeteners: You can swap maple syrup for honey or agave. Each adds a unique taste to the dish. Serving your baked oatmeal can be fun and creative! Here are my favorite ways: - Best ways to serve: Cut the oatmeal into squares. Drizzle with extra maple syrup. A sprinkle of powdered sugar makes it look special. - Pairing ideas: Enjoy it warm with a side of yogurt. You can also serve it with fresh fruit or nuts for a tasty breakfast or dessert. {{image_2}} You can easily tweak this recipe to fit your taste. Here are some simple swaps: - Using different types of oats: Try steel-cut oats for a heartier texture. Quick oats work too but will make the dish softer. - Alternative liquids to replace apple cider: If you don't have apple cider, use milk or almond milk. This change will keep the oatmeal moist and tasty. - Nut-free and dairy-free options: Substitute coconut oil for butter. Choose nut-free milk to make it safe for allergies. Spice it up with fun additions. Here are some ideas: - Adding dried fruits or chocolate chips: Toss in some raisins or cranberries for a sweet twist. Dark chocolate chips add a rich flavor and a hint of indulgence. - Modifying spices for different flavors: Swap cinnamon for pumpkin pie spice or ginger. These spices can change the flavor profile and elevate your oatmeal. Make this dish fit the season with these ideas: - Incorporating pumpkin for fall flavor: Mix in half a cup of pumpkin puree. This gives a warm, cozy flavor perfect for autumn. - Cranberry additions for a festive touch: Add fresh or dried cranberries for a tart bite. They brighten up the dish and make it festive. With these variations, you can always keep your Apple Cider Doughnut Baked Oatmeal fresh and exciting. After you bake the Apple Cider Doughnut Baked Oatmeal, let it cool. Cut it into squares. Use an airtight container to store the leftovers. This keeps moisture in and prevents drying out. Glass or plastic containers work well. You can also wrap the squares tightly in plastic wrap if needed. To reheat, place a square in the microwave. Heat for 30 seconds to 1 minute. You can also warm it in the oven. Preheat the oven to 350°F (175°C). Place the oatmeal on a baking sheet and heat for about 10 minutes. If you have many squares, consider freezing some. Wrap them tightly in plastic wrap and then in foil. This helps keep the flavor fresh. In the fridge, the baked oatmeal lasts for about 5 days. If you freeze it, expect it to last for up to 3 months. Always check for any signs of spoilage before eating leftovers. To make your oatmeal more moist, you can add extra liquid. Try using more apple cider or even a bit of milk. You can also add more applesauce. Each of these will help keep your baked oatmeal nice and soft. If you find it too dry, add a splash of liquid before baking. Yes, you can prep this dish ahead of time! Mix the dry and wet ingredients the night before. Store them separately in your fridge. In the morning, combine them and bake. This saves you time and lets you enjoy a quick breakfast. If you don’t have apple cider, you can use apple juice or even water. Both will work in a pinch. You can also mix apple juice with a bit of vinegar for a tangy flavor. This keeps the taste close to apple cider. Absolutely! You can adjust the maple syrup to fit your taste. Use less for a less sweet dish. If you want it sweeter, try honey or brown sugar. Just remember to taste as you go to get it just right! This blog post covers how to make a delicious baked oatmeal. We looked at the ingredients needed, step-by-step instructions, and helpful tips. You learned how to add fun variations and proper storage techniques. Remember, you can easily customize this recipe to fit your taste. Experiment with flavors, spices, and toppings to make it your own. Enjoy this healthy treat any time!

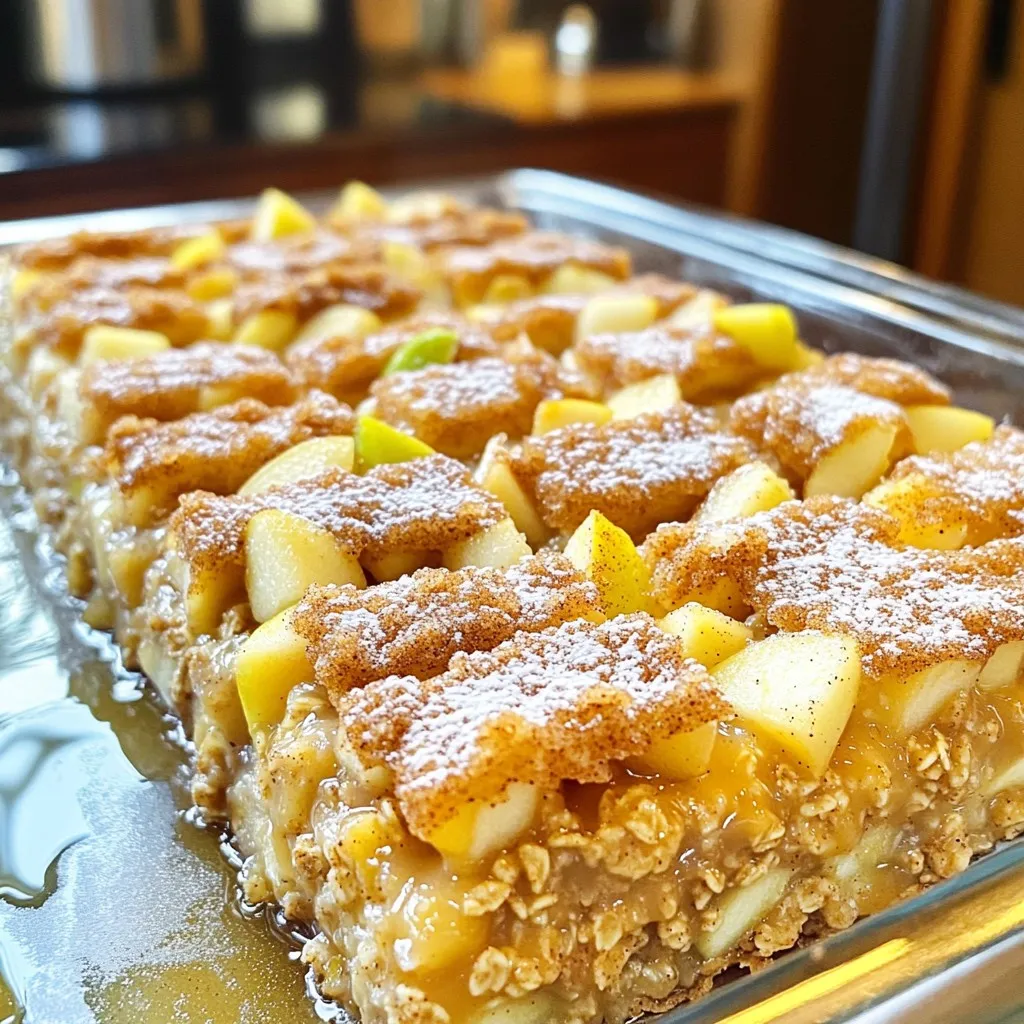
If you’re craving a warm, cozy breakfast that tastes like a fall fair treat, you’ve got to try Apple Cider Doughnut Baked Oatmeal. This dish combines the sweet notes of …

Read more

Categories Breakfast

Minute Sweet Chili Peanut Noodles Simple and Quick

October 2, 2025 by Chef Owen
- 8 oz (225g) rice noodles - 1/2 cup peanut butter (smooth or chunky) - 1/4 cup sweet chili sauce - 2 tablespoons soy sauce (low sodium recommended) - 1 tablespoon sesame oil - 2 teaspoons lime juice - 1 tablespoon grated ginger - 2 garlic cloves, minced - 1/4 cup chopped scallions (green onions) - 1/4 cup crushed peanuts (for garnish) - Fresh cilantro leaves (for garnish) Using fresh ingredients makes a big difference. Fresh rice noodles cook well and taste great. The flavor of peanut butter shines when it’s fresh. Fresh scallions add a crisp bite. Lime juice brightens the whole dish. When you use fresh, you get more taste. Fresh ingredients also help you stay healthy. They bring more nutrients to your meal. This dish is quick, but with fresh items, it feels gourmet. You’ll enjoy every bite more. If you don’t have rice noodles, you can try another noodle. Egg noodles or whole wheat pasta work well. For the peanut butter, almond butter is a great swap. It gives a different flavor but stays creamy. If you need a spicy kick, add sriracha to the sauce. You can also use a store-bought peanut sauce if you're short on time. Just check the label for added sugar. For those who avoid peanuts, sunflower seed butter is a tasty alternative. It keeps the dish nut-free but still creamy. There are many options to make this dish fit your taste. First, fill a pot with water. Bring it to a boil. Add the rice noodles and cook them as per the package instructions. This usually takes about 4 to 5 minutes. Stir them gently to prevent sticking. Once done, drain the noodles. Rinse them with cold water to stop the cooking process. Set the noodles aside to cool while you make the sauce. Grab a mixing bowl. Add the peanut butter. Next, pour in the sweet chili sauce, soy sauce, and sesame oil. Then, squeeze in the lime juice. Now, add the grated ginger and minced garlic. Whisk everything together until it is smooth and well mixed. Taste the sauce. You want it to be creamy with just the right amount of sweetness and a hint of spice. Take a large mixing bowl and add the cooked rice noodles. Pour the peanut sauce over the noodles. Toss them gently, making sure every noodle gets coated. Then, add half of the chopped scallions. Mix well to combine them into the noodles. You can taste the noodles now. If you want, adjust the flavor by adding more sweet chili sauce or lime juice. Serve the noodles in bowls or on a platter. Finish with the remaining scallions, crushed peanuts, and fresh cilantro leaves. Enjoy your colorful and tasty dish! To make the best peanut sauce, focus on balance. The blend of sweet and salty is key. I use smooth peanut butter for a creamy texture. If you like crunch, chunky peanut butter works too. Always taste your sauce before adding it to the noodles. Adjust with more sweet chili sauce or lime juice if needed. This sauce should be rich and flavorful. Presentation adds joy to your meal. I like to serve the noodles in bright bowls. Top them with extra crushed peanuts and fresh cilantro. This not only looks good but adds flavor too. You can also add lime wedges on the side. A squeeze of lime brightens the dish and enhances the taste. Serve with chopsticks for fun, or a fork for ease. One mistake is not rinsing the noodles. Rinsing prevents them from sticking together. Another issue is under-mixing the sauce with the noodles. Make sure every noodle is coated well. If the noodles seem dry, don’t hesitate to add more sauce. Lastly, don’t skip the garnishes. They enhance both flavor and appearance. {{image_2}} You can add protein to your Minute Sweet Chili Peanut Noodles for a heartier meal. Some great choices are: - Grilled chicken - Shrimp - Tofu If you choose chicken, grill or sauté it until cooked through. For shrimp, cook until pink and opaque. If using tofu, press it first, then sauté until golden. Adding these proteins makes the dish filling and adds flavor. Adding vegetables can boost nutrition and color. Here are some tasty options: - Bell peppers - Carrots - Broccoli - Snap peas You can steam or stir-fry the vegetables before mixing them with the noodles. This step keeps the veggies crisp and fresh. They will add texture and flavor, making the dish more vibrant. Want a kick? Spice it up! Here are ideas to add heat: - Red pepper flakes - Sriracha sauce - Chopped fresh chili Sprinkle red pepper flakes into the sauce for a mild heat. For more spice, mix in Sriracha or fresh chili. These adjustments can make your noodles exciting and full of flavor! To keep your Minute Sweet Chili Peanut Noodles fresh, store them in an airtight container. This will help prevent the noodles from drying out. Place the container in the fridge. They will stay good for about three days. If you have extra sauce, keep it separate to maintain flavor. When you're ready to eat your leftovers, reheat them gently. You can use a microwave or a pan on low heat. If using the microwave, heat in short bursts. Stir after each burst to avoid hot spots. If the noodles feel dry, add a splash of water or extra sauce. This will help restore the creamy texture. If you want to keep your noodles longer, freezing is a great option. Place the cooled noodles in a freezer-safe bag. Squeeze out as much air as you can before sealing. They can stay in the freezer for up to three months. When you're ready to eat, thaw them overnight in the fridge. Reheat as mentioned above, and enjoy! Rice noodles take about 4 to 6 minutes to cook. Check the package for exact times. You want them soft but not mushy. After cooking, drain and rinse them with cold water. This stops the cooking and keeps them from sticking. Yes, you can use other noodles. Try soba, udon, or even spaghetti. Each type will change the taste slightly. Just make sure to cook them as directed on the package. Remember, cooking time may vary with different noodles. These noodles pair great with many foods. Try adding grilled chicken or shrimp for protein. You can also mix in fresh veggies like bell peppers or snap peas. Top with crushed peanuts and cilantro for extra crunch and flavor. Serve with lime wedges for a zesty touch. This post covered how to make sweet chili peanut noodles. We discussed fresh ingredients and their importance. You learned how to cook rice noodles, make peanut sauce, and combine everything well. I shared tips to perfect your sauce, serve your dish, and avoid common mistakes. Variations helped you explore protein options and spicy add-ins. Lastly, you found storage info for leftovers. Get creative with your noodle dish and enjoy every bite!

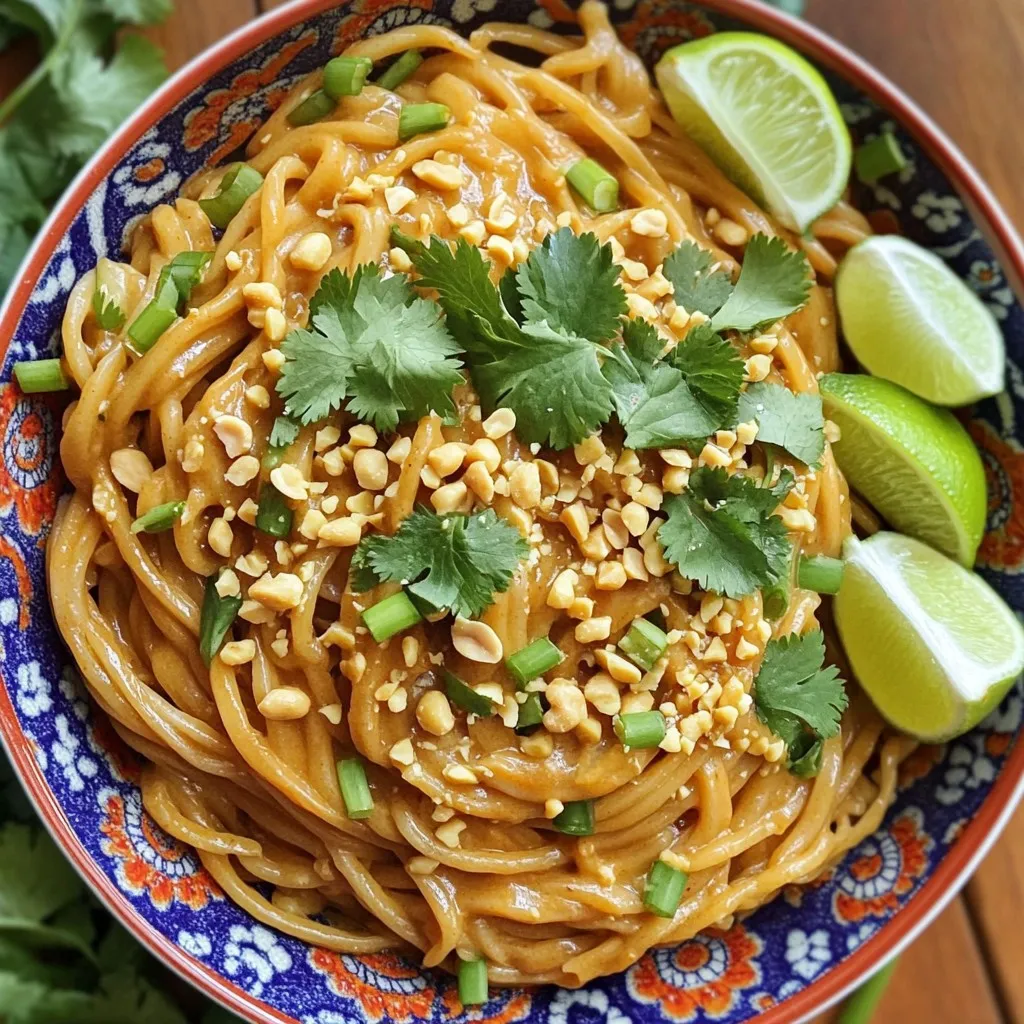
Looking for a quick meal? I’ve got just the thing! My Minute Sweet Chili Peanut Noodles are easy to make and bursting with flavor. This dish takes just minutes to …

Read more

Categories Dinner

Lemon Poppy Seed Greek Yogurt Muffins Easy Recipe

October 2, 2025 by Chef Owen
To make these tasty muffins, gather the following ingredients: - 1 cup all-purpose flour - 1/2 cup whole wheat flour - 1/2 cup granulated sugar - 1 tablespoon poppy seeds - 1 teaspoon baking powder - 1/2 teaspoon baking soda - 1/4 teaspoon salt - 1 cup plain Greek yogurt - 1/4 cup vegetable oil - 2 large eggs - Zest of 1 lemon - 2 tablespoons fresh lemon juice - 1 teaspoon vanilla extract These ingredients create a light and moist muffin with a fresh, zesty flavor. You can easily swap some ingredients if needed. Here are some ideas: - Flour: For a gluten-free option, use a gluten-free flour blend instead of all-purpose and whole wheat flours. - Sugar: You can replace granulated sugar with coconut sugar or honey, but adjust the amount. - Greek Yogurt: If you don’t have Greek yogurt, regular yogurt works well. Just check the thickness. - Oil: Substitute vegetable oil with melted coconut oil for a different taste. - Eggs: If you want to make these muffins vegan, replace eggs with flax eggs. Mix 1 tablespoon of flaxseed meal with 2.5 tablespoons of water for one egg. These swaps keep the muffins tasty while catering to dietary needs. Each muffin is not only delicious but also provides nutrients. Here’s the breakdown: - Calories: Approximately 150 - Protein: 4g - Carbohydrates: 22g - Fat: 6g - Fiber: 1g - Sugar: 6g These muffins offer a good mix of protein and carbs, making them a great breakfast or snack option. Enjoy these treats while knowing they are not just tasty, but also have some health benefits. First, you need to set your oven. Preheat it to 350°F (175°C). This temperature helps the muffins rise perfectly. Next, prepare your muffin tin. You can line it with paper liners or lightly grease it with butter or oil. This step makes it easy to remove the muffins later. In a large bowl, combine your dry ingredients. Add 1 cup of all-purpose flour, 1/2 cup of whole wheat flour, 1/2 cup of granulated sugar, and 1 tablespoon of poppy seeds. Then, include 1 teaspoon of baking powder, 1/2 teaspoon of baking soda, and 1/4 teaspoon of salt. Whisk these together until they mix well. This mix gives your muffins structure and flavor. Now, take another bowl for the wet ingredients. Mix 1 cup of plain Greek yogurt with 1/4 cup of vegetable oil. Add 2 large eggs, the zest of 1 lemon, 2 tablespoons of fresh lemon juice, and 1 teaspoon of vanilla extract. Whisk until it’s smooth. This mixture adds moisture and flavor to the muffins. Pour the wet ingredients into the bowl with the dry mix. Use a rubber spatula to gently fold the batter. Be careful not to overmix; a few lumps are okay. This keeps the muffins light and fluffy. Once mixed, divide the batter among the muffin cups. Fill each cup about two-thirds full for the best rise. Place the muffin tin in your preheated oven. Bake for 18-20 minutes. To check if they're done, insert a toothpick into the center. If it comes out clean, your muffins are ready. Also, the tops should spring back when touched lightly. Once baked, let them cool in the pan for 5 minutes. Then, transfer them to a wire rack to cool completely. Enjoy your delicious lemon poppy seed muffins! To get the best muffin texture, mix the wet and dry ingredients carefully. When you combine them, use a rubber spatula to fold gently. You want the batter to be slightly lumpy. Overmixing can make your muffins tough. Keep it light and simple for a fluffy result. To keep your muffins fresh, store them in an airtight container. Place a paper towel at the bottom to absorb moisture. This helps prevent sogginess. You can keep them at room temperature for up to three days. For longer storage, freeze them. Wrap each muffin in plastic wrap and place them in a freezer bag. These muffins shine when served warm. You can add a pat of butter or a drizzle of honey on top. For a fun twist, pair them with a fruit salad or yogurt. They also go well with tea or coffee. Display them on a platter with lemon slices for an eye-catching treat. {{image_2}} To make gluten-free lemon poppy seed muffins, substitute the all-purpose flour. Use a gluten-free flour blend instead. Check that it has xanthan gum for better texture. You can also mix in almond flour for added flavor. The rest of the recipe stays the same. Your muffins will still taste bright and fresh! To make these muffins vegan, replace the eggs with flax eggs. Mix one tablespoon of ground flaxseed with three tablespoons of water. Let it sit for five minutes to thicken. Use coconut oil or applesauce in place of vegetable oil. Lastly, choose a plant-based yogurt. Your muffins will still be moist and delicious! You can easily change the flavor of your muffins. Add a handful of blueberries for a fruity twist. Or, mix in some chopped nuts for crunch. For a sweet finish, drizzle a simple lemon glaze on top. Just combine powdered sugar with lemon juice until smooth. These variations keep the recipe exciting and fun! To keep your Lemon Poppy Seed Greek Yogurt Muffins fresh, place them in an airtight container. You can store them at room temperature for up to three days. If you want them to last longer, consider the fridge. They will stay good for about a week in the refrigerator. Freezing muffins is simple and effective. First, let them cool completely. Then, wrap each muffin in plastic wrap. You can also use aluminum foil for extra protection. Place the wrapped muffins in a freezer bag. They can last for up to three months in the freezer. When you are ready to eat them, just thaw them at room temperature or in the fridge overnight. To reheat your muffins, preheat your oven to 350°F (175°C). Place the muffins on a baking sheet. Heat them for about 10 minutes. This will help bring back their soft texture. If you are in a rush, you can also microwave them. Heat each muffin for about 15-20 seconds. This quick method is great if you want a warm treat fast. If you don't have Greek yogurt, you can use regular yogurt. Sour cream is also a good choice. For a dairy-free option, try unsweetened coconut yogurt. This will keep the muffins moist and tasty. To make these muffins sugar-free, use a sugar substitute. Options like honey, maple syrup, or agave nectar work well. Use about half the amount of sweetener compared to sugar. This keeps the muffins sweet without added sugar. Yes, you can use lemon extract. Use about one teaspoon of extract for every tablespoon of juice. Keep in mind that fresh lemon juice adds a bright flavor. Extract may not give the same zest but will still taste good. These muffins stay fresh for about three days at room temperature. If you store them in the fridge, they can last up to a week. For longer storage, freeze them for up to three months in an airtight container. You can serve these muffins warm or at room temperature. A dusting of powdered sugar adds a nice touch. For extra flair, add lemon slices or edible flowers on the platter. Pair with tea or coffee for a delightful treat. You now have a complete guide to making perfect Lemon Poppy Seed Greek Yogurt Muffins. From the ingredient list to storage tips, every step matters. Remember, small adjustments can lead to big flavors. Enjoy experimenting with variations like gluten-free or vegan options. Store them well to keep them fresh. These muffins not only taste great but are also easy to make, making them perfect for any occasion. I hope you get to savor every bite!

Craving a light and fluffy treat? You’ll love these Lemon Poppy Seed Greek Yogurt Muffins! This easy recipe brings together tangy lemon and nutty poppy seeds for a burst of …

Read more

Categories Breakfast

Savory Slow Cooker Turkey Sweet Potato Chili Recipe

October 1, 2025 by Chef Owen
To make this chili, gather the following main ingredients: - 1 lb ground turkey - 2 medium sweet potatoes, peeled and diced - 1 can (15 oz) kidney beans, drained and rinsed - 1 can (15 oz) black beans, drained and rinsed - 1 can (28 oz) crushed tomatoes - 1 medium onion, chopped - 3 cloves garlic, minced - 1 bell pepper (red or green), chopped - 2 cups chicken or vegetable broth These ingredients create a hearty base for your chili. The ground turkey adds protein. Sweet potatoes bring sweetness and texture. Beans provide fiber and a creamy mouthfeel. Tomatoes add acidity and depth. For the perfect flavor, you'll need these spices: - 2 tablespoons chili powder - 1 teaspoon cumin - 1 teaspoon smoked paprika - ½ teaspoon salt - ¼ teaspoon black pepper These spices make your chili warm and tasty. Chili powder adds heat. Cumin gives it an earthy flavor. Smoked paprika lends a subtle smokiness. Salt and pepper round out the taste. To elevate your chili, consider these optional garnishes: - Fresh cilantro - Diced avocado These toppings add color and freshness. Cilantro provides a bright flavor. Avocado adds creaminess and richness. You can serve the chili with crusty bread or tortilla chips for extra crunch. Start by heating 1 tablespoon of olive oil in a large skillet over medium heat. Once hot, add 1 lb of ground turkey. Cook it for about 5 to 7 minutes. Use a wooden spoon to break it apart as it cooks. You want it to brown evenly. Lightly season it with ½ teaspoon salt and ¼ teaspoon black pepper. This step adds flavor and helps the turkey cook well. In your slow cooker, add the browned turkey. Then, toss in 2 medium sweet potatoes, peeled and diced. Next, add 1 can of drained kidney beans and 1 can of drained black beans. Pour in 1 can of crushed tomatoes, then add 1 chopped medium onion, 3 minced garlic cloves, and 1 chopped bell pepper. Don’t forget to sprinkle in 2 tablespoons of chili powder, 1 teaspoon of cumin, and 1 teaspoon of smoked paprika. Mix everything well to combine the flavors. Pour in 2 cups of chicken or vegetable broth. This liquid helps cook the sweet potatoes and melds the flavors. Set your slow cooker to low and cook for 6 to 8 hours. If you’re short on time, you can set it to high for 3 to 4 hours. The chili is ready when the sweet potatoes are tender. Before serving, taste the chili. Adjust any seasonings if needed. Enjoy your warm bowl of chili! To make your chili really pop, use fresh spices. Fresh chili powder adds a rich taste. Try toasting spices in the pan for a few minutes. This brings out their best flavor. You can also play with the heat. If you like it spicy, add more chili powder or jalapeños. For a sweet touch, add a splash of maple syrup or honey. This balances the heat nicely. You can change this recipe to fit your taste. For a vegetarian option, swap the turkey for lentils or mushrooms. They add great texture and flavor. If you prefer a milder chili, use less chili powder. Adding more beans and sweet potatoes makes it hearty without the heat. You can also try different beans, like pinto or cannellini, for a new twist. To make your chili thicker, mash some sweet potatoes while cooking. This adds body and creaminess. You can also let it cook longer with the lid off. For a thinner chili, add more broth. Start with half a cup, then check the consistency. Another tip is to blend a portion of the chili in a blender. This gives a smooth texture while keeping some chunky bits. {{image_2}} If you want a vegetarian option, you can swap the turkey for lentils or quinoa. Both options add protein and a nice texture. Lentils cook well in the slow cooker, making them a great choice. Quinoa adds a light, fluffy feel to the chili. Just make sure to adjust the cooking time as needed. Want to boost the nutrition? Add more veggies! Chopped carrots, zucchini, or spinach can blend in well. These veggies add color and flavor. They also increase the fiber content. You can toss them in with the other ingredients for more taste and texture. Explore different bean combinations to change the flavor. Instead of kidney and black beans, try pinto beans or chickpeas. Each type of bean brings a unique taste and texture. Mixing beans can create a fun twist on the original recipe. Just remember to rinse and drain canned beans to keep the chili from getting too salty. After you finish your Slow Cooker Turkey Sweet Potato Chili, let it cool first. Once it's cool, transfer it to an airtight container. Store the chili in the fridge for up to four days. If you plan to eat it soon, this is the best way to keep it fresh. Make sure to label your container with the date. This way, you will know when to eat it. If you want to save some chili for later, freezing is a great option. Allow the chili to cool down completely. Then, put it in a freezer-safe container or a heavy-duty freezer bag. Make sure to remove as much air as you can. Frozen chili can last up to three months. When you're ready to eat it, just thaw it in the fridge overnight. To reheat your chili, you can use the stove or microwave. If using the stove, heat it in a pot over medium heat. Stir occasionally until it's hot. This usually takes about 10 minutes. If you prefer the microwave, place your chili in a bowl. Heat it on high for 2-3 minutes, stirring halfway through. Always check that it’s hot all the way through before eating. Enjoy your tasty leftovers! Cooking this chili takes about 6-8 hours on low or 3-4 hours on high. These times help the sweet potatoes become soft and the flavors mix well. The slow cooker does the hard work while you relax or do other tasks. Yes, you can! If you prefer, you can swap ground turkey for ground beef, chicken, or even pork. Each meat gives a different taste. Just remember to cook the meat first if you use beef or pork. This step adds depth to your chili's flavor. To store leftover chili, let it cool first. Then, place it in an airtight container. It can stay in the fridge for up to four days. For longer storage, freeze the chili. Just make sure to use a freezer-safe container. You can enjoy it later by simply reheating! In this blog post, we covered how to make Slow Cooker Turkey Sweet Potato Chili. We explored main ingredients, spices, and optional garnishes. I shared easy steps for preparation, cooking times, and tips for flavor. You can even try variations like vegetarian options or extra veggies. Remember, chili is flexible and fun to make. Adjust it to your taste, and enjoy it with friends or family. Happy cooking!

If you’re ready to elevate your dinner game, this Savory Slow Cooker Turkey Sweet Potato Chili recipe is your answer. Packed with protein and nutrients, it’s not just tasty but …

Read more

Categories Dinner
Older posts
Newer posts
← Previous Page1 … Page18 Page19 Page20 … Page125 Next →

THE RECIPE HATCH

Where tasty ideas take flight! 🚀🐣 Fresh, easy recipes hatched daily to make cooking simple and flavorful.

PAGES

Home About Contact Privacy Policy Terms & Conditions Cookie Policy GDPR Policy Copyright Policy Disclaimer

CATEGORIES

Appetizers Desserts Salads Breakfast Dinner

Contact

  • Pinterest
  • Mail
Copyright © 2026 The Recipe Hatch. All rights reserved.