Skip to content
The Recipe Hatch
  • Home
  • Appetizers
  • Desserts
  • Salads
  • Breakfast
  • Dinner
  • Privacy Policy
  • Contact
  • About

Chef Owen

Chili Garlic Chicken Pizza Tasty and Simple Recipe

November 11, 2025February 17, 2025 by Chef Owen
- Pre-made pizza dough or homemade - 1 cup cooked chicken, shredded - 1 tablespoon chili garlic sauce - 1 cup mozzarella cheese, shredded - 1/2 cup red bell pepper, thinly sliced - 1/2 cup red onion, thinly sliced - 1/4 cup fresh cilantro, chopped - 2 tablespoons olive oil - 1 teaspoon garlic powder - Salt and pepper to taste - Optional: red pepper flakes for extra heat The key to a great chili garlic chicken pizza lies in the ingredients. Start with the dough. You can use store-bought or make your own. Homemade dough gives a fresh taste. The cooked chicken adds protein, and chili garlic sauce brings the heat. Mozzarella cheese is a must; it melts beautifully and balances the spice. Red bell pepper and red onion add crunch and sweetness. Fresh cilantro brightens the flavors and adds a pop of color. Don't forget olive oil! It gives flavor and helps the crust crisp up. Garlic powder enhances the taste, while salt and pepper finish the mix. If you like more heat, add red pepper flakes for an extra kick. Gather these ingredients, and you're ready to make a tasty pizza that everyone will love! {{ingredient_image_1}} 1. Preheat the oven to 475°F (245°C). If you have a pizza stone, place it in now. 2. In a bowl, mix 1 cup of shredded chicken with 1 tablespoon of chili garlic sauce. Make sure the chicken is well coated. 3. Roll out your pizza dough on a floured surface. Aim for your desired thickness. Carefully transfer the dough to a baking sheet or pizza peel lined with parchment paper if using a stone. 1. Brush the dough with 2 tablespoons of olive oil. This adds flavor and helps the crust brown. 2. Sprinkle 1 teaspoon of garlic powder evenly over the dough. Season with salt and pepper to taste. 3. Add a generous layer of 1 cup of shredded mozzarella cheese. Then, layer on the chili garlic chicken, 1/2 cup of thinly sliced red bell peppers, and 1/2 cup of thinly sliced red onion. 4. Top with another sprinkle of mozzarella. For extra heat, add red pepper flakes if you like. 1. Bake the pizza for 12-15 minutes. Look for a golden brown crust and bubbly cheese. 2. Once baked, take the pizza out and let it cool for a minute. Garnish with 1/4 cup of chopped fresh cilantro before slicing. 3. Serve hot and enjoy the spicy, flavorful twist! To get the right thickness for your pizza, roll out the dough on a floured surface. Aim for about a quarter-inch thick. This thickness gives you a nice balance between a crispy crust and a soft inside. If you like a thicker crust, roll it out a bit less. If you're using a pizza stone, place it in the oven as it preheats. This makes the crust crispier. Remember to use parchment paper when transferring the dough. This makes it easier to slide onto the hot stone. For extra flavor, try adding toppings like jalapeños, mushrooms, or olives. These toppings can add depth and texture to your pizza. You can also mix different cheeses, like cheddar or feta, for a unique twist. When using chili garlic sauce, spread it evenly over the chicken. This ensures every bite has that spicy kick. If you like heat, sprinkle some red pepper flakes on top before baking. Adjust the amount to match your spice tolerance. Pairing drinks with chili garlic chicken pizza can elevate your meal. A cold beer or a refreshing lemonade works well. If you prefer wine, a chilled white wine can balance the heat. For side dishes, consider a simple salad or garlic bread. A fresh salad adds crunch and lightness. Garlic bread can complement the flavors of the pizza and is always a crowd-pleaser. Pro Tips Use Fresh Ingredients: For the best flavor, use fresh vegetables and herbs. Fresh cilantro and bell peppers will enhance the taste of your pizza significantly. Experiment with Sauces: If you want to adjust the heat level, try mixing the chili garlic sauce with barbecue sauce or a sweet chili sauce for a different flavor profile. Perfect Your Crust: For a crispier crust, pre-bake the dough for 5 minutes before adding toppings. This helps avoid a soggy bottom. Garnish Wisely: Add garnishes like avocado or a drizzle of lime juice after baking for an extra layer of flavor that complements the spiciness. {{image_2}} You can easily swap chicken for other proteins. Shrimp adds a nice twist. Simply sauté shrimp with chili garlic sauce before adding it to the pizza. Tofu is a great option too. Use firm tofu, press it to remove water, and sauté it with chili garlic sauce. Both choices keep the flavor and make the pizza feel fresh. For a meatless chili garlic pizza, skip the chicken completely. Add more veggies instead! Use the following ingredients: - 1 pre-made pizza dough (or homemade) - 1 tablespoon chili garlic sauce - 1 cup mozzarella cheese, shredded - 1/2 cup red bell pepper, thinly sliced - 1/2 cup red onion, thinly sliced - 1/2 cup mushrooms, sliced - 1/4 cup fresh cilantro, chopped - 2 tablespoons olive oil - 1 teaspoon garlic powder - Salt and pepper to taste - Optional: red pepper flakes for extra heat This version is just as tasty and colorful. The added mushrooms give a nice, earthy flavor. Want more heat? Add red pepper flakes to the top before baking. Mix extra chili garlic sauce into the chicken or shrimp for a spicier kick. If you prefer milder flavors, use less chili garlic sauce. Adjust it to your taste and enjoy! To store your chili garlic chicken pizza, first let it cool. After that, wrap each slice in plastic wrap or foil. You can also place the slices in an airtight container. This keeps the pizza fresh and tasty. Store it in the fridge for up to 3 days. Ensure it's sealed well to avoid drying out. When reheating pizza, you want to keep it moist. The best way is to use an oven. Preheat the oven to 350°F (175°C). Place the pizza on a baking sheet. Cover it with foil to prevent it from drying. Bake for about 10-15 minutes. If you prefer, you can also use a skillet. Heat it on medium-low and cover it with a lid. This method warms the crust while keeping it crispy. To freeze leftover pizza, start by wrapping each slice tightly in plastic wrap. Then, place the wrapped slices in a freezer bag. Squeeze out as much air as possible before sealing. Label the bag with the date. You can freeze the pizza for up to 2 months. When you're ready to eat, thaw it in the fridge overnight before reheating. This helps maintain the flavor and texture. Chili garlic sauce is a spicy blend of chili peppers, garlic, and vinegar. It adds heat and flavor to many dishes. You can use it in stir-fries, marinades, or as a dip. This sauce gives your chili garlic chicken pizza a bold taste that wakes up your palate. Yes, making dough at home is easy! Here’s a quick recipe: - Ingredients: - 2 cups all-purpose flour - 1 packet (2 1/4 teaspoons) active dry yeast - 3/4 cup warm water - 1 teaspoon sugar - 1 teaspoon salt - 1 tablespoon olive oil - Instructions: 1. Mix warm water, sugar, and yeast. Let it sit for 5 minutes. 2. In a bowl, combine flour and salt. Add yeast mixture and olive oil. 3. Knead the dough for about 5 minutes until smooth. 4. Let it rise in a warm spot for 1 hour. It should double in size. 5. Roll it out and use it for your pizza! Homemade pizza stays good in the fridge for 3 to 4 days. Make sure to wrap it tightly. This keeps it fresh and prevents it from drying out. Enjoy your leftovers cold or reheat them for a quick meal! This blog post covered how to make a tasty chili garlic chicken pizza. You learned key ingredients, simple steps to prepare, and ways to enhance flavors. I shared storage tips and variations to suit your taste. Enjoying this pizza starts with understanding each part. Experiment with different proteins and spice levels to find your favorite. Storing leftovers correctly ensures you have delicious slices for later. Now, gather your ingredients and get ready to enjoy a great meal!

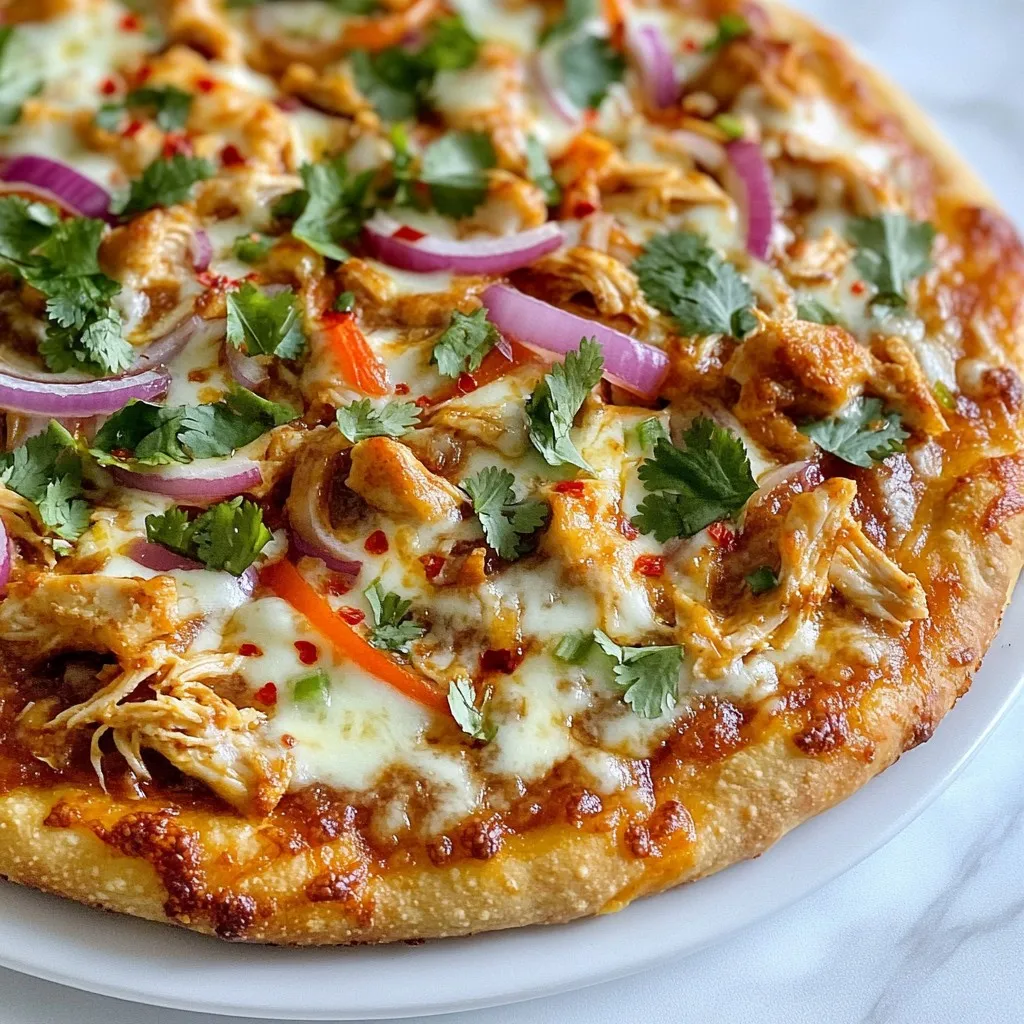
Are you ready to spice up your pizza night? This Chili Garlic Chicken Pizza is a game changer! With bold flavors and simple ingredients, you can whip up a delicious …

Read more

Categories Dinner

Copycat Outback Potato Soup Flavorful and Creamy Dish

November 12, 2025February 11, 2025 by Chef Owen
- 4 medium russet potatoes, peeled and diced - 1/2 cup chopped onion - 1/4 cup chopped celery - 1/4 cup chopped carrots - 3 cloves garlic, minced - 4 cups chicken broth (or vegetable broth for a vegetarian option) - 1 cup heavy cream - 1/2 cup sour cream - 1 teaspoon dried thyme - 1 teaspoon smoked paprika - Salt and pepper to taste - 1 cup shredded cheddar cheese (for garnish) - 1/2 cup chopped green onions (for garnish) When making this soup, measurements matter. You need four medium russet potatoes for the best taste. If you want a different flavor, try Yukon gold potatoes. For the onion, half a cup works well. You can swap it with shallots if you prefer a milder taste. Use celery and carrots in equal amounts. If you don't have fresh garlic, use garlic powder. Chicken broth gives depth, but vegetable broth can be a good alternative. For creaminess, heavy cream is best. Substitute with coconut cream for a dairy-free option. Sour cream adds tang; yogurt can work too. Use dried thyme and smoked paprika for flavor; fresh herbs can also be used. Adjust salt and pepper to your taste. Choosing the right vegetables is key for great soup. Look for firm russet potatoes without blemishes. They should feel heavy for their size. Fresh onions should be dry and papery. Avoid onions with soft spots or sprouting. For celery, pick stalks that are crisp and green. The carrots should be bright and firm, not limp. Always choose garlic that is firm and has no sprouts. When it comes to green onions, look for vibrant green tops. Fresh produce makes a big difference in flavor and texture. {{ingredient_image_1}} Start by peeling and dicing four medium russet potatoes. You want them in small cubes. Next, chop 1/2 cup of onion, 1/4 cup of celery, and 1/4 cup of carrots. Mince three cloves of garlic. These veggies add great taste to the soup. In a large pot, add the diced potatoes, onion, celery, carrots, and garlic. Pour in four cups of chicken broth. If you want a vegetarian option, use vegetable broth. Bring this mix to a boil over medium-high heat. Once it boils, reduce the heat to medium-low. Let it simmer for about 15-20 minutes. You want the potatoes to be fork-tender. After the potatoes are tender, use a potato masher. Mash some potatoes in the pot but leave some chunks for texture. Now stir in one cup of heavy cream and 1/2 cup of sour cream. Add one teaspoon of dried thyme and one teaspoon of smoked paprika. Season with salt and pepper to taste. Let the soup simmer for another five minutes. This lets the flavors mix well. Serve the soup hot, topped with shredded cheddar cheese and chopped green onions. Enjoy your creamy potato soup! To make this soup creamy, use heavy cream and sour cream. They add richness and smoothness. When cooking, mash some of the potatoes, but leave some chunks. This gives a nice texture. You can also blend part of the soup for extra creaminess. If it is too thick, add more broth or cream to thin it out. Always taste as you cook. You can add more salt and pepper if needed. Dried thyme and smoked paprika give great flavor, but feel free to adjust them. If you like it spicy, add a pinch of cayenne pepper. Fresh herbs can also brighten the soup. Green onions make a great garnish, adding both color and flavor. When you reheat the soup, do it slowly on the stove. Stir often to prevent sticking. You can add a splash of cream for smoothness when reheating. Serve the soup hot, topped with shredded cheddar cheese and green onions. It pairs well with crusty bread or a simple salad for a complete meal. Pro Tips Choose the Right Potatoes: For a creamy texture, use russet potatoes as they break down well and create a smooth soup. Enhance Flavor with Broth: Use homemade chicken or vegetable broth for a richer, more complex flavor than store-bought options. Adjust the Creaminess: If you prefer a lighter soup, reduce the amount of heavy cream and replace it with more broth. Garnish for Presentation: Don't skip the garnishes! Shredded cheese and green onions add color and an extra layer of flavor to your soup. {{image_2}} You can easily make a vegetarian version of this soup. Just swap the chicken broth for vegetable broth. This will keep the rich flavor while making it meat-free. You still get creamy goodness from the heavy cream and sour cream. Add extra veggies like spinach or kale for more color and nutrients. They blend well with the potatoes and add fun textures. If you want to add protein, bacon or chicken works great. For bacon, cook it until crispy, then crumble it on top as a garnish. This adds a nice crunch and smoky taste. You can also use cooked chicken. Just shred or dice it and stir it in after the soup simmers. Both options make your soup heartier and more filling. To change the flavor, try different spices and herbs. For a kick, add cayenne pepper or red pepper flakes. These spices bring warmth to the soup. Fresh herbs like parsley or chives can also brighten the dish. If you want a more earthy taste, consider adding rosemary or oregano. Experimenting with these flavors makes your soup unique every time! To store leftovers, let the soup cool down first. Once cool, transfer it to an airtight container. Make sure to seal it well. This helps keep the flavors fresh. Store the container in the fridge. It should stay good for about 3 to 5 days. If you want to enjoy it later, freezing is a great option. If you want to freeze the soup, use a freezer-safe container. Leave some space at the top for expansion. Label the container with the date. This way, you know when you made it. It can last up to 3 months in the freezer. When you're ready to eat it, you can thaw it overnight in the fridge. Reheating is simple. You can use the stove or microwave. If using the stove, heat it in a pot over low heat. Stir it often to avoid burning. If using the microwave, heat it in short bursts. Stir after each burst to ensure even heating. If the soup looks too thick, add a splash of broth or cream. This will bring back its creamy texture. Enjoy your tasty potato soup! Yes, you can use other potatoes. I suggest Yukon Gold for a buttery taste. Red potatoes work too, but they stay firmer. These types add nice flavors and textures. Just remember, russet potatoes give the creamiest result. To make this soup gluten-free, use gluten-free broth. Most chicken or vegetable broths are gluten-free. Check the label to be sure. Also, avoid adding any flour or bread toppings. This way, everyone can enjoy it safely. Yes, you can! For a slow cooker, add all the ingredients. Cook on low for 6-8 hours or high for 3-4 hours. For an Instant Pot, use the sauté function first. Then add ingredients and cook on high pressure for 10 minutes. Both methods yield a delicious soup! You now have a full guide to making a great potato soup. We covered the key ingredients, how to prepare them, and tips for rich flavor. I shared ways to tweak the recipe for your taste and how to store leftovers. Whether you want a creamy base or a spicy kick, the choices are yours. Keep these tips in mind for the best soup experience. Enjoy creating a delicious dish that warms your heart and belly!

If you love the bold, creamy taste of Outback Potato Soup, you’re in for a treat! I’m about to share my copycat recipe that makes this rich dish right at …

Read more

Categories Dinner

Ground Beef Philly Cheesesteaks Tasty and Easy Meal

November 12, 2025February 9, 2025 by Chef Owen
To make tasty Ground Beef Philly Cheesesteaks, gather these key items: - 1 pound ground beef - 1 onion, thinly sliced - 1 green bell pepper, thinly sliced - 1 red bell pepper, thinly sliced - 2 cloves garlic, minced - 1 teaspoon Worcestershire sauce - 1 teaspoon smoked paprika - Salt and pepper to taste - 4 hoagie rolls - 8 slices provolone cheese - Olive oil for cooking - Fresh parsley, chopped (for garnish) These ingredients bring flavor and texture to your cheesesteak. Feel free to mix in some optional items for a twist: - Mushrooms, sliced - Jalapeños for heat - Spinach for extra greens - Hot sauce for a kick Adding these can create a unique taste. Top your cheesesteaks for extra flavor and crunch: - Sautéed onions - Pickled peppers - Additional cheese like cheddar - Ketchup or mayo These toppings can make your meal even more delicious. Enjoy customizing your Ground Beef Philly Cheesesteaks! {{ingredient_image_1}} To start, heat a large skillet over medium-high heat. Add a drizzle of olive oil to the pan. When the oil is hot, add 1 pound of ground beef. Use a spatula to break it apart. Season with salt, pepper, and 1 teaspoon of smoked paprika. Cook the beef until it turns brown, about 5-7 minutes. If there is extra fat, drain it away. This step gives the dish a rich flavor. Next, push the browned beef to one side of the skillet. Add sliced onion and both bell peppers to the other side. Let them cook for about 3-5 minutes until they soften. Stir the veggies into the beef. Add 2 minced garlic cloves and 1 teaspoon of Worcestershire sauce. Mix well and cook for another 2 minutes. This makes the vegetables fragrant and tasty. Now, lower the heat to medium-low. Place 8 slices of provolone cheese on top of the beef and vegetables. Let the cheese melt for 2-3 minutes. You can cover the skillet to help it melt faster if you want. While the cheese melts, toast 4 hoagie rolls in a separate pan or under the broiler until they are golden brown. This adds a nice crunch to the rolls. Once the cheese is melted, it's time to assemble. Divide the beef and cheese mixture among the toasted hoagie rolls. This is where the magic happens. The warm, cheesy filling makes each bite amazing. Finally, sprinkle some chopped fresh parsley on top for color. Serve your sandwiches hot and enjoy! To get that real Philly taste, use fresh ingredients. Start with ground beef, as it cooks fast and tastes great. The smoked paprika adds depth to your beef. Use Worcestershire sauce for a savory kick. Sauté your onions and peppers until soft. This makes them sweet and flavorful. Don't rush this step; let them shine. One big mistake is overcooking the beef. You want it browned but not dry. Drain any extra fat after cooking to keep your sandwich from being greasy. Another mistake is using cold cheese. Make sure to let the cheese melt over the beef. It makes the sandwich gooey and delicious. Finally, don't skip toasting the hoagie rolls. Toasting adds crunch and keeps the bread from getting soggy. Make your Philly cheesesteak unique! Swap out provolone for other cheeses like cheddar or mozzarella. You can also change the meat. Try using turkey or chicken for a lighter version. Add extra toppings like jalapeños for heat or mushrooms for earthiness. You can even pile on fresh herbs like basil or cilantro for a twist. The options are endless, so have fun! Pro Tips Use High-Quality Beef: Choosing a good quality ground beef can significantly enhance the flavor and texture of your cheesesteaks. Look for 80/20 ground beef for a balance of flavor and juiciness. Don’t Overcook the Vegetables: Sauté the onions and bell peppers just until they are tender. Overcooking can result in a mushy texture, which detracts from the overall sandwich experience. Toast the Rolls for Extra Crunch: Lightly toasting the hoagie rolls not only adds a pleasing crunch but also helps to hold up the filling without getting soggy. Experiment with Cheese: While provolone is traditional, feel free to mix in other cheeses like mozzarella or cheddar for a unique twist on the classic cheesesteak flavor. {{image_2}} When making Ground Beef Philly Cheesesteaks, cheese is key. Provolone is a classic choice, but you can try others. Cheddar adds a sharp flavor. Mozzarella gives a creamy touch. Pepper Jack brings a spicy kick. Each cheese changes the taste and texture. Experiment to find your favorite! Ground beef is great, but you can switch it up. Ground turkey is leaner and still tasty. Chicken can work, too, for a lighter option. Even diced steak offers a classic feel. These choices can make your cheesesteak unique while keeping it delicious. You can enjoy a cheesesteak without meat. Use mushrooms for a rich and savory flavor. Eggplant is another option that adds a nice texture. For a vegan twist, use plant-based ground meat. Pair with vegan cheese to keep it creamy. These options let everyone savor this meal! After enjoying your Ground Beef Philly Cheesesteaks, store leftovers in an airtight container. Make sure they cool down first. Place them in the fridge for up to three days. Keeping the veggies and beef together helps maintain the flavor. To reheat, simply grab a skillet. Heat it over medium heat. Add a splash of olive oil, then add the leftovers. Stir them gently until warmed through. You can also use the microwave. Heat in short bursts, about 30 seconds. Check often to avoid overcooking. Freezing is a great option for longer storage. Place the cooled leftovers in a sturdy freezer bag. Remove as much air as you can. They can last up to three months in the freezer. When ready to eat, thaw in the fridge overnight. Reheat on the stove or microwave as mentioned. Yes, you can make ground beef Philly cheesesteaks ahead of time. Cook the beef and veggies, then cool them down. Store in an airtight container in the fridge for up to three days. To serve, just reheat the mixture on the stove. Melt the cheese on top and assemble the sandwiches. This makes for a quick meal on busy days. The main difference is the meat. Traditional cheesesteaks use thinly sliced ribeye beef. Ground beef is more affordable and easier to cook. It also gives a different texture. Both options taste great, but ground beef creates a more casual sandwich. Each has its own charm and flavor. Absolutely! While hoagie rolls are classic, you can use other types. Try sub rolls, baguettes, or even sandwich bread. Just make sure the rolls can hold the filling. A sturdy roll makes for a better eating experience. You can even use gluten-free rolls if needed. In this post, I explained how to make delicious ground beef Philly cheesesteaks. We covered the main ingredients, step-by-step cooking methods, and tips for great taste. I also shared variations for different diets and storage advice. My final thought is to enjoy your cheesesteaks your way. Experiment with flavors and toppings. You will surely create a tasty meal that your friends and family will love. Happy cooking!

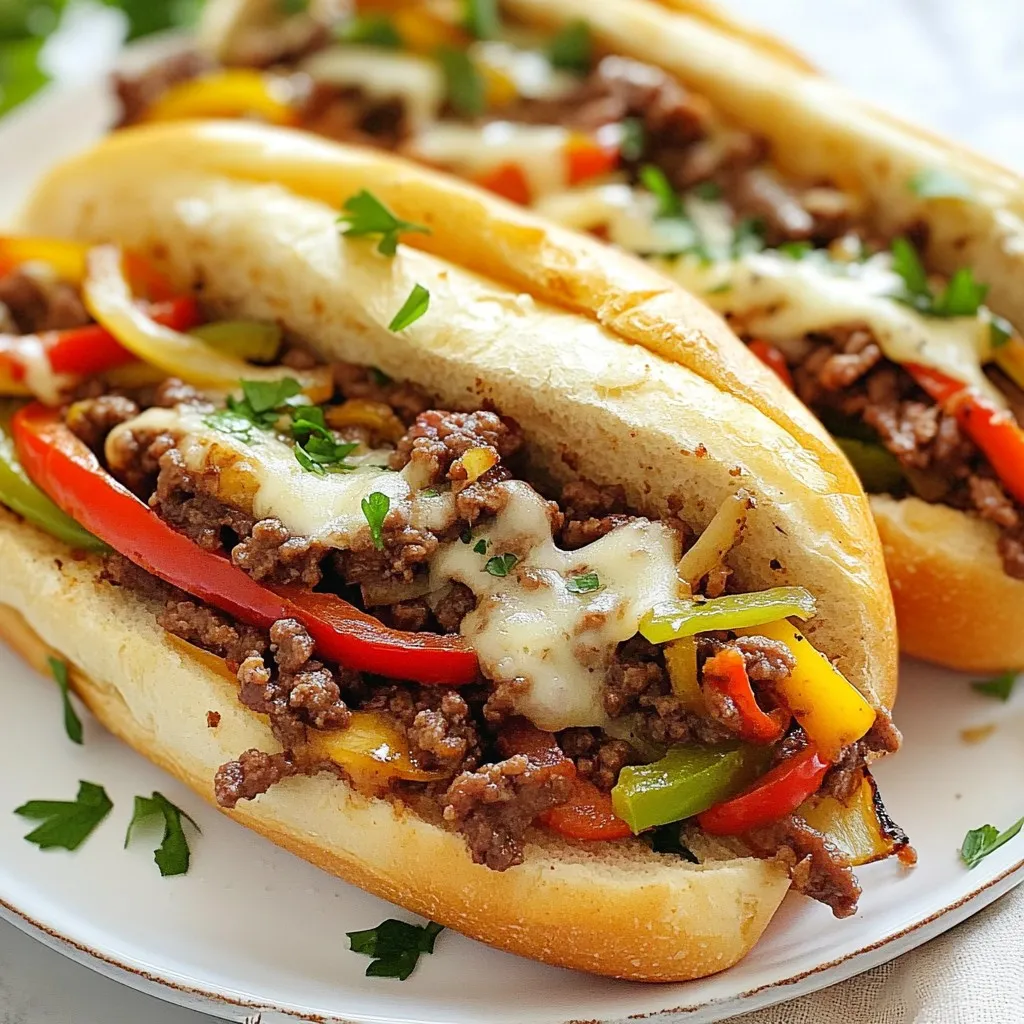
Craving a delicious meal that’s quick to make? Ground Beef Philly Cheesesteaks are your answer! These hearty sandwiches burst with flavor and are super easy to customize. In just a …

Read more

Categories Dinner

Butternut Squash Gnocchi with Sausage Delight

November 13, 2025February 8, 2025 by Chef Owen
- Butternut squash: This is the star of the dish. It gives sweetness and creaminess. - Olive oil: We use this for roasting the squash. It adds flavor and helps it brown. - Ricotta cheese: This soft cheese makes the gnocchi light and fluffy. - Italian sausage: It adds a savory touch. Look for spicy or mild based on your taste. - All-purpose flour: This helps make the dough. It gives the gnocchi structure. - Nutmeg: A pinch of this spice adds warmth and depth to the dish. - Garlic: Fresh garlic gives a lovely aroma and enhances the sausage flavor. - Parmesan cheese: Grated on top, it adds a salty kick and richness. - Fresh sage leaves: These leaves add a fragrant herbal note that pairs well with the sausage. {{ingredient_image_1}} First, preheat your oven to 400°F (200°C). Take the butternut squash and peel it if you haven't yet. Cut it into small cubes. Toss these cubes with olive oil, salt, and pepper on a baking sheet. Place the sheet in the oven and roast the squash for about 25 minutes. You want it to be tender and slightly caramelized. Once done, let it cool for a bit. Next, take the cooled butternut squash and mash it until it is smooth. In a large bowl, mix in one cup of ricotta cheese, one egg, and a teaspoon of nutmeg. Stir everything well. Now, gradually add two cups of all-purpose flour. This helps form the dough. It should be soft but not sticky. For easier handling, divide the dough into four portions. On a lightly floured surface, take one portion of dough. Roll it into a long rope, about half an inch thick. Cut this rope into 1-inch pieces to create the gnocchi. If you like, you can use a fork to shape the gnocchi. This adds some texture. Repeat this process for the rest of the dough. Now, bring a large pot of salted water to a boil. Once boiling, drop in the gnocchi in small batches. Cook them until they float to the surface, which should take about 2-3 minutes. Use a slotted spoon to remove the gnocchi and place them on a plate or baking sheet. In a large skillet over medium heat, add the Italian sausage. Cook it until browned, breaking it up with a spoon as it cooks. After about 5 minutes, add two minced garlic cloves and chopped sage. Sauté for an additional two minutes until the mixture is fragrant. Finally, add the cooked gnocchi to the skillet with the sausage. Gently toss everything together. This allows the gnocchi to soak up the delicious flavors. If you want, sprinkle in half of the grated Parmesan cheese and stir to combine. For the best gnocchi, focus on dough consistency. The dough should feel soft but firm. If it's too wet, add more flour, a little at a time. This keeps the gnocchi from being too sticky. To avoid sticky dough, use plenty of flour on your work surface. Dust your hands and the rolling pin too. This simple trick makes shaping the gnocchi much easier. Spices and herbs boost the taste of your gnocchi. Consider adding more nutmeg or some fresh black pepper. A pinch of cayenne can add a little heat, too! For serving, pair your dish with a simple salad or garlic bread. The fresh flavors really complement the savory sausage. Serve your gnocchi in shallow bowls for a lovely look. Drizzle a bit of olive oil on top for shine. Finish with freshly cracked pepper for a pop of flavor. Garnish with extra sage leaves. They add color and a nice aroma. Your dish will look as great as it tastes! Pro Tips Use Fresh Ingredients: For the best flavor, opt for fresh butternut squash and high-quality Italian sausage. Don’t Overwork the Dough: Mix the gnocchi dough just until it comes together to ensure a light and fluffy texture. Test the Gnocchi: Before cooking all the gnocchi, test a few pieces to ensure they hold their shape and taste great. Perfect the Sauce: Add a splash of pasta cooking water to the sausage mixture to create a silky sauce that clings to the gnocchi. {{image_2}} To make a vegetarian version of butternut squash gnocchi, replace the sausage. Mushrooms or lentils work well. For mushrooms, use a mix of cremini and shiitake. They add a rich flavor. If you choose lentils, cook them until soft. This gives a hearty texture. You can sauté the mushrooms with garlic and sage. This enhances their flavor. For lentils, mix them into the sautéed garlic and sage. Both options make a tasty meal. If you need a gluten-free option, swap the all-purpose flour. Use gluten-free flour blends or almond flour. These work well to form the gnocchi. The texture may be slightly different, but they still taste great. When you make the dough, mix it slowly. This helps you get the right texture. Roll the dough gently to avoid breaking. You can add other seasonal vegetables for extra nutrition. Try spinach, kale, or roasted carrots. Chop them into small pieces, and sauté them with the sausage. This adds color and flavor to your dish. Feel free to get creative! Use whatever vegetables you enjoy. This keeps your meal fresh and exciting. After enjoying your butternut squash gnocchi with sausage, store any leftovers in the fridge. Place them in an airtight container. They will stay fresh for about three days. Make sure to let them cool before sealing. This keeps them from getting soggy. If you want to save uncooked gnocchi for later, freeze them. First, lay them out on a baking sheet in a single layer. This prevents them from sticking together. Freeze for about an hour, then transfer them to a freezer bag. They will keep well for up to three months. Reheating cooked gnocchi is easy. Just add them to a pot of boiling water for two minutes. You can also sauté them in a skillet with a bit of olive oil. This adds flavor and gets them crispy. Yes, you can make gnocchi ahead of time. Prepare the dough and shape it into gnocchi. Then, place them on a baking sheet lined with parchment paper. Make sure they don’t touch each other. Cover the sheet and freeze the gnocchi. Once frozen, transfer them to a bag. You can store them for up to three months. When ready to cook, drop them directly into boiling water without thawing. I recommend using Italian sausage for a great flavor. You can choose sweet or spicy, based on your taste. Sweet sausage adds a nice sweetness to the dish. Spicy sausage gives it a kick. Make sure to remove the casings before cooking. This helps the sausage mix well with the gnocchi. You can use frozen butternut squash. It saves time and is convenient. Frozen squash is already peeled and cut. However, fresh squash has better texture and flavor. If using frozen, thaw and drain excess water before mashing. This helps keep the gnocchi from being too wet. You can tell when the gnocchi is cooked by watching them closely. Once they float to the top of the boiling water, they are done. This usually takes about 2 to 3 minutes. If they sink, they need more time. Remove them carefully with a slotted spoon to avoid breaking. In this article, we explored key ingredients and steps to create delicious butternut squash gnocchi. I shared tips for forming and cooking the gnocchi, along with ideas for serving and variations like vegetarian and gluten-free options. Remember, perfecting this dish takes practice, but it's worth the effort. Enjoy experimenting and making it your own. Homemade gnocchi brings warmth and joy to any meal. Now, it's your turn to get cooking!

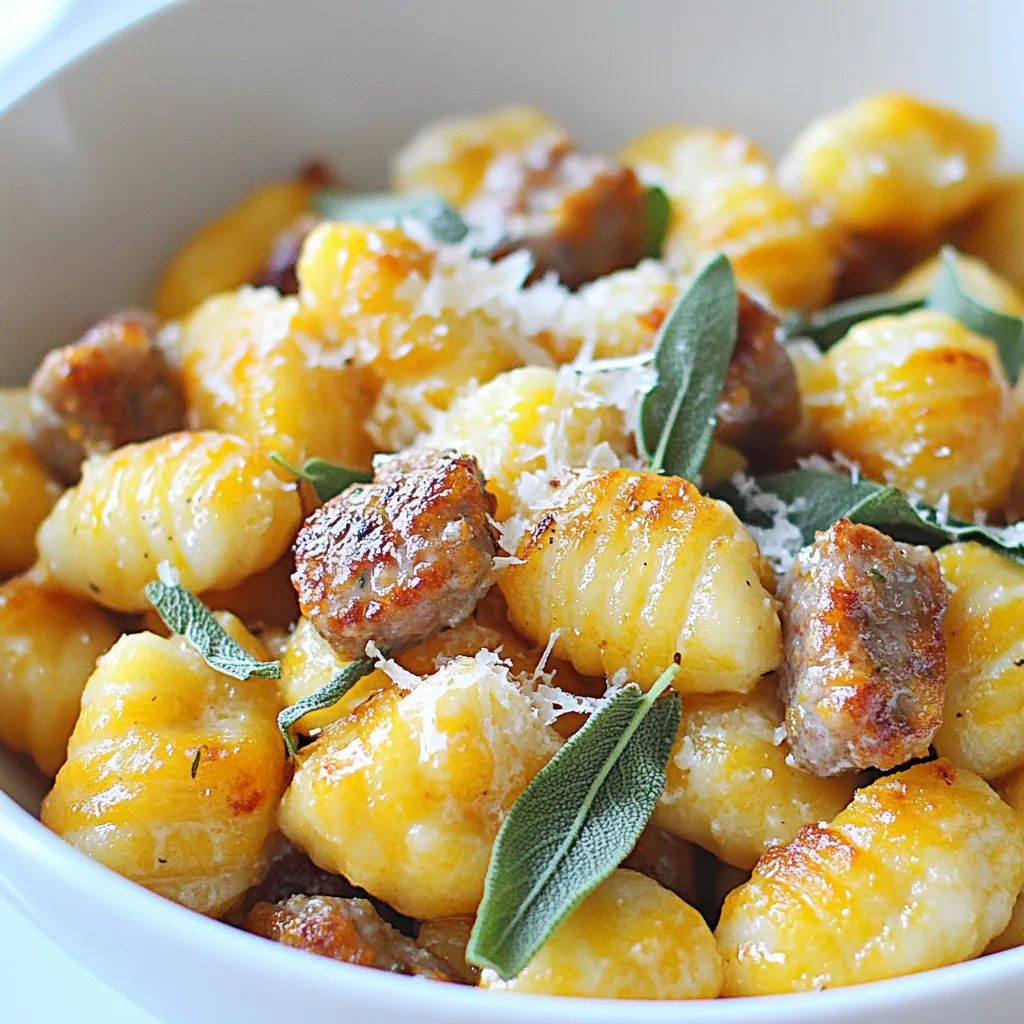
Get ready to impress your family and friends with my Butternut Squash Gnocchi with Sausage Delight! This dish brings together tender gnocchi and savory sausage, making a warm and hearty …

Read more

Categories Dinner

Savory Chicken Parmesan Stuffed Zucchini Boats Recipe

January 9, 2026February 7, 2025 by Chef Owen
- 4 medium zucchini - 1 lb ground chicken - 1 cup marinara sauce - 1 cup shredded mozzarella cheese - 1/2 cup grated Parmesan cheese - 1/2 teaspoon red pepper flakes - 1 teaspoon dried oregano - 1 teaspoon garlic powder - 1 tablespoon olive oil - Salt and freshly ground black pepper to taste Gather these ingredients before you start cooking. Zucchini serves as a great base for this dish. Ground chicken adds protein and flavor. Marinara sauce gives a rich, tangy taste. Mozzarella cheese melts beautifully, making the dish gooey and satisfying. You can add grated Parmesan for a cheesy finish. Red pepper flakes can spice things up if you like heat. For seasoning, dried oregano and garlic powder bring a nice aroma. Olive oil helps to cook the chicken while adding flavor. Salt and pepper balance the dish. With these ingredients, you're ready to create a delicious meal that your family will love. Enjoy the process and don’t hesitate to make it your own! {{ingredient_image_2}} Set your oven to 375°F (190°C). Preheating helps cook the dish evenly. It ensures the cheese melts perfectly. Slice the zucchini in half lengthwise. Use a spoon to scoop out the flesh. Leave about 1/4 inch of the shell. This keeps your zucchini sturdy. Save the scooped-out flesh for later. In a large skillet, heat a tablespoon of olive oil over medium heat. When the oil shimmers, add 1 pound of ground chicken. Cook it for about 5-7 minutes. Break it apart with a spoon until it’s brown and no longer pink. Add the reserved zucchini flesh, 1 cup of marinara sauce, 1 teaspoon of dried oregano, and 1 teaspoon of garlic powder. If you want a kick, add 1/2 teaspoon of red pepper flakes. Season with salt and pepper. Stir well and cook for 3-4 minutes. Make sure everything is hot and mixed. Take the skillet off the heat. Stir in half of the shredded mozzarella cheese and all of the grated Parmesan cheese. Mix until the cheese melts and spreads evenly throughout the chicken. Place the hollowed zucchini halves in a baking dish. Spoon the chicken and cheese mixture into each boat. Press it down gently to pack it in. Top with the remaining mozzarella cheese for a tasty finish. Cover the baking dish with foil. Bake in the preheated oven for 20 minutes. After that, remove the foil and bake for another 10 minutes. This step allows the zucchini to soften and the cheese to bubble. Once done, take the zucchini boats out of the oven. Let them cool for a few minutes. Garnish with fresh basil leaves for a nice touch. This adds color and a fresh aroma. Enjoy your Chicken Parmesan Stuffed Zucchini Boats warm! How to choose the best zucchini: Look for medium-sized zucchini. They should feel firm and smooth. Avoid any with soft spots or wrinkles. Fresh zucchini will give the best flavor and texture. Preventing sogginess: To prevent soggy zucchini, scoop out the flesh carefully. Leave about 1/4 inch of the shell. This keeps the boat sturdy. You can also salt the zucchini shells lightly. Let them sit for a few minutes. This draws out extra moisture. Additional seasonings to consider: You can add more flavor with fresh herbs like basil or parsley. A pinch of Italian seasoning can also add depth. For a bolder taste, consider some smoked paprika. Complementary ingredients: Try adding chopped bell peppers or mushrooms to the filling. These add texture and flavor. You can also mix in some chopped spinach for a healthy boost. Alternative cooking methods (grilling, air frying): Grilling gives a nice smoky flavor. You can place the zucchini boats on a grill, covered, until tender. For air frying, cook them at 375°F for about 15-20 minutes. Both methods will give you a tasty result! Pro Tips Use Fresh Zucchini: Choose firm, fresh zucchini for the best flavor and texture. Look for zucchinis that are small to medium-sized, as larger ones may have tougher skin and more seeds. Customize the Filling: Feel free to add other ingredients such as chopped bell peppers, onions, or mushrooms to the chicken mixture for added flavor and nutrition. Cheese Variations: Experiment with different cheeses like provolone or gouda for a unique twist on the classic chicken parmesan flavor. Don’t Overcook: Keep an eye on the zucchini while baking; overcooking can lead to mushy boats. They should be tender yet retain their shape. {{image_4}} You can easily switch the ground chicken for turkey. Ground turkey has less fat and works well here. For a vegetarian twist, use lentils or chickpeas. They add protein and flavor. Just mash them and mix them with the other ingredients. If you want to change the cheese, try using provolone or gouda. Both melt nicely and offer different flavors. You can also use vegan cheese for a dairy-free option. Just make sure it melts well to get that cheesy goodness. For extra flavor, consider adding pesto on top. It gives a fresh, herby taste. You can also sprinkle olives or sun-dried tomatoes. These toppings add a nice contrast and depth to your dish. Don't be afraid to experiment with flavors that you love! To store your Chicken Parmesan stuffed zucchini boats, let them cool first. Place them in an airtight container. This keeps them fresh and tasty. You can store them in the fridge for up to three days. After that, they may lose flavor and texture. If you want to save some for later, freezing is a great option. Wrap each stuffed zucchini boat in plastic wrap. Then, place them in a freezer bag. Make sure to remove as much air as possible. You can freeze them for up to three months. When you're ready to enjoy, take them out of the freezer and let them thaw in the fridge overnight. For the best taste and texture, reheat your zucchini boats in the oven. Preheat your oven to 350°F (175°C). Place the boats on a baking sheet and cover with foil. Heat for about 15-20 minutes. If you like extra crispiness, remove the foil for the last five minutes. This helps the cheese get bubbly and golden again. Enjoy your delicious leftovers! Making Chicken Parmesan Stuffed Zucchini Boats takes about 45 minutes total. You will need 15 minutes to prep and 30 minutes to cook. This time allows for perfect flavor and texture. Yes, you can make this dish ahead of time. Prepare the stuffed zucchini boats, then cover and store them in the fridge for up to 24 hours. When you're ready to eat, just bake them straight from the fridge. This saves time on busy days! These stuffed zucchini boats pair well with a fresh side salad. You could also serve them with garlic bread for a classic touch. Another great option is steamed veggies, which add color and nutrition. Yes, you can use other vegetables! Bell peppers and eggplants work well as alternatives. Just remember to adjust cooking times as needed, since different veggies have different textures. To make this dish gluten-free, use a gluten-free marinara sauce. Check the labels on your cheese too. Most cheese is gluten-free, but it’s good to double-check. You can also use gluten-free breadcrumbs if you want a crunchy topping. In this article, I shared how to make Chicken Parmesan Stuffed Zucchini Boats. You learned about the main and optional ingredients, and seasoning tips. The step-by-step guide showed you how to prepare and cook the dish, along with helpful tips and variations. These boats are tasty and fun to make. Enjoy your cooking! Try new flavors and techniques to make this dish your own. With these tips, you can create a healthy meal that everyone will love. Happy cooking!

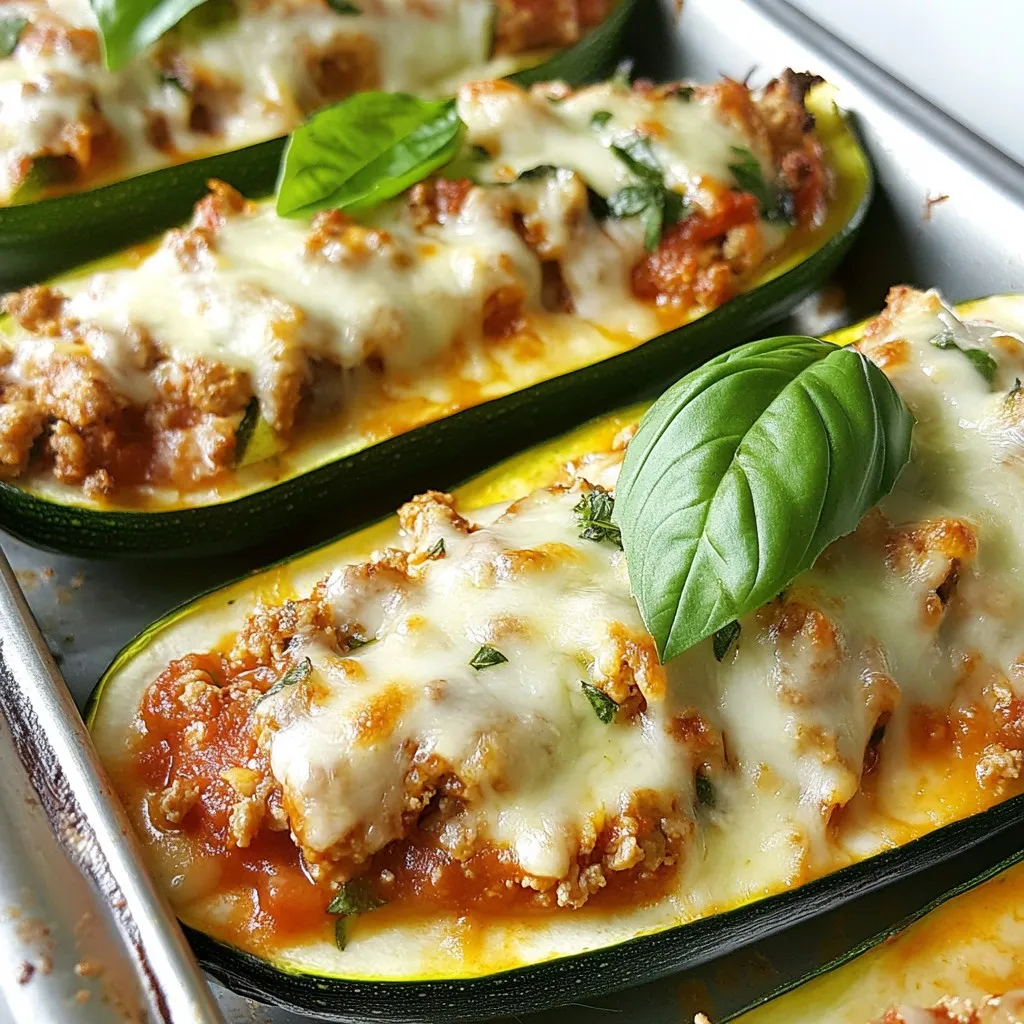
Are you ready to dive into a delicious and healthy meal? My Chicken Parmesan Stuffed Zucchini Boats are not just tasty; they are easy to make too! With tender zucchini …

Read more

Categories Dinner

Pumpkin Smores Cookies Divine Fall Treat to Indulge

November 11, 2025February 5, 2025 by Chef Owen
To make these delicious pumpkin s'mores cookies, gather the following ingredients: - 1 cup all-purpose flour - 1/2 cup rolled oats - 1/2 teaspoon baking soda - 1/2 teaspoon baking powder - 1 teaspoon ground cinnamon - 1/4 teaspoon nutmeg - 1/4 teaspoon salt - 1/2 cup unsalted butter, softened - 1/2 cup brown sugar, packed - 1/4 cup granulated sugar - 1/2 cup pumpkin puree - 1 large egg - 1 teaspoon vanilla extract - 1/2 cup mini marshmallows - 1/2 cup chocolate chips - 1/2 cup graham cracker crumbs Each ingredient plays a key role in creating the perfect cookie. The all-purpose flour and rolled oats give the cookies their structure. Baking soda and baking powder help them rise. The spices like cinnamon and nutmeg add warmth and comfort, perfect for fall. Unsalted butter is essential for creaminess, while brown sugar adds moisture and depth. Pumpkin puree brings a lovely fall flavor and keeps the cookies soft. Don't forget the mini marshmallows, chocolate chips, and graham cracker crumbs for that classic s'mores taste! When you have all these ingredients ready, you’ll be set to create a treat that captures the essence of fall in every bite. {{ingredient_image_1}} 1. Preheat the oven: Start by setting your oven to 350°F (175°C). This helps the cookies bake evenly. 2. Prepare the baking sheet: Line your baking sheet with parchment paper. This prevents sticking and makes cleanup easy. 1. Combine dry ingredients: In a medium bowl, whisk together: - 1 cup all-purpose flour - 1/2 cup rolled oats - 1/2 teaspoon baking soda - 1/2 teaspoon baking powder - 1 teaspoon ground cinnamon - 1/4 teaspoon nutmeg - 1/4 teaspoon salt This mix gives the cookies structure and flavor. 2. Cream butter and sugars: In a large bowl, cream together: - 1/2 cup unsalted butter, softened - 1/2 cup brown sugar, packed - 1/4 cup granulated sugar Beat until the mixture is light and fluffy. This step adds air and makes your cookies soft. 1. Incorporate pumpkin and egg: Add: - 1/2 cup pumpkin puree - 1 large egg - 1 teaspoon vanilla extract Mix until everything is combined. This adds moisture and that lovely pumpkin taste. 2. Add dry ingredients, marshmallows, chocolate, and crumbs: Gradually stir the dry mix into the wet mix. Then gently fold in: - 1/2 cup mini marshmallows - 1/2 cup chocolate chips - 1/2 cup graham cracker crumbs This makes the cookies gooey and sweet. 3. Bake the cookies: Drop rounded balls of dough onto the prepared baking sheet, spacing them about 2 inches apart. Bake for 10-12 minutes. Look for golden edges and set tops. The cookies will smell amazing! Let them cool for just a bit on the sheet before you transfer them to a wire rack. Enjoy your delicious pumpkin s'mores cookies! To get the right texture, focus on the dough. It should be soft and slightly sticky. If it feels too dry, add a bit more pumpkin puree. The temperature of your ingredients matters too. Use room temperature butter and egg for better mixing. Cold butter can lead to lumps in your dough. Set your oven to 350°F (175°C). This is a key step for even baking. If your oven runs hot, lower the temperature by 25°F. Always line your baking sheet with parchment paper. This helps cookies lift off easily and prevents sticking. To make your cookies stand out, drizzle melted chocolate over them. I love using dark chocolate for a rich flavor. You can add extra graham cracker crumbs on top for a nice crunch. Stacking them on a decorative plate makes for a great display! Pro Tips Chill the Dough: For a thicker cookie, chill the dough for at least 30 minutes before baking. This helps to prevent spreading and keeps the cookies chewy. Use Fresh Pumpkin Puree: For the best flavor, use homemade pumpkin puree or high-quality canned pumpkin. Fresh ingredients make a noticeable difference! Don’t Overmix: Mix the dry ingredients into the wet ingredients just until combined. Overmixing can lead to tough cookies. Store Properly: To keep cookies soft, store them in an airtight container at room temperature. You can also freeze them for up to 3 months for later enjoyment. {{image_2}} You can change the spices in these cookies for a new taste. Try adding ginger or cloves. They will offer a warm kick. You can also use pumpkin spice to keep it simple. For chocolate, you have options too. Swap the chocolate chips for white chocolate. This adds a sweet touch. Dark chocolate also works well for a rich flavor. If you need gluten-free cookies, use gluten-free flour. It works just as well in this recipe. Your cookies will still taste great and have good texture. For a dairy-free option, replace the butter with coconut oil. You can also use a dairy-free chocolate. This makes the cookies friendly for many diets. Nuts can add crunch to your cookies. Try adding chopped walnuts or pecans for a tasty twist. They pair well with pumpkin flavors. Dried fruit is another fun option. Add raisins or cranberries for extra sweetness. You can even mix in some coconut flakes for a tropical vibe. To keep your pumpkin s'mores cookies fresh, store them at room temperature. Place them in a container with a lid. They stay soft and tasty for about five days. If your home is warm, you might want to refrigerate them. This helps maintain their flavor and moisture. You can freeze pumpkin s'mores cookies for later. First, let them cool completely. Then, place them in a single layer on a baking sheet. Freeze them for about an hour until firm. After that, transfer the cookies to a freezer-safe bag. Make sure to remove as much air as possible. To thaw, take them out of the freezer and let them sit at room temperature for about 30 minutes. For storage, choose airtight containers. They keep your cookies fresh longer. Glass or plastic containers work well. If you use non-airtight options, the cookies may dry out. Keep them away from light and heat sources for best results. To make your cookies chewy, don't overbake them. Remove them when the edges are golden but the center is soft. This keeps moisture in. You can also add an extra egg yolk for richness. Using brown sugar instead of white sugar adds more moisture. Yes, you can use pumpkin spice! Just replace the individual spices with a mix. About 2 teaspoons of pumpkin spice will work well. It simplifies the process and gives your cookies great flavor. These cookies stay fresh for about a week at room temperature. Store them in an airtight container to keep them soft. If you want them to last longer, consider freezing them. Absolutely! You can make the dough ahead of time. Just chill it in the fridge for up to 3 days. When you’re ready, scoop and bake as usual. You can also freeze the dough for about 2 months. Pumpkin s'mores cookies go well with warm drinks. Try pairing them with hot chocolate, coffee, or chai tea. They also taste great with vanilla ice cream or whipped cream for a fun dessert! This article covered how to make delicious pumpkin s'mores cookies. We covered the key ingredients, step-by-step instructions, and useful tips for perfect texture. You learned about creative variations and how to store your cookies. Remember, baking can be fun! Experiment with flavors and textures to find what you love. Keep your cookies fresh, and share them with friends and family. Your pumpkin s'mores cookies will surely bring smiles to everyone! Enjoy your baking adventure!

Fall brings cozy flavors, and pumpkin s’mores cookies are the perfect treat. Imagine warm, sweet cookies filled with chocolate, marshmallows, and pumpkin spice goodness. I’ll guide you through creating this …

Read more

Categories Desserts

Lemon Baked Chicken Simple and Flavorful Dish

January 4, 2026February 4, 2025 by Chef Owen
- 4 boneless, skinless chicken breasts - 2 large lemons (one for zesting and juicing, one sliced for topping) - 4 cloves of garlic, minced finely - 3 tablespoons of extra virgin olive oil - 2 teaspoons of fresh thyme leaves (or 1 teaspoon if using dried thyme) - 2 teaspoons of fresh rosemary, chopped (or 1 teaspoon if using dried rosemary) - 1 teaspoon of kosher salt - ½ teaspoon of freshly ground black pepper - Fresh parsley, finely chopped (for garnish) Each ingredient plays a key role in this dish. The chicken breasts provide the main protein. Lemons add brightness and zest. Garlic gives a lovely depth of flavor. Olive oil keeps the chicken moist and adds richness. Thyme and rosemary bring fresh, herbal notes to the meal. Salt enhances all other flavors, while pepper adds a bit of heat. Finally, parsley adds color and freshness to the plate. If you don't have boneless chicken, you can use thighs. They will stay juicy. For lemons, limes are a good substitute. Garlic powder can replace fresh garlic in a pinch. If you lack fresh herbs, use dried ones, but use less. For olive oil, any cooking oil works, though olive oil is best for flavor. {{ingredient_image_2}} Start by preheating your oven to 400°F (200°C). This helps the chicken cook evenly. Next, take one lemon and zest it. Then, juice that lemon into a bowl. Add minced garlic, olive oil, thyme, rosemary, salt, and pepper. Whisk these together to make a flavorful marinade. Now, place the chicken breasts in a baking dish. Make sure they lay flat and do not touch. Pour the marinade over the chicken. Use a spoon to coat each piece well. If you have time, let the chicken marinate for at least 15 minutes. For more flavor, refrigerate it for up to 2 hours. After marinating, cut the second lemon into slices. Place these slices on top of the chicken. They will add a nice citrus flavor as the chicken bakes. Now, it’s time to bake. Put the baking dish in the preheated oven. Bake the chicken for 25 to 30 minutes. The chicken is ready when its internal temperature hits 165°F (75°C). Use a meat thermometer for accuracy. Make sure the juices run clear when you pierce the chicken. Once baked, take the chicken out of the oven. Let it rest for about 5 minutes. This resting allows the juices to settle, making the chicken tender. After resting, sprinkle fresh parsley over the chicken. This adds color and a fresh taste. For serving, present the chicken on a large platter. Add extra lemon slices and a sprig of parsley for decoration. Pair the dish with steamed vegetables or a light salad for a full meal. Enjoy your flavorful lemon baked chicken! To get the best taste, marinate the chicken well. Mix the lemon zest, juice, garlic, olive oil, thyme, rosemary, salt, and pepper. After you coat the chicken, let it sit for at least 15 minutes. If you can, refrigerate it for up to 2 hours. This helps the flavors soak in deeply. Ovens can vary, so check your chicken while it cooks. Bake the chicken for 25 to 30 minutes at 400°F (200°C). Use a meat thermometer to ensure it reaches 165°F (75°C). If the chicken is not done, bake for a few more minutes. This way, you get juicy chicken every time. To keep the chicken moist, let it rest after baking. This resting time, about 5 minutes, helps the juices settle. Also, avoid overcooking. Dry chicken can ruin the dish. If you follow these tips, your lemon baked chicken will be tender and juicy, full of flavor. Pro Tips Marinate Longer for Flavor: If time allows, marinate the chicken in the refrigerator for up to 2 hours. This will enhance the flavor and tenderness of the meat. Use Fresh Herbs: Fresh herbs like thyme and rosemary provide a more vibrant flavor compared to dried. If possible, opt for fresh to elevate the dish. Check Doneness with a Thermometer: Always use a meat thermometer to ensure the chicken reaches an internal temperature of 165°F (75°C) for safe consumption. Rest Before Serving: Allow the chicken to rest for at least 5 minutes after baking. This helps the juices redistribute, making for a juicier bite. {{image_4}} You can change the flavor of your lemon baked chicken by using different herbs. Try adding fresh basil for a sweet taste. Oregano adds a Mediterranean touch. You can also use dill for a bright flavor that pairs well with lemon. The key is to use fresh herbs when possible. They bring a vibrant taste that dried herbs cannot match. Adding vegetables to your lemon baked chicken makes the dish even better. You can place sliced bell peppers, zucchini, or carrots in the baking dish. They soak up the lemony goodness while cooking. This adds color and nutrients, making your meal complete. Plus, it saves you time on side dishes. Just bake everything together for a one-pan wonder. If you enjoy some heat, try making spicy lemon baked chicken. Add red pepper flakes to the marinade for a kick. You can also use hot sauce or minced jalapeños, depending on your spice level. This variation gives a fun twist to the classic recipe. The spicy flavors balance nicely with the lemon, creating a bold dish. After enjoying your Lemon Baked Chicken, store leftovers in an airtight container. Allow the chicken to cool to room temperature first. This helps keep moisture locked in. Refrigerate the chicken within two hours of cooking for best results. Properly stored, it can last for 3 to 4 days. When you are ready to eat the leftovers, reheat them in the oven for the best taste. Preheat your oven to 350°F (175°C). Place the chicken on a baking sheet, cover it with foil, and heat for about 15 to 20 minutes. This keeps the chicken juicy and avoids drying it out. You can also use a microwave, but the oven gives better results. If you want to save the chicken for later, freezing is a great option. Wrap each piece tightly in plastic wrap and then place them in a freezer bag. Be sure to remove as much air as possible before sealing. The chicken will stay fresh for up to 3 months in the freezer. When you're ready to enjoy it again, thaw it in the fridge overnight before reheating. You can serve Lemon Baked Chicken with many sides. Here are some great options: - Steamed vegetables like broccoli, carrots, or green beans. - A light salad with mixed greens, cherry tomatoes, and a lemon vinaigrette. - Creamy mashed potatoes or garlic roasted potatoes for a comforting touch. - Quinoa or rice to soak up the delicious juices. These sides add color and flavor to your meal, making it special. Yes, you can use bone-in chicken. Just adjust the cooking time. Bone-in chicken often takes longer to cook than boneless chicken. Aim for an internal temperature of 165°F (75°C) to ensure it's safe to eat. Bake it for about 35 to 45 minutes, depending on the size. The skin adds flavor and keeps the chicken moist. To check if the chicken is done, use a meat thermometer. Insert it into the thickest part of the chicken. If it reads 165°F (75°C), it’s cooked. You can also cut into the chicken; the juices should run clear, not pink. Letting the chicken rest for five minutes helps keep it juicy and tender. Enjoy your meal! This article covered the key ingredients and their importance in making lemon baked chicken. I shared step-by-step instructions for perfect preparation, baking, and serving. We discussed tips for flavor and moisture, along with variations to suit your taste. Lastly, I explained how to store and reheat leftovers safely. Using these insights, you can cook a delicious meal that impresses. Enjoy creating your lemon baked chicken!

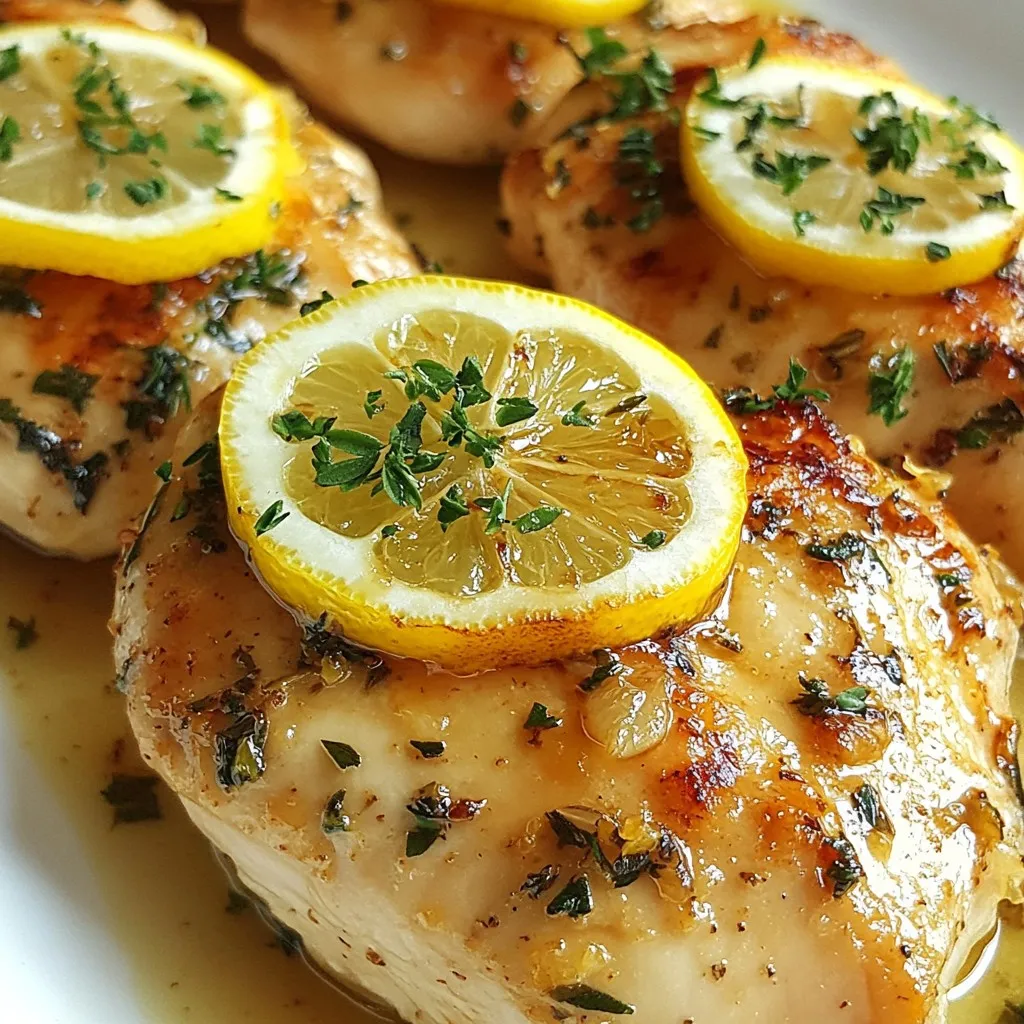
Are you ready to impress your family with a simple yet tasty dish? Lemon Baked Chicken is just what you need! This recipe brings together bright lemon flavor and juicy …

Read more

Categories Dinner

Crockpot Butternut Squash Chicken Stew Hearty Comfort Food

January 5, 2026February 1, 2025 by Chef Owen
- 1 lb boneless, skinless chicken thighs, cut into 1-inch chunks - 1 medium butternut squash, peeled and diced into 1-inch cubes - 2 medium carrots, sliced into rounds - 2 celery stalks, diced - 1 medium onion, chopped - 3 cloves garlic, minced - 4 cups low-sodium chicken broth - 1 teaspoon dried thyme - 1 teaspoon ground cumin - 1 teaspoon smoked paprika - Salt and freshly ground black pepper to taste - 1 tablespoon olive oil - Fresh parsley or cilantro, roughly chopped, for garnish Butternut squash is sweet and creamy. It adds warmth and color to the stew. Choose squash that feels heavy and has a smooth skin. Look for a uniform tan color. Avoid any with soft spots or blemishes. Chicken thighs are juicy and full of flavor. They stay moist during cooking. I prefer boneless, skinless thighs for this dish. They are easy to cut and shred. When cooked, they blend well with the squash and other veggies. When buying fresh produce, look for bright colors and firm textures. For carrots, choose ones that are crisp and not bendable. Celery should feel firm and have fresh green leaves. For butternut squash, pick one that is heavy for its size. Avoid any that feel light. When you shop for onions, select ones that are dry and firm. {{ingredient_image_2}} Start by gathering all your ingredients. You will need chicken thighs, butternut squash, carrots, celery, onion, garlic, chicken broth, and spices. Make sure your butternut squash is peeled and diced into one-inch cubes. This size helps it cook evenly. 1. Heat one tablespoon of olive oil in a skillet over medium heat. 2. Add the chopped onion and minced garlic. Cook them until the onion looks clear, about 3 to 5 minutes. 3. Once done, move this mix to your crockpot. 4. In the crockpot, add the diced butternut squash, sliced carrots, diced celery, and chicken thigh chunks. Mix them gently. 5. Pour in the chicken broth, ensuring all the ingredients are covered. 6. Sprinkle dried thyme, ground cumin, smoked paprika, salt, and black pepper on top. Stir gently to combine. 7. Cover the crockpot with its lid. Set it to cook on low for 6 to 8 hours or high for 4 hours. 8. When it’s finished, use two forks to shred the chicken right in the crockpot. Stir to mix it with the stew. 9. Taste the stew and add more salt or pepper if needed. 10. Serve hot in bowls, garnished with chopped fresh parsley or cilantro. Cooking on low takes 6 to 8 hours. If you are short on time, use the high setting for about 4 hours. The chicken should be tender, and the butternut squash should easily break apart with a fork. To make your stew pop, use fresh herbs. Fresh parsley or cilantro adds a nice touch. Think about adding a squeeze of lemon before serving. This brightens the dish and balances the flavors. If you like a kick, try a pinch of red pepper flakes. They add warmth without overpowering the meal. One big mistake is overcooking the chicken. Set your crockpot to the right time. Cooking too long makes the chicken dry. Another error is not seasoning enough. Taste your stew before serving. Adjust the salt and pepper to your liking. Also, be careful when adding the broth. Ensure all veggies and chicken are covered, but do not drown them. Shredding chicken is simple. Use two forks and pull the meat apart while it's still hot. This keeps the chicken juicy and full of flavor. If you find it hard to shred, let it cook a bit longer. The meat should fall apart easily. Mix the shredded chicken back into the stew for added flavor and texture. Pro Tips Use Fresh Ingredients: Fresh butternut squash and seasonal vegetables enhance the flavor and nutrition of the stew. Adjust Seasoning: Always taste your stew before serving; you can add more salt, pepper, or spices to suit your palate. Consider a Thickener: If you prefer a thicker stew, you can add a cornstarch slurry (cornstarch mixed with water) during the last hour of cooking. Storage Tips: This stew stores well in the refrigerator for up to 3 days or can be frozen for up to 3 months, making it perfect for meal prep! {{image_4}} If you want a vegetarian stew, swap the chicken for chickpeas or lentils. These options add protein and fiber. Use vegetable broth instead of chicken broth for a rich base. You can also add tofu for extra texture. Feel free to get creative with spices. Try adding a pinch of cayenne for heat or a dash of curry powder for warmth. You can also sneak in more veggies like bell peppers or zucchini. Just chop them into small pieces so they cook evenly. You can use turkey or even beef in place of chicken. Just make sure to adjust cooking times if you choose a denser meat. For the broth, homemade stock is best, but any low-sodium option will work. This keeps the stew healthy and tasty. You can store your leftover stew in an airtight container. Let the stew cool down first. Once cooled, cover it tightly. This helps keep the flavors fresh. You can keep it in the fridge for up to three days. If you plan to eat it later, freezing might be a better option. To reheat, pour the stew into a pot. Heat it over medium-low heat. Stir often until it’s hot. You can also use the microwave. Place the stew in a microwave-safe bowl. Cover it loosely and heat in short bursts. Stir in between each burst for even warming. To freeze, use a freezer-safe container. Leave some space at the top for expansion. You can keep it in the freezer for up to three months. When you’re ready to eat, thaw it overnight in the fridge. Reheat it on the stove or in the microwave. Enjoy your warm, comforting stew again! Yes, you can use frozen butternut squash and chicken. Just remember that frozen chicken may take longer to cook. If you use frozen vegetables, add them near the end of the cooking time. This keeps them from getting too soft. To make this stew low-carb, skip the carrots and use fewer potatoes. You can add more low-carb veggies like spinach or zucchini instead. This keeps your stew tasty but lighter. Using chicken broth with no added sugars is also key. This stew pairs well with crusty bread or a fresh green salad. You can also serve it with rice or quinoa for a heartier meal. For a simple touch, add a sprinkle of fresh herbs on top for extra flavor. In this blog post, we explored how to make a tasty butternut squash chicken stew. We covered key ingredients, step-by-step cooking instructions, and tips to enhance flavors. I shared common mistakes to avoid and offered alternatives for vegetarians. Proper storage and reheating tips ensure your stew stays fresh. Remember, making a great stew is about enjoying good food with simple steps. Keep experimenting with flavors and ingredients to make this dish truly your own. Happy cooking!

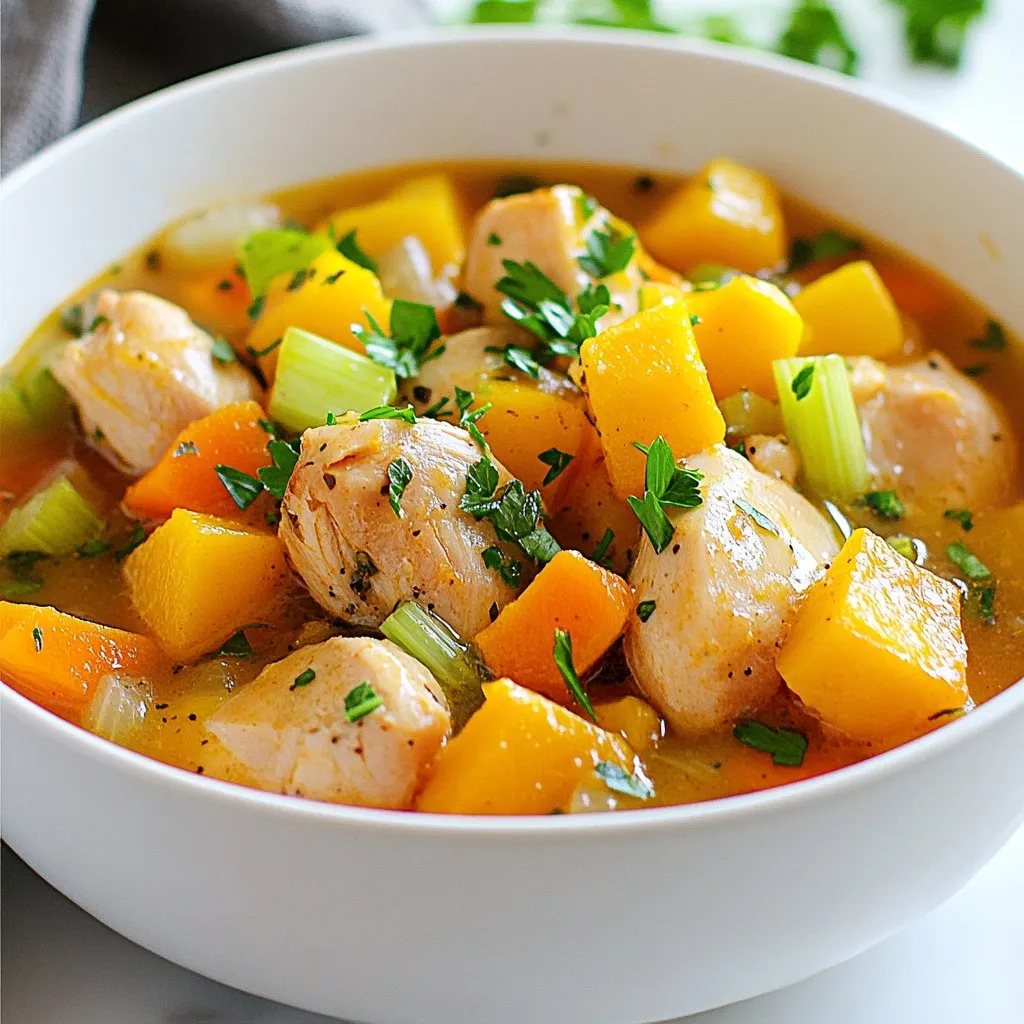
Welcome to your new favorite comfort food: Crockpot Butternut Squash Chicken Stew! This dish is easy to make and packed with flavors. You’ll enjoy tender chicken and sweet squash in …

Read more

Categories Dinner

Minute Garlic Parmesan Chicken Quick and Easy Meal

January 12, 2026February 1, 2025 by Chef Owen
To make Minute Garlic Parmesan Chicken, you will need: - 4 boneless, skinless chicken breasts - 4 tablespoons unsalted butter - 4 cloves garlic, finely minced - 1 teaspoon onion powder - 1 teaspoon Italian seasoning blend - ½ cup freshly grated Parmesan cheese - Salt and freshly cracked black pepper, to taste - Fresh parsley, finely chopped (for garnish) These ingredients come together to create a rich and tasty dish. The chicken is the star, and the garlic and Parmesan add great flavors. You can easily change some ingredients if needed: - Chicken Breasts: You can use chicken thighs for a juicier option. - Butter: Olive oil works well if you want a lighter choice. - Parmesan: Try using Pecorino Romano or even nutritional yeast for a vegan twist. - Garlic: Garlic powder can be used if you don’t have fresh garlic, but fresh is best. Feel free to mix and match these ingredients. This recipe allows for fun twists and personal touches! Garnishing adds color and freshness. Here are some great ideas: - Fresh Parsley: Adds a bright flavor and makes the dish look nice. - Lemon Wedges: A squeeze of lemon brightens the dish. - Extra Parmesan: A sprinkle of extra cheese makes it even more delicious. These simple garnishes can take your meal to the next level. Enjoy experimenting! {{ingredient_image_2}} To start, you need to tenderize the chicken breasts. This step helps them cook evenly. Place each breast between two sheets of plastic wrap. Use a meat mallet or rolling pin to pound them to half an inch thick. This also cuts down cooking time. Once flattened, season both sides with salt, black pepper, onion powder, and Italian seasoning. This will boost the flavor. Next, heat two tablespoons of unsalted butter in a large skillet over medium-high heat. Wait until the butter melts and starts to sizzle. Carefully add your seasoned chicken breasts to the skillet. Let them cook for about 3 to 4 minutes on each side. You want them golden brown and fully cooked. If your skillet is small, cook in batches. This prevents steaming and helps achieve a nice brown crust. After cooking, place the chicken on a plate and cover it with foil to keep warm. In the same skillet, add the remaining two tablespoons of butter and minced garlic. Sauté for 1 to 2 minutes, stirring often. You want the garlic fragrant but not burnt. Lower the heat, then return the cooked chicken to the skillet. Spoon the garlic butter over the chicken. Sprinkle freshly grated Parmesan cheese on top. Cover the skillet with a lid for 1 to 2 minutes. This melts the cheese perfectly. Finally, remove from heat and garnish with fresh parsley. Serve right away for a burst of flavor. To season the chicken well, start with salt and pepper. Use fresh black pepper for the best taste. Next, add onion powder and Italian seasoning for extra flavor. Make sure to rub the spices evenly on both sides. This step helps the chicken soak in the seasonings and boosts the taste. For a perfect golden brown, heat your skillet well. Use medium-high heat and add butter until it sizzles. Place the chicken in the skillet gently. Avoid overcrowding the pan; this keeps the chicken from steaming. Cook for 3-4 minutes on each side. Look for that nice, brown color. If the chicken sticks, leave it alone. It will release naturally when it’s ready. When serving, arrange the chicken on a platter. Drizzle any leftover garlic butter over the top. This adds flavor and makes it look nice. Garnish with fresh parsley for color. Lemon wedges on the side give a fresh taste. Pair it with a light salad or steamed veggies for a complete meal. Enjoy every bite! Pro Tips Butter Temperature: Ensure your butter is at room temperature for easier melting and even distribution in your garlic butter sauce. Fresh Garlic: Use fresh garlic rather than pre-minced for a more robust and aromatic flavor in your dish. Pasta Pairing: Serve this chicken over a bed of pasta to soak up the delicious garlic butter sauce for a complete meal. Keep it Warm: If cooking in batches, keep the cooked chicken warm in a low oven (around 200°F) to prevent it from cooling down while you finish cooking the rest. {{image_4}} You can make Minute Garlic Parmesan Chicken even better by adding veggies. Try bell peppers, zucchini, or broccoli. Cut them into small pieces. Add them to the skillet along with the chicken. Cook until they are tender but still crisp. This adds color and nutrients to your meal. Feel free to switch up the flavors. Instead of Italian seasoning, use taco seasoning or smoked paprika. For cheese, swap Parmesan with mozzarella or feta. Each choice brings a new twist to the dish. You can even play with herbs like thyme or rosemary for a fresh taste. You can cook this chicken in many ways. Grilling gives a nice smoky flavor. Heat your grill and place the chicken on it. Cook for about 6-7 minutes on each side. Baking is another simple option. Preheat your oven to 400°F and cook the chicken in a baking dish for about 20 minutes. Both methods keep the chicken juicy and tasty. After enjoying your Minute Garlic Parmesan Chicken, let the leftovers cool down. Place them in an airtight container. You can keep the chicken in the fridge for up to three days. Make sure to cover it well to avoid drying out. If you want to keep it longer, freezing is a great option. To reheat, you can use the microwave or the stove. If you use the microwave, place the chicken on a plate and cover it with a damp paper towel. Heat it in short bursts to avoid overcooking. For the stove, warm it gently in a skillet over low heat. Add a splash of water or chicken broth to keep it moist. To freeze, wrap each piece of chicken tightly in plastic wrap. Then, place the wrapped chicken in a freezer-safe bag. It can stay in the freezer for up to three months. When you are ready to eat, move it to the fridge to thaw overnight. Reheat it as mentioned above for the best taste. Yes, you can use frozen chicken breasts. However, you need to thaw them first. Thaw the chicken overnight in the fridge or use the microwave. After thawing, tenderize and season as in the recipe. This ensures even cooking and better flavor. The chicken is done when it reaches an internal temperature of 165°F (75°C). You can check this with a meat thermometer. If you don't have one, cut into the thickest part. The meat should be white, not pink, and the juices should run clear. Garlic Parmesan Chicken goes well with many sides. Here are some great options: - Steamed broccoli - Garlic mashed potatoes - Caesar salad - Rice pilaf - Roasted vegetables These sides will complement the flavors and make for a complete meal. Enjoy your meal! You learned about the essential ingredients for Garlic Parmesan Chicken and how to prepare them. I shared tips on cooking and seasoning the chicken just right. You can also explore fun variations like adding veggies or using different cheeses. Storing and reheating leftovers is easy with the right tips. Enjoy making this dish your own, and don’t be afraid to try new things. Cooking should be fun and rewarding!

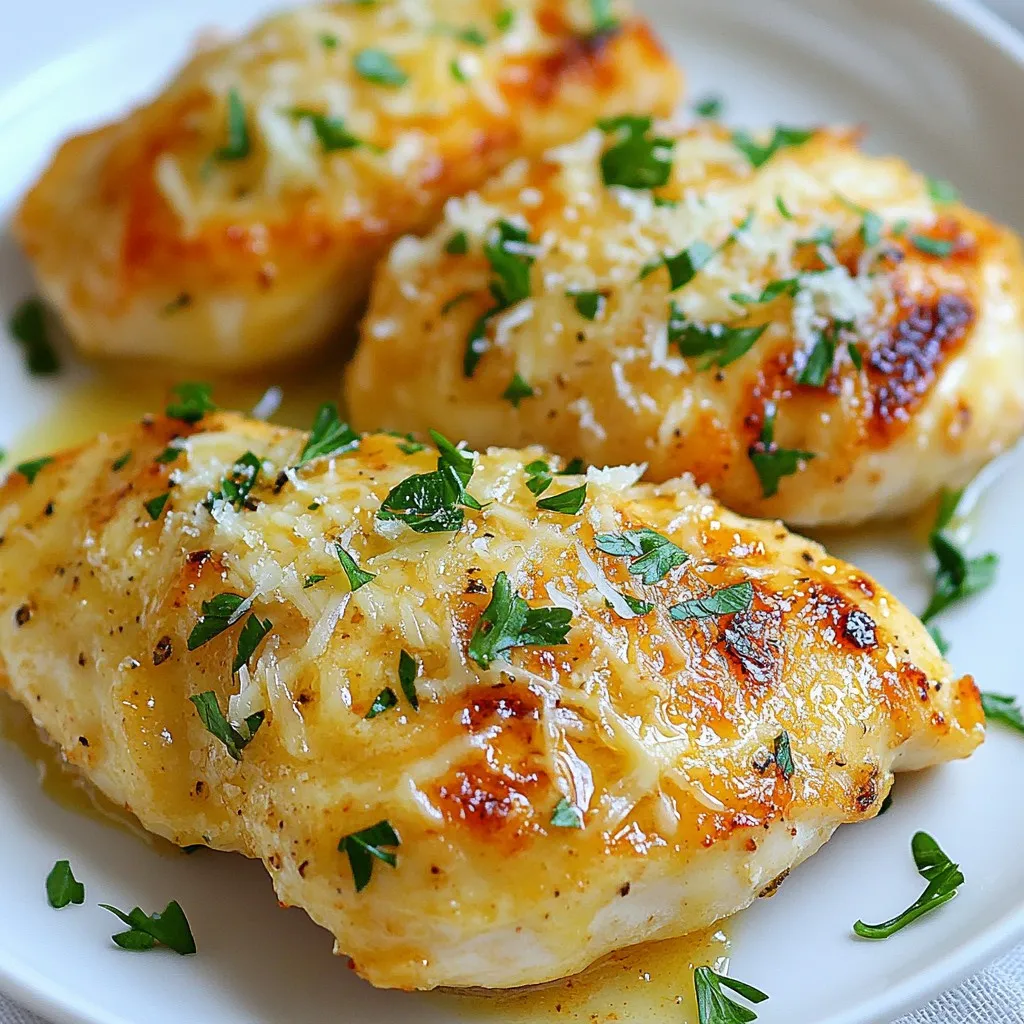
Are you ready for a tasty meal that’s quick and simple? I’m excited to share my Minute Garlic Parmesan Chicken recipe with you! This dish is packed with flavor and …

Read more

Categories Dinner

Pizza Grilled Cheese Delight for the Perfect Meal

November 11, 2025January 31, 2025 by Chef Owen
To make a tasty pizza grilled cheese, gather these key items: - 2 slices of sourdough bread - 2 tablespoons pizza sauce - 1 cup shredded mozzarella cheese - 1/4 cup chopped pepperoni or your favorite topping - 1/2 teaspoon dried oregano - 1/4 teaspoon garlic powder - 2 tablespoons unsalted butter - Fresh basil leaves for garnish (optional) These ingredients create a delicious mix of flavors and textures. The sourdough bread gives you a crispy crust. The mozzarella cheese melts beautifully and hugs your toppings. Feel free to jazz up your pizza grilled cheese with these fun add-ins: - Sliced bell peppers - Mushrooms - Olives - Spinach - Cooked sausage - Fresh tomatoes These options let you customize your sandwich. You can create new flavors each time you make it. You will need a few tools to make the pizza grilled cheese: - A non-stick skillet - A spatula - A butter knife These basic kitchen items help you cook your sandwich evenly and flip it with ease. {{ingredient_image_1}} 1. Start by gathering your ingredients. You need: - 2 slices of sourdough bread - 2 tablespoons pizza sauce - 1 cup shredded mozzarella cheese - 1/4 cup chopped pepperoni (or your favorite topping) - 1/2 teaspoon dried oregano - 1/4 teaspoon garlic powder - 2 tablespoons unsalted butter - Fresh basil leaves for garnish (optional) 2. Preheat your skillet over medium heat. This ensures your sandwich cooks evenly. 3. Spread 1 tablespoon of butter on one side of each slice of bread. This helps in crisping the bread. 1. Place one slice of bread, butter side down, on the skillet. 2. On the unbuttered side, spread 1 tablespoon of pizza sauce. This adds flavor to your sandwich. 3. Sprinkle half of the mozzarella cheese over the sauce. This will help hold the toppings. 4. Add the chopped pepperoni, oregano, and garlic powder. This enhances the taste. 5. Top with the remaining mozzarella cheese. This ensures a cheesy goodness. 6. Place the second slice of bread, unbuttered side facing the cheese. 7. Cook for about 3-4 minutes. Look for a golden brown color on the bottom. The cheese should start to melt. 8. Carefully flip the sandwich with a spatula. Cook the other side for another 3-4 minutes. Wait for it to be golden brown and the cheese fully melted. - Use a sturdy spatula for easy flipping. - Gently lift one side before flipping. This prevents a messy situation. - If you struggle, press down lightly on the sandwich. This helps it cook evenly. - Practice makes perfect! Don't worry if it takes a couple of tries. To get cheese that melts just right, use fresh mozzarella. Shredded cheese melts better than slices. Make sure your skillet is hot before you start cooking. Cook on medium heat for even melting. If you want extra gooey cheese, cover the skillet with a lid. This traps heat and helps the cheese melt faster. I love sourdough for its crunch and flavor. It holds up well with all the toppings. You could also try thick-cut white or whole grain. These choices give a nice texture and taste. Avoid soft breads like sandwich bread. They can get soggy and fall apart. Spices can take your pizza grilled cheese to the next level. Dried oregano adds a nice pizza taste. Garlic powder gives it a savory kick. You can also add crushed red pepper for heat. Fresh basil leaves make a great garnish and add freshness. Mix and match these flavors to find your favorite! Pro Tips Use Fresh Ingredients: Using fresh mozzarella and quality pizza sauce will enhance the flavors and overall taste of your grilled cheese. Butter It Right: Make sure to use softened butter for easy spreading on the bread; this ensures an even toast and golden crust. Customize Your Toppings: Feel free to add other toppings like bell peppers, olives, or mushrooms to create your perfect pizza grilled cheese. Cook Low and Slow: Keeping the heat at medium ensures that the cheese melts thoroughly without burning the bread. {{image_2}} You can make a tasty vegetarian pizza grilled cheese. Swap out pepperoni for veggies. Try bell peppers, mushrooms, or olives. You can add spinach for a fresh touch. Use the same amount of mozzarella cheese. This keeps the gooey texture we all love. Add a sprinkle of crushed red pepper for heat. If you need a gluten-free option, choose gluten-free bread. Many stores sell good gluten-free slices. Make sure to check the label for any allergens. The rest of the recipe stays the same. You will still enjoy a cheesy, melty flavor. No one will miss the gluten! Get creative with your toppings! You can use different meats like grilled chicken or bacon. Try barbecue sauce instead of pizza sauce for a twist. Add fresh herbs like basil or chives for extra flavor. Experiment with different cheeses such as cheddar or provolone. Each choice brings a new taste to your grilled cheese. To keep your leftover pizza grilled cheese fresh, wrap it tightly in plastic wrap. You can also place it in an airtight container. Make sure to store it in the fridge. It stays good for up to three days. This way, you enjoy a tasty meal later without losing flavor. When you want to eat your leftover pizza grilled cheese, heat it in a skillet. Set the skillet to medium heat. Cook for about 2-3 minutes on each side. This method helps the cheese melt again and keeps the bread crispy. You can also use a microwave, but the bread may get soft. If you prefer a crunchy texture, stick with the skillet. If you want to save your pizza grilled cheese for later, freezing works great. Wrap each sandwich in plastic wrap, then place it in a freezer bag. Squeeze out the air to prevent freezer burn. You can freeze it for up to one month. When ready to eat, thaw it in the fridge overnight before reheating. This keeps your meal delicious and easy to prepare. Yes, you can use different cheeses! Try cheddar, provolone, or gouda. Each cheese gives a unique taste. Mix and match to find your favorite. Just remember, mozzarella melts best for that gooey texture you crave. You can use olive oil instead. Just brush a little oil on the bread. You can also use cooking spray for a lighter option. This will still give you a nice crisp while keeping it healthier. Some great sides include a salad or soup. A fresh green salad adds crunch and color. Tomato soup is a classic choice too. It complements the flavors of the pizza grilled cheese well. You could also serve it with potato chips for a fun crunch. This blog post covered how to make a pizza grilled cheese. We explored essential ingredients, add-ins, and the tools you'll need. I shared simple steps for preparation, cooking, and flipping the sandwich. I offered tips for melted cheese and the best bread to use. You also learned about vegetarian options, storing leftovers, and reheating methods. In the end, you have the tools to create delicious pizza grilled cheese that suits your tastes. Enjoy experimenting with toppings and flavors!

Get ready for a mouth-watering treat! The Pizza Grilled Cheese Delight combines two beloved favorites into one amazing meal. You’ll discover easy steps and simple ingredients to make each cheesy …

Read more

Categories Dinner
Older posts
Newer posts
← Previous Page1 … Page122 Page123 Page124 Page125 Next →

THE RECIPE HATCH

Where tasty ideas take flight! 🚀🐣 Fresh, easy recipes hatched daily to make cooking simple and flavorful.

PAGES

Home About Contact Privacy Policy Terms & Conditions Cookie Policy GDPR Policy Copyright Policy Disclaimer

CATEGORIES

Appetizers Desserts Salads Breakfast Dinner

Contact

  • Pinterest
  • Mail
Copyright © 2026 The Recipe Hatch. All rights reserved.