Skip to content
The Recipe Hatch
  • Home
  • Appetizers
  • Desserts
  • Salads
  • Breakfast
  • Dinner
  • Privacy Policy
  • Contact
  • About

Chef Owen

Minute Lo Mein Quick and Flavorful Recipe Guide

January 4, 2026March 30, 2025 by Chef Owen
Minute Lo Mein uses simple yet fresh ingredients. Each one adds a unique flavor. You need lo mein noodles, vegetables, and a few key seasonings. This makes your dish both quick and tasty. - 8 oz lo mein noodles - 2 tablespoons vegetable oil - 1 cup shredded carrots - 1 cup snap peas - 1 red bell pepper, julienned - 3 green onions, sliced - 2 cloves garlic, minced - 1 tablespoon ginger, grated - 3 tablespoons soy sauce - 1 tablespoon sesame oil - 1 tablespoon rice vinegar You can add more flavor with optional items. Consider adding: - 1 tablespoon chili paste for heat - Sesame seeds for garnish - Fresh cilantro for added color and taste These options let you tailor your dish. You can make it mild or spicy, based on your taste. {{ingredient_image_2}} Start by boiling a large pot of salted water. Once it bubbles, add 8 oz of lo mein noodles. Cook them for about 3-4 minutes, following the package instructions. When they are ready, drain the noodles well. Set them aside in a bowl. Next, heat 2 tablespoons of vegetable oil in a large skillet or wok over medium-high heat. Wait until the oil shimmers. Add 2 cloves of minced garlic and 1 tablespoon of grated ginger. Stir them quickly to avoid burning. Sauté for about 30 seconds until they smell nice and golden. Now it’s time for the veggies! Add 1 cup of shredded carrots, 1 cup of snap peas, and 1 julienned red bell pepper to the skillet. Stir-fry the mix for 3-4 minutes. You want them tender-crisp, so keep an eye on the texture. Gently add the cooked lo mein noodles to the skillet with the veggies. Use tongs or a spatula to toss everything together. Mix well to ensure the noodles blend nicely with the vegetable medley. In a small bowl, whisk together 3 tablespoons of soy sauce, 1 tablespoon of sesame oil, and 1 tablespoon of rice vinegar. If you like heat, add 1 tablespoon of chili paste. Pour this sauce over the noodle and veggie mix. Stir-fry everything for 2 more minutes to coat the noodles well. After mixing, take the skillet off the heat. Gently fold in 3 sliced green onions. Their fresh flavor will make the dish pop! Spoon your warm lo mein into bowls or plates. Finish with a sprinkle of sesame seeds and a few cilantro leaves. This adds color and flavor. Enjoy your quick and zesty lo mein right away for the best taste! To cook lo mein noodles, bring a big pot of salted water to a boil. Add the noodles and cook for 3-4 minutes. Stir them gently to prevent sticking. Drain and set them aside to keep them warm. You want them soft but not mushy. When sautéing, use a hot skillet or wok. Heat vegetable oil until it shimmers. Add minced garlic and grated ginger first, then cook for about 30 seconds. This gives your dish a great base flavor. Next, add shredded carrots, snap peas, and red bell pepper. Stir-fry these for 3-4 minutes. Keep them crisp for the best taste and texture. To enhance flavor, use quality soy sauce and fresh ginger. Adding sesame oil brings a nutty taste. For more heat, include chili paste or fresh chili. You can also add lime juice or rice vinegar for a bright touch. Garnishing with fresh cilantro and sesame seeds adds color and crunch. Prep all your ingredients before you start cooking. Chop veggies and measure sauces ahead of time. This step cuts down on cooking time. You can use pre-cut vegetables if you’re in a hurry. Keep the heat high to cook quickly. Cook in batches if your skillet is small to avoid steaming and to get that nice stir-fry sear. Pro Tips Prep Your Ingredients: Having all your vegetables prepped and ready to go will make the cooking process smoother and quicker. Don't Overcook the Vegetables: Stir-fry the vegetables until they are tender-crisp to maintain their vibrant color and crunch. Adjust the Sauce to Taste: Feel free to modify the sauce ingredients according to your flavor preference, adding more soy sauce for saltiness or rice vinegar for tang. Garnish for Extra Flavor: Fresh herbs and sesame seeds not only enhance the dish's appearance but also add layers of flavor. {{image_4}} Adding protein to your Minute Lo Mein makes it heartier. You can choose chicken, tofu, or shrimp. - Chicken: Use cooked, shredded chicken. Add it during step four when you mix the noodles and veggies. - Tofu: Use firm tofu. Press it to remove water, then cut it into cubes. Sauté it in the skillet until golden. - Shrimp: Add peeled shrimp to the skillet with the veggies. Cook until they turn pink, about 3-4 minutes. Each option brings a different flavor and texture. Feel free to swap vegetables based on your taste. Here are some great options: - Broccoli: Cut it into small florets. Steam or sauté it with the other veggies for added crunch. - Bell Peppers: You can use yellow or green bell peppers. They add color and sweetness. - Zucchini: Slice it thinly. It cooks quickly and adds a nice texture. Mixing different veggies keeps the dish fresh and fun. Making Minute Lo Mein vegan or gluten-free is easy. - Vegan: Skip any meat and use tofu or a plant-based protein. Ensure your sauces are vegan-friendly. - Gluten-free: Choose gluten-free lo mein noodles or rice noodles. Check the soy sauce for gluten-free options. These changes keep the dish delicious and suitable for everyone. If you like heat, add some spice! Here are ways to kick it up a notch: - Chili Paste: Add a tablespoon to the sauce for a warm kick. - Sriracha: Drizzle some on top when serving for extra flavor. - Spicy Soy Sauce: Look for soy sauce with added spice or make your own by mixing soy sauce and chili oil. These sauces can transform your Minute Lo Mein into a spicy delight. To store leftover Minute Lo Mein, place it in an airtight container. Make sure to cool the dish to room temperature before sealing it. This helps keep the noodles fresh. Store it in the fridge for up to three days. If you want to keep it longer, consider freezing it. When you reheat leftovers, use a skillet or a wok. Add a splash of water or soy sauce to keep the noodles moist. Heat over medium heat and stir often. This ensures even heating and keeps the noodles from getting sticky. You can also use the microwave, but be careful not to overheat. To freeze Minute Lo Mein, first cool it completely. Then, divide it into portions and place each in a freezer-safe bag. Remove as much air as possible to prevent freezer burn. It can last in the freezer for up to three months. When ready to eat, thaw it overnight in the fridge before reheating. It takes about 20 minutes to make Minute Lo Mein. You spend 10 minutes prepping and 10 minutes cooking. This quick time makes it perfect for busy nights. Yes, you can make Minute Lo Mein in advance. Cook it fully and store it in the fridge. It will stay fresh for about 3 days. Just reheat it before serving. You can use various sauces to boost flavor. Soy sauce is a must for saltiness. Sesame oil adds a nutty taste. Rice vinegar gives a nice tang. You can also add chili paste for heat. Absolutely! Minute Lo Mein is great for meal prep. You can portion it into containers for easy lunches. This dish keeps well, and you can change up the veggies each time. Enjoy your meals throughout the week! In this blog post, I shared how to make Minute Lo Mein. We covered the ingredients, from essential to optional, and detailed step-by-step cooking instructions. I provided tips for cooking noodles and enhancing flavors. We explored variations for different tastes and discussed how to store and reheat leftovers. Remember, this dish is easy to customize. You can mix in your favorite proteins or veggies. With practice, you'll master Minute Lo Mein and enjoy it time after time. Happy cooking!

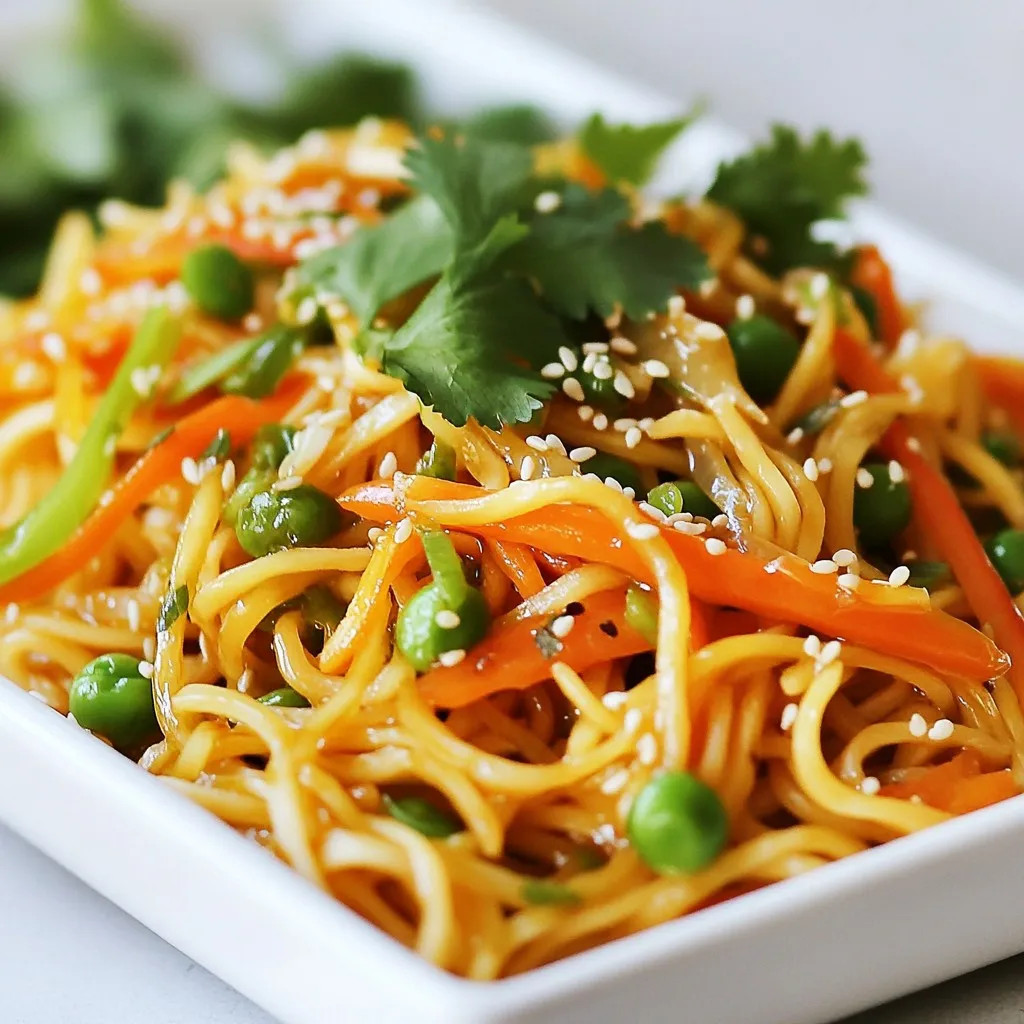
Welcome to your new favorite dish—Minute Lo Mein! This quick and flavorful recipe guide makes it easy for you to whip up a delicious meal in no time. From choosing …

Read more

Categories Dinner

Cheeseburger Sliders Flavorful and Simple Recipe

January 13, 2026March 28, 2025 by Chef Owen
To make tasty cheeseburger sliders, you need simple, fresh ingredients. Here’s what you’ll need: - 1 lb ground beef (use 80/20 blend for juiciness) - 1 teaspoon garlic powder - 1 teaspoon onion powder - Salt and black pepper, to taste - 6 slider buns - 6 slices of sharp cheddar cheese - 1/2 cup mayonnaise - 1/4 cup ketchup - 1/4 cup yellow mustard - 1 cup shredded iceberg lettuce - 1 medium tomato, sliced thin - Dill pickle slices, for garnishing You can get creative with toppings and sauces. Here are some ideas: - Crispy bacon strips - Sliced jalapeños for heat - Avocado or guacamole - BBQ sauce for a sweet twist - Sautéed onions or mushrooms Pair your sliders with drinks that enhance their taste. Some tasty choices include: - Classic soda or root beer - Iced tea with lemon - A light lager or pale ale - Sparkling water with lime - Lemonade for a refreshing option {{ingredient_image_2}} To start, gather your ingredients. You need ground beef, garlic powder, onion powder, salt, and black pepper. In a bowl, mix the ground beef with the garlic and onion powder, salt, and pepper. Use your hands but don’t overwork the meat. Shape the mixture into six equal patties. Make a small dent in the middle of each patty with your thumb. This helps them cook evenly. Preheat your grill or skillet to medium-high heat. You want it hot before adding the patties. Place the patties on the grill or skillet. Cook them for about 3-4 minutes on each side. If you like your burger medium-rare, this timing works well. In the last minute, add a slice of cheddar cheese on top of each patty. Let it melt while finishing cooking. While the patties cook, slice the slider buns in half. Toast them lightly on the grill or skillet until golden brown. This adds flavor and makes them sturdy. In a bowl, mix mayonnaise, ketchup, and mustard for a tasty sauce. Spread this sauce on the bottom half of each bun. Place a cheeseburger patty on top, then add lettuce, a slice of tomato, and dill pickles. Top each slider with the other half of the bun. Enjoy your sliders with fries or a salad! To get a great burger texture, use ground beef with a fat content of 80/20. This blend keeps your sliders juicy and tasty. When mixing the meat, add garlic powder, onion powder, salt, and black pepper. Use your hands gently to combine. Overworking the meat makes it tough. Shape each portion into a patty, and press a small dent in the center. This helps keep the burgers flat as they cook. Customize your sliders to match your taste. You can add spices like smoked paprika or cayenne for heat. Try different cheeses, like pepper jack or gouda, for a twist. Top them with unique ingredients, such as avocado, crispy bacon, or sautéed mushrooms. The sauce can change too. Mix mayo, ketchup, and mustard, or use BBQ sauce for a zing. The options are endless! Grilling gives your sliders a smoky flavor. Preheat your grill to medium-high heat. Cook the patties for 3-4 minutes on each side. Add cheese during the last minute to melt it perfectly. If you use a skillet, make sure it’s hot before adding the patties. Both methods work well, but grilling adds a special taste. Remember to toast the buns lightly for the best texture. Pro Tips Use Quality Beef: Choosing an 80/20 blend of ground beef ensures your sliders are juicy and flavorful. Don't Overwork the Meat: When mixing your beef with seasonings, handle it gently to maintain tenderness in your patties. Toast the Buns: Lightly toasting the slider buns adds flavor and prevents them from getting soggy once assembled. Customize Your Toppings: Feel free to experiment with different cheeses and toppings to personalize your sliders to your taste. {{image_4}} If you want a meat-free option, try using black beans or chickpeas. Mash them well and mix in spices like cumin and paprika. You can also use store-bought veggie patties. For a vegan choice, skip the cheese and use vegan mayo. You can add sliced avocado for creaminess. Want to spice things up? Try a BBQ slider! Add BBQ sauce to the beef mixture for a smoky taste. You could also mix in some diced jalapeños for heat. For a gourmet twist, try goat cheese with caramelized onions. This adds a rich, sweet flavor to your sliders. You can make sliders smaller for parties or larger for a meal. For mini sliders, divide the beef into smaller patties. They cook faster and are perfect for appetizers. If you want big sliders, use larger buns and make larger patties. This way, everyone gets a hearty bite! To keep your leftover sliders fresh, wrap them tightly in plastic wrap or foil. You can also place them in an airtight container. Store them in the fridge for up to three days. This helps maintain their taste and texture. If you want to save them longer, freeze the sliders. Just make sure to freeze them without any toppings. They will last for about three months in the freezer. To reheat your sliders, the oven works best. Preheat your oven to 350°F (175°C). Place the sliders on a baking sheet. Cover them with foil to keep them moist. Heat for about 10-15 minutes until warm. If you prefer the microwave, use it for a quick option. Just pop one slider in for about 30 seconds. But remember, the microwave can make the buns soggy. To avoid soggy sliders, follow a few tips. First, toast the buns lightly before adding the fillings. This adds a nice crunch. Use a thin layer of sauce so it does not soak in too much. You can also pat the lettuce dry before adding it. Lastly, keep the toppings separate until you serve the sliders. This keeps everything fresh and tasty! Yes, you can use ground turkey or chicken. These options are leaner than beef. They may dry out if cooked too long. To keep them moist, add a bit of olive oil. Use the same spices to keep the flavor strong. The best cheese is sharp cheddar. It melts well and adds great flavor. You can also try American cheese for a classic taste. Swiss cheese provides a nice, nutty flavor too. You can prepare the patties ahead of time. Shape them and store them in the fridge. Cook them just before serving to keep them fresh. You can also toast the buns early. Store them in an airtight container until ready to use. Yes, many stores sell gluten-free slider buns. Look for ones made from rice or almond flour. You can also use lettuce wraps as a fun, low-carb alternative. Cheeseburger sliders are fun and easy to make. You learned about the main ingredients, optional toppings, and drink pairings. I shared tips on cooking methods and how to assemble them perfectly. You can even customize the sliders to fit your taste. If you have leftovers, I explained how to store and reheat them. Remember, these tasty bites work for any event. Now, go make your sliders and enjoy every bite!

Craving a fun and tasty meal? You’re in the right spot! I’m excited to share my simple and flavorful cheeseburger sliders recipe. These little bites pack a big punch and …

Read more

Categories Appetizers

Savory Smash Burger Tacos Easy and Flavorful Recipe

January 7, 2026March 25, 2025 by Chef Owen
- 1 lb ground beef (80/20 blend for optimal juiciness) - 8 small corn tortillas - 1 cup shredded cheddar cheese - 1/2 cup lettuce, finely shredded - 1 large tomato, diced - 1/4 cup pickles, thinly sliced - 1/4 cup onion, finely chopped - 2 tablespoons mayonnaise - 2 tablespoons ketchup - 1 tablespoon mustard - Salt and pepper to taste - Cooking oil (for frying) You can enhance your tacos with extra toppings. Try avocado slices for creaminess. Jalapeños can add a spicy kick. Fresh cilantro brings a burst of flavor. Sour cream adds a cool and tangy touch. You can also use your favorite hot sauce for extra heat. The choices are endless, so mix and match! To make smash burger tacos, you need a few key tools: - A large skillet or griddle for cooking the beef. - A spatula to smash and flip the patties. - A mixing bowl for the sauce. - Another skillet or griddle to warm the tortillas. - A sharp knife and cutting board for prepping veggies. These tools will help you create delicious tacos quickly and easily. {{ingredient_image_2}} Start by getting your toppings ready. Shred the lettuce. Place it in a bowl to keep it fresh. Next, dice the tomato into small pieces. Set it aside until you need it. Slice the pickles thinly and chop the onion finely. Keeping these items organized helps when you assemble the tacos. To make the special sauce, grab a small mixing bowl. Combine the mayonnaise, ketchup, and mustard in the bowl. Mix well until the sauce is smooth. This sauce adds a tasty twist to your tacos. Set it aside for later use. Heat a large skillet or griddle over high heat. Add a little cooking oil to prevent sticking. Take about four ounces of the ground beef and shape it into a loose ball. Place this ball on the hot skillet. Use a spatula to press down firmly. Flatten the burger to about half an inch thick. Season it with salt and pepper. Let it cook for 2-3 minutes until a golden crust forms. Once the beef patty is cooked, flip it carefully using the spatula. Cook for another 1-2 minutes. Right after flipping, sprinkle a good amount of shredded cheddar cheese on top. Cover the skillet for about a minute, letting the cheese melt. While the patties cook, warm the corn tortillas in another skillet. Heat them for about 30 seconds on each side. They should be soft and slightly toasted. Now, to assemble your tacos, place each cooked patty on a warm tortilla. Top it off with shredded lettuce, diced tomato, chopped onion, and sliced pickles. Drizzle your homemade sauce over the top. Fold each tortilla over the filling, creating a taco shape. Enjoy them warm for the best taste! For smash burger tacos, I recommend using an 80/20 ground beef blend. This mix gives you the right fat content for juicy burgers. The fat makes the meat flavorful and tender. If you go leaner, your burgers might be dry. A good blend ensures your tacos stay moist and tasty. To get that perfect crust, heat your skillet on high. This step is key. Once the pan is hot, add a little cooking oil. Then, shape your beef into a loose ball. When you place it on the skillet, press down firmly. This creates a nice, golden crust. Let it cook without moving it for a few minutes. The crust forms best when you leave it alone. You can save time by prepping your ingredients in advance. Chop the vegetables a day before. Store them in the fridge to keep them fresh. You can also make the sauce ahead of time. Mix the mayonnaise, ketchup, and mustard, then store it in a jar. This way, when you’re ready to cook, everything is ready to go. Enjoy quick meals even on busy days! Pro Tips Choose the Right Beef: For the juiciest smash burgers, opt for an 80/20 blend of ground beef. This fat content ensures your burgers are flavorful and moist. Keep It Hot: Make sure your skillet or griddle is hot before adding the beef. This helps in creating that perfect sear and crispy crust that defines a great smash burger. Don’t Overcrowd: Cook the patties in batches if necessary. Overcrowding the skillet can lower the temperature and result in steaming rather than searing. Customize Your Toppings: Feel free to experiment with different toppings! Avocado, jalapeños, or even a spicy aioli can elevate your smash burger tacos to new heights. {{image_4}} To make spicy smash burger tacos, add heat with jalapeños. You can chop fresh jalapeños or use pickled ones. Mix in some hot sauce with your special sauce for extra zing. A sprinkle of cayenne pepper on the beef gives a nice kick too. Adjust the spice level to suit your taste. For a vegetarian twist, swap the beef for a plant-based option. Use black beans or lentils as your base. You can also try a veggie burger made from chickpeas or quinoa. For more flavor, add spices like cumin or smoked paprika. Top with your favorite fresh veggies, and you’ll have a tasty meal. Create a unique sauce by mixing ingredients. Try adding chipotle mayo for a smoky taste. A ranch dressing can give a creamy touch. You can also mix in some barbecue sauce for a sweet, tangy flavor. Don’t shy away from experimenting with flavors to find your perfect match! To store leftover tacos, wrap them in foil or plastic wrap. Place them in an airtight container. This keeps them fresh and prevents drying out. You can store them in the fridge for up to three days. You can freeze these tacos for later. First, let them cool completely. Wrap each taco tightly in plastic wrap. Then, place them in a freezer-safe bag or container. They will stay good for up to two months. To reheat frozen tacos, take them out and let them thaw in the fridge overnight. For quick reheating, use a microwave for about one minute. You can also heat them in a skillet on medium heat. This brings back their crispy texture. Enjoy your tasty tacos warm! The best meat for these tacos is ground beef with an 80/20 blend. This mix gives you a juicy burger. The fat adds flavor and moisture. You can also use ground turkey or plant-based meat if you prefer. Yes, you can use flour tortillas. They are soft and work well with the fillings. Just remember that they may add more calories. Corn tortillas have a nice flavor and are also gluten-free. To make these tacos gluten-free, use corn tortillas. Ensure that your toppings and sauces are gluten-free too. Check the labels on mayonnaise, ketchup, and mustard. This way, everyone can enjoy them. You can add many toppings! Consider avocado slices, jalapeños, or salsa for extra flavor. Chopped cilantro or green onions also add freshness. Get creative with your favorites for a fun twist. You can prep some parts in advance. Cook the beef and store it in the fridge. Warm the tortillas just before serving for the best taste. Keep your toppings fresh until you are ready to assemble. In this article, we covered the key ingredients and steps to make delicious Smash Burger Tacos. You learned how to prepare toppings, make special sauce, and cook beef patties. We explored tips for juiciness, achieving a great crust, and meal prep for busy days. Plus, we shared fun variations and storage info to keep your tacos fresh. Remember, experimenting with toppings and sauces can make each meal exciting. Enjoy making these tasty tacos, and share them with friends!

Are you ready to spice up taco night? My savory smash burger tacos are the answer! With juicy beef patties tucked inside warm tortillas and topped with creamy sauce, this …

Read more

Categories Dinner

Three Ingredient Banana Oat Pancakes Simple and Easy

November 14, 2025March 15, 2025 by Chef Owen
- 1 large ripe banana - 1 cup rolled oats - 1 cup milk (dairy or non-dairy) These three simple ingredients make the best pancakes. First, you need a large ripe banana. The ripeness adds sweetness and flavor. Next, grab one cup of rolled oats. These oats give the pancakes a nice texture and help bind the mix. Finally, choose one cup of milk. You can use regular milk or any non-dairy option like almond or oat milk. This mix is not just easy; it is also healthy. You get good carbs, fiber, and natural sweetness. Plus, it’s quick to make! You can whip up breakfast in about 15 minutes. You don’t need fancy tools or hard-to-find items. Just a blender, a skillet, and your ingredients. Now that you have the ingredients ready, you can move on to the next steps in making your delicious pancakes. Enjoy your cooking adventure! {{ingredient_image_1}} - Step 1: Blend the ingredients Start by placing one large ripe banana, one cup of rolled oats, and one cup of milk in a blender. Blend these until the mixture turns smooth. The goal is to reach a pancake batter consistency. You want it thick but pourable. - Step 2: Preheat the skillet While blending, preheat a non-stick skillet over medium heat. Lightly grease it with cooking spray or a small amount of oil. This helps prevent sticking and gives a nice golden color. - Step 3: Pour and cook the pancakes Once the skillet is hot, pour about 1/4 cup of batter onto it for each pancake. Cook for 2 to 3 minutes. Watch for bubbles to form on the surface; this shows they’re ready to flip. - Step 4: Flip and finish cooking Gently flip each pancake and cook for another 1 to 2 minutes. Look for a golden brown color and make sure they are cooked through. Remove them from the skillet and repeat with the rest of the batter. Adjust the heat if needed to ensure even cooking. To make the best three-ingredient banana oat pancakes, focus on the batter. You want it smooth and thick. If it's too runny, add a bit more oats. If too thick, add a splash more milk. This helps create a nice fluffy texture. Next, pay attention to the cooking temperature. Start at medium heat. If the pancakes brown too fast, lower the heat a bit. Cooking them slowly helps them cook through without burning. When it comes to flipping, wait for bubbles to form on the surface. This shows they are ready. Use a spatula to flip gently. If they break, don’t worry. Just press the batter back together and keep cooking. These pancakes shine with toppings. Slice fresh bananas on top for extra sweetness. A drizzle of honey or maple syrup adds more flavor. A sprinkle of cinnamon gives a warm touch. For a complete meal, pair these pancakes with yogurt or a side of berries. This adds protein and freshness. You can also serve with nuts for crunch and healthy fats. Enjoy your meal! Pro Tips Use Overripe Bananas: The riper the banana, the sweeter and more flavorful your pancakes will be. Look for bananas with brown spots for the best results. Adjust Consistency: If the batter is too thick, you can add a little more milk to reach your desired consistency. For thicker pancakes, reduce the milk slightly. Don't Overmix: Blend just until combined. Overmixing can lead to tough pancakes. A few lumps are okay! Keep Them Warm: To keep pancakes warm while you cook the rest, place them on a plate in a preheated oven at 200°F (93°C) until ready to serve. {{image_2}} You can make these banana oat pancakes even better. Adding spices can change the taste. Try mixing in a bit of cinnamon. It gives a warm flavor that pairs well with banana. You can also add a splash of vanilla extract for more sweetness. If you love chocolate, throw in some chocolate chips. They melt and add a rich taste. Nuts also work great. Chopped walnuts or pecans give a nice crunch. This adds texture and flavor to your pancakes. If you want to make these pancakes vegan, it's easy. You can use almond milk or oat milk instead of regular milk. This keeps the recipe plant-based and tasty. You can also skip the milk altogether. Just mash the banana well and use a bit of water to thin the batter. For gluten-free options, rolled oats can be a concern. Look for oats labeled gluten-free. This ensures no gluten contamination. These pancakes can fit into many diets while still being delicious. To keep your pancakes fresh, store them well. - Refrigeration guidelines: Place leftover pancakes in an airtight container. They last up to 3 days in the fridge. If you notice any moisture, use a paper towel to absorb it. This helps prevent sogginess. - Freezing for future meals: For longer storage, freeze the pancakes. Stack them with parchment paper in between. Then place the stack in a freezer-safe bag. They can stay good for up to 2 months. When you want to enjoy your pancakes again, reheating is simple. - Best methods for reheating pancakes: The microwave is quick and easy. Heat each pancake for about 20-30 seconds. If you want them warm and crispy, use a skillet. Heat them on medium for about 1-2 minutes on each side. This gives you that fresh-off-the-griddle taste! Can I make these pancakes without milk? Yes, you can! If you want to skip the milk, use water or a plant-based milk. The pancakes will still taste great. Just blend the banana and oats with your chosen liquid. How can I make the pancakes fluffier? To make fluffier pancakes, use an extra ripe banana. You can also add a spoonful of baking powder. This helps the pancakes rise and become light. What can I use instead of banana? If you don’t have bananas, try using applesauce or even pureed pumpkin. Both options work well and add natural sweetness to your pancakes. Are these pancakes suitable for a gluten-free diet? Yes, they can be gluten-free! Just make sure to use gluten-free rolled oats. These oats will keep your pancakes safe for those avoiding gluten. What is the calorie count for one serving? One serving of these pancakes has about 200 calories. This count can change based on your toppings or any added ingredients. This blog post covered a simple pancake recipe with just a banana, oats, and milk. You learned how to prepare, cook, and store these pancakes. Remember to adjust cooking times and explore flavors with spices or toppings for your taste. You can easily modify them for various diets, too. Enjoy fluffy pancakes any day by using the tips and tricks shared. Now, whip up these delicious pancakes and make breakfast fun!

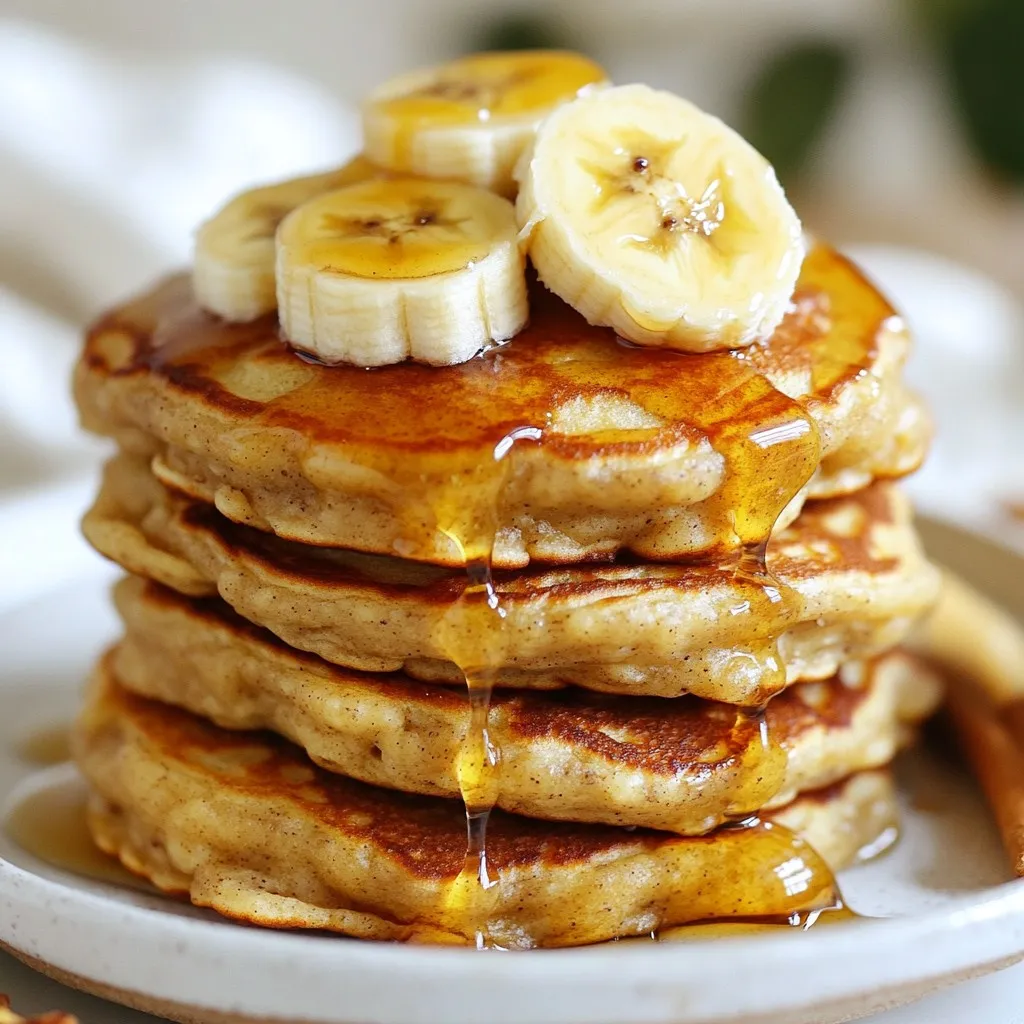
If you’re looking for a quick and tasty breakfast, try my three-ingredient banana oat pancakes! Just blend a large ripe banana, rolled oats, and milk. It’s simple, easy, and ready …

Read more

Categories Breakfast

Cinnamon Roll Protein Muffins Delicious and Easy Treat

January 5, 2026March 9, 2025 by Chef Owen
- 1 cup rolled oats - 1 cup vanilla protein powder - 1/2 cup Greek yogurt - 1/2 cup unsweetened applesauce - 1/4 cup maple syrup - 1/4 cup almond milk (or your preferred milk) - 2 large eggs - 1 teaspoon vanilla extract - 2 teaspoons baking powder - 2 teaspoons ground cinnamon - 1/4 teaspoon salt - 1/4 cup chopped pecans or walnuts (optional) - 1/4 cup raisins (optional) You can easily change these muffins to fit your taste. Add in chopped nuts for crunch. Pecans or walnuts work well. You can also toss in some raisins for a sweet bite. If you want more flavor, try adding a bit of nutmeg or cardamom. For a richer texture, swap out the almond milk for coconut milk. These muffins are a great mix of protein and carbs. Each muffin has about 150 calories. They also pack around 10 grams of protein. The oats give you fiber, which is good for your digestion. Greek yogurt adds calcium and helps keep you full. Plus, the natural sweetness from applesauce and maple syrup means you don’t need extra sugar. {{ingredient_image_2}} Start by preheating your oven to 350°F (175°C). This step is key for even baking. Next, grab a muffin tin and line it with paper liners. If you don’t have liners, lightly grease each cup. This helps the muffins come out easily after baking. In a large bowl, add these dry ingredients: - 1 cup rolled oats - 1 cup vanilla protein powder - 2 teaspoons baking powder - 2 teaspoons ground cinnamon - 1/4 teaspoon salt Stir them together well. Make sure there are no clumps. This mix gives your muffins their base flavor and texture. In another bowl, whisk together these wet ingredients: - 1/2 cup Greek yogurt - 1/2 cup unsweetened applesauce - 1/4 cup maple syrup - 1/4 cup almond milk - 2 large eggs - 1 teaspoon vanilla extract Mix until it’s smooth. Slowly pour this wet mix into the bowl with dry ingredients. Stir gently until just combined. If you want, fold in 1/4 cup of chopped nuts or raisins for extra crunch and sweetness. Using a spoon or a scoop, fill each muffin cup about two-thirds full with batter. This amount lets them rise without spilling over. Place the muffin tin in the oven and bake for 18-20 minutes. They are done when a toothpick comes out clean when poked in the center. Let them cool in the tin for about 5 minutes. After that, transfer them to a wire rack to finish cooling. This keeps them from getting soggy. To make the best cinnamon roll protein muffins, I have some tips for you. - Measure Carefully: Use dry measuring cups for oats and protein powder. Level them off with a knife. - Don’t Overmix: Mix the wet and dry ingredients just until combined. Overmixing makes muffins dense. - Use Fresh Ingredients: Check expiration dates on your baking powder and protein powder. Fresh ingredients yield better results. - Fill Cups Evenly: Fill each muffin cup about two-thirds full. This helps them rise nicely without overflowing. To keep your muffins fresh, here are some simple storage tips. - Cool Completely: Let the muffins cool on a wire rack before storing. This prevents sogginess. - Use an Airtight Container: Store muffins in an airtight container at room temperature. This keeps them soft for 2-3 days. - Refrigerate for Longer Life: If you need them to last longer, refrigerate them. They stay fresh for up to a week. When serving your muffins, presentation matters. Here are some ideas. - Serve Warm: Warm muffins taste better and smell amazing. - Add a Glaze: Drizzle a simple glaze of powdered sugar and almond milk on top. It adds sweetness and looks great. - Sprinkle Cinnamon: A pinch of cinnamon on top enhances flavor and adds a lovely touch. - Pair with Fruit: Serve with fresh fruit like slices of apple or berries for a balanced bite. Pro Tips Ingredient Substitutions: If you don't have Greek yogurt on hand, you can substitute it with cottage cheese for a similar texture and flavor. Protein Powder Choice: Use a high-quality vanilla protein powder to enhance the flavor of your muffins. Experiment with different brands to find your favorite! Storage Tips: Store any leftover muffins in an airtight container at room temperature for up to 3 days or in the refrigerator for up to a week. Serving Suggestions: Enjoy these muffins for breakfast or as a post-workout snack. They pair well with a dollop of Greek yogurt or a smear of almond butter! {{image_4}} You can change the flavor of your muffins by using different spices. Try nutmeg for a warm, cozy taste. Cardamom adds a sweet, floral note. Cloves bring a strong, spicy flavor. Each spice gives a new twist to the classic cinnamon roll taste. If you want to swap the protein powder, you can use other sources. Cottage cheese offers a creamy texture and more protein. Silken tofu is a great vegan option, blending smoothly into the batter. You can also use ground nuts or seeds for added protein and crunch. Adding healthy ingredients can make your muffins even better. Chia seeds boost fiber and omega-3s. Flaxseed meal adds healthy fats and nutrients. You can also fold in grated carrots or zucchini for extra veggies. These add flavor and moisture, making your muffins even more delicious. To keep your Cinnamon Roll Protein Muffins fresh, place them in an airtight container. This method locks in moisture and keeps them soft. You can store them at room temperature for up to three days. If you want to keep them longer, refrigeration is a good option. Just remember to wrap them well to avoid drying out. Freezing your muffins is simple and smart. First, allow the muffins to cool completely. Once cooled, you can wrap each muffin in plastic wrap. Place the wrapped muffins in a freezer bag or container. They will stay good in the freezer for up to three months. When you want one, just take it out and let it thaw. To enjoy your muffins warm, reheating is key. Use your oven for the best texture. Preheat it to 350°F (175°C). Place the muffin on a baking sheet and heat for about 5 to 10 minutes. This method keeps the muffin moist and soft. If you’re in a hurry, you can use the microwave too. Heat them for about 15 to 20 seconds. Just be careful not to overheat, or they may become dry. Enjoy them warm for the best taste! You can use plain yogurt or cottage cheese instead of Greek yogurt. Both will work well. If you want a dairy-free option, try silken tofu or dairy-free yogurt. These substitutes keep the muffins moist and tasty. Yes, you can easily make these muffins vegan. Replace the eggs with flax eggs. To make a flax egg, mix 1 tablespoon of ground flaxseed with 2.5 tablespoons of water. Let it sit for 5 minutes to gel. Also, use a plant-based yogurt instead of Greek yogurt. Check if the muffins are done by inserting a toothpick into the center. If it comes out clean, they are ready. You can also look for a golden-brown color on top and a firm texture. Absolutely! You can use any protein powder you like. Whey, casein, or plant-based options all work. Just keep in mind that different powders may change the flavor and texture a bit. Adjust the liquid if needed for the best result. You learned how to make tasty muffins with a simple recipe. We discussed key ingredients, step-by-step instructions, and useful tips. You also found ways to customize flavors and store muffins properly. Remember, practice makes perfect, so don’t hesitate to experiment! Healthy muffins can be fun and delicious. Enjoy your baking journey and share your creations!

Are you ready to enjoy a sweet treat that’s also healthy? These Cinnamon Roll Protein Muffins are not only delicious, but they’re super easy to make. Packed with protein and …

Read more

Categories Breakfast

Rotisserie Chicken Nachos Quick and Tasty Meal

January 4, 2026March 3, 2025 by Chef Owen
Making Rotisserie Chicken Nachos is simple. You only need a few key items to create this tasty dish. Here’s what you will need: - 2 cups rotisserie chicken, shredded - 1 bag tortilla chips (approximately 10-12 oz) - 1 cup shredded cheddar cheese - 1 cup black beans, drained and rinsed - 1 medium tomato, diced finely - 1 jalapeño, thinly sliced (optional) - 1/2 cup sour cream - 1/3 cup fresh cilantro, chopped - 1/4 cup green onions, sliced - 1/4 cup pickled jalapeños (optional) - 1 ripe avocado, diced - 1 tablespoon lime juice - Salt and pepper to taste These ingredients blend well together. The rotisserie chicken adds flavor and protein. The tortilla chips provide crunch. Black beans give extra texture. Fresh vegetables like tomatoes and avocados add freshness. Toppings like sour cream and cilantro enhance the taste. Feel free to adjust ingredients based on your preferences. Enjoy the mix of flavors in every bite! {{ingredient_image_2}} 1. Preheat your oven to 375°F (190°C). This step gets your oven hot and ready. 2. In a large bowl, mix the shredded rotisserie chicken with 1 tablespoon of lime juice. Add salt and pepper to taste. This adds flavor and brightness. 3. On a large baking sheet, spread out the tortilla chips in a single layer. Make sure there are no gaps. This helps the toppings stay put. 4. Evenly distribute the seasoned chicken over the chips. Cover as many chips as you can with chicken. 5. Sprinkle the drained black beans on top of the chicken. This adds texture and protein. 6. Next, add the diced tomatoes, jalapeño slices, and diced avocado. Arrange them nicely for a colorful look. 7. Finally, sprinkle the shredded cheddar cheese over everything. This is key for that melty, cheesy goodness. 1. Place the baking sheet in the preheated oven. Bake for about 10-15 minutes. Keep an eye on the cheese. 2. Look for cheese that is melted and bubbly with a slight golden hue. This means the nachos are ready. 3. Carefully take the nachos out of the oven. Let them cool for about a minute. This helps avoid burns when serving. 4. Top the nachos with dollops of sour cream. Add chopped cilantro, sliced green onions, and pickled jalapeños if you like extra heat. 5. Serve these nachos hot and cheesy for the best experience! Enjoy the burst of flavors and textures in every bite. To make your rotisserie chicken shine, try these seasoning ideas: - Cumin: Adds warmth and earthiness. - Paprika: Gives a slight smokiness. - Chili powder: Adds a nice kick. Mix these spices with lime juice for a vibrant boost! When it comes to cheese, you want melty goodness. Here are the best options: - Cheddar: Classic choice for that gooey texture. - Monterey Jack: Creamy and melts beautifully. - Pepper Jack: Adds spice and flavor. Presentation matters, even for nachos! Here are some serving suggestions: - Baking sheet: Serve right on the sheet for a fun vibe. - Large platter: Transfer for a more elegant look. To make your nachos pop, try these garnish ideas: - Extra cilantro: Adds fresh color and flavor. - Lime wedges: A bright touch that guests can squeeze on top. With these tips, your rotisserie chicken nachos will not only taste great but look amazing too! Pro Tips Use Fresh Ingredients: Opt for ripe avocados and fresh cilantro for the best flavor. Fresh ingredients enhance the overall taste and presentation of your nachos. Layering Technique: To prevent soggy chips, layer the toppings strategically. Start with cheese, then chicken, and finish with fresh toppings like tomatoes and cilantro. Customize Your Heat: Adjust the spiciness by varying the amount of jalapeños or adding hot sauce. This way, you can cater to different heat preferences. Serve Immediately: Nachos are best enjoyed fresh out of the oven. Serve them right away to keep the chips crispy and the cheese melty for the ultimate experience. {{image_4}} You can easily switch up the protein in your nachos. Instead of rotisserie chicken, try shredded beef or pulled pork. These meats add a new flavor and texture. For a lighter option, use shredded turkey. If you want a vegan or vegetarian version, replace the chicken with black beans or lentils. You can also use grilled veggies like peppers and zucchini. This keeps it hearty while being plant-based. Want some heat? Add diced jalapeños for a spicy kick. You can also sprinkle on some chili powder or cayenne pepper for an extra boost. For more fun toppings, consider fresh corn or olives. Pickled onions or a drizzle of hot sauce can also add flavor. Try different combinations to make your nachos unique! After enjoying your rotisserie chicken nachos, store any leftovers right away. You want to keep them fresh. First, let the nachos cool down to room temperature. Then, transfer them to an airtight container. This helps prevent sogginess. You can also wrap them tightly in plastic wrap. Storing them this way keeps them good for 2 to 3 days in the fridge. Just remember, the longer they sit, the softer the chips may get. When you're ready to enjoy your leftovers, reheating them properly is key. Preheat your oven to 350°F (175°C). Spread the nachos on a baking sheet in a single layer. This helps them heat evenly. Bake for about 10 minutes. This method keeps the chips crispy while melting the cheese once more. If you’re in a hurry, you can microwave them for 1-2 minutes. However, this may make the chips a bit chewy. For the best flavor and texture, the oven is your best bet. Enjoy your nacho goodness! Can I use store-bought nacho cheese? Yes, you can use store-bought nacho cheese for a quick option. Just warm it up and drizzle it over your nachos after baking. It adds a creamy texture and a cheesy flavor that many love. How can I make these nachos spicy? To make your nachos spicy, add more jalapeños. You can use fresh or pickled ones. You may also mix in some diced green chilies or sprinkle chili powder over the chicken. For extra heat, try adding hot sauce or spicy cheese. What are the best sides to serve with nachos? Some great sides for nachos include guacamole, salsa, or a fresh salad. You can also serve with a bowl of refried beans for added protein. These sides will balance the flavors and make your meal more filling. You have learned how to make tasty nachos using simple ingredients and steps. We covered everything from choosing the right toppings to baking tips. Remember to experiment with flavors and variations to make the dish your own. Proper storage and reheating keep your leftovers delicious. With this knowledge, you can serve great nachos anytime. Enjoy the fun of creating and sharing this snack!

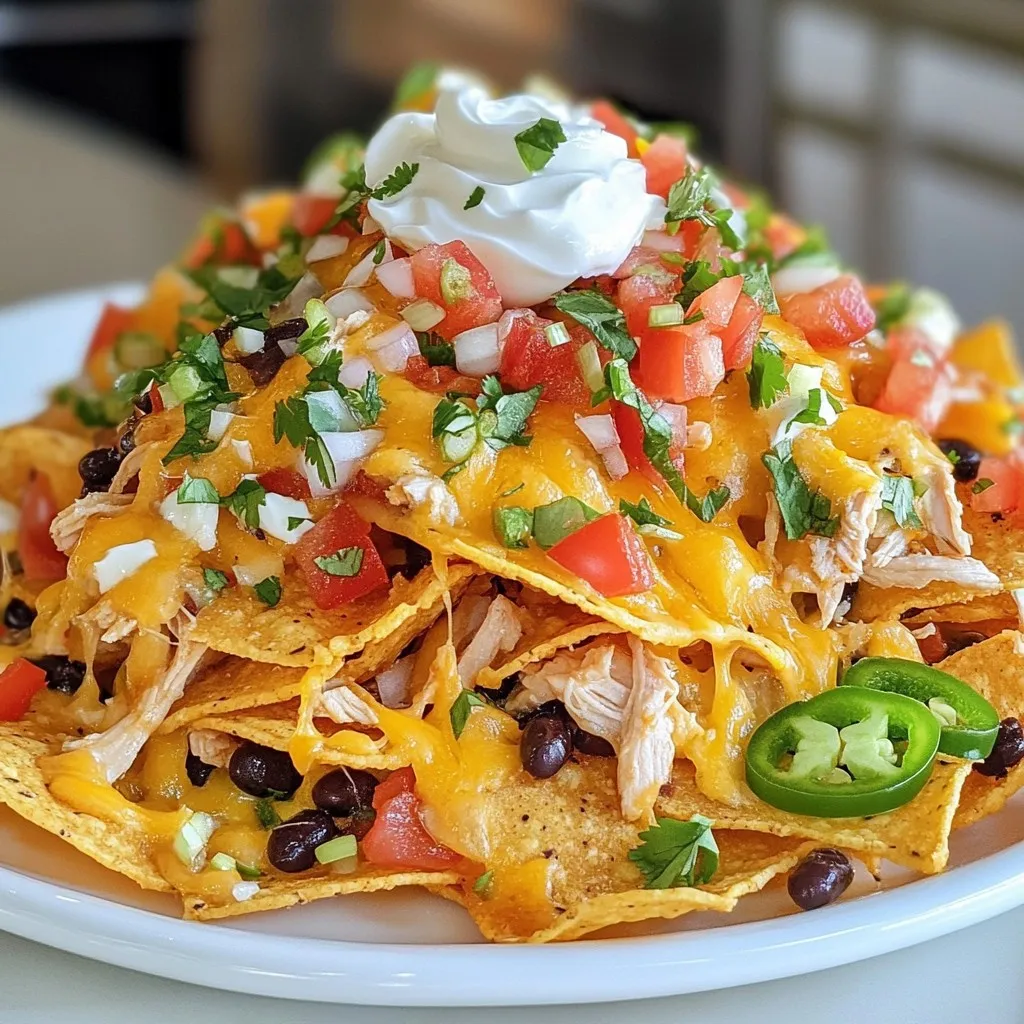
Looking for a quick meal that packs a punch? You’ve found it with rotisserie chicken nachos! This tasty dish uses simple ingredients and saves you time in the kitchen. With …

Read more

Categories Appetizers

Savory Chicken Alfredo Flatbread Easy and Flavorful Dish

January 5, 2026February 26, 2025 by Chef Owen
- Large flatbread (store-bought or homemade) - 1 cup cooked chicken breast, shredded - 1 cup creamy Alfredo sauce (store-bought or homemade) For this dish, you need a large flatbread. You can buy it or make your own at home. The flatbread holds all the tasty toppings. Next, use 1 cup of cooked chicken breast. Shredding it gives a nice texture. The star of this dish is 1 cup of creamy Alfredo sauce. You can either buy it or make your own from scratch. - 1 cup shredded mozzarella cheese - 1/2 cup finely grated Parmesan cheese For a cheesy delight, use 1 cup of shredded mozzarella cheese. It melts beautifully, creating that gooey texture we love. Add 1/2 cup of finely grated Parmesan cheese for a rich flavor. This mix of cheeses makes your flatbread extra special. - 1 cup fresh baby spinach leaves - Fresh basil leaves for a fragrant garnish Freshness is key! Use 1 cup of fresh baby spinach leaves. They add color and nutrients. Lastly, don’t forget the fresh basil leaves. These fragrant herbs make each bite burst with flavor and aroma. {{ingredient_image_2}} 1. Preheat your oven to 400°F (200°C). This hot oven helps the flatbread bake well. 2. Prepare a baking sheet by lining it with parchment paper. This makes cleanup easy. 1. Lay the flatbread flat on the baking sheet. Spread the creamy Alfredo sauce evenly on top. Leave a small edge for a nice crust. 2. Sprinkle the garlic powder and Italian seasoning blend over the sauce. This adds great flavor. 1. Distribute the shredded chicken evenly over the Alfredo layer. This way, every bite has chicken in it. 2. Carefully layer the fresh baby spinach leaves on top of the chicken. This adds a fresh touch. 3. Generously sprinkle the shredded mozzarella cheese over the flatbread. Follow this with the finely grated Parmesan cheese. Cover all the toppings with cheese. 4. Season the flatbread with a touch of salt and freshly cracked black pepper. This enhances all the flavors. 1. Place the baking sheet in the oven. Bake for 12-15 minutes. Look for melted, bubbly, and golden cheese. The edges should be crispy. 2. Once out of the oven, allow the flatbread to cool for about 1 minute. Slice it into generous portions. 3. For a lovely finish, garnish each slice with fresh basil leaves. This adds color and aroma. To ensure even cooking, keep your oven at 400°F (200°C). This high heat helps the cheese melt and the edges get crispy. Spread the Alfredo sauce evenly. Leave a small border for the crust. This helps the flatbread stay crisp. To keep the flatbread crispy, use parchment paper on your baking sheet. This prevents the bottom from getting soggy. Bake for 12-15 minutes until the cheese is bubbly and golden. If you want a homemade Alfredo sauce, you can use butter, cream, and Parmesan cheese. Blend them until smooth for a rich taste. For a lighter option, try using Greek yogurt with garlic and herbs. When it comes to chicken, you can use rotisserie chicken for quick prep. You can also swap it for turkey or even chickpeas for a plant-based option. Pair your Chicken Alfredo Flatbread with a fresh salad. A simple green salad with a light vinaigrette works well. You can also serve it with roasted veggies for added flavor. For presentation ideas, slice the flatbread into triangles. Arrange them on a colorful platter. Garnish with fresh basil leaves on top for a vibrant look. This adds both color and aroma to your dish. Pro Tips Tip Title: Use Fresh Ingredients: Fresh spinach and high-quality chicken will elevate the flavor of your flatbread and make it more delicious. Tip Title: Customize Your Cheese: Feel free to mix in other cheeses like provolone or gouda for a unique flavor twist. Tip Title: Monitor Baking Time: Keep an eye on the flatbread as it bakes to prevent burning, as ovens can vary. Tip Title: Add a Kick: For some heat, sprinkle red pepper flakes over the toppings before baking. {{image_4}} You can switch up the chicken to make this dish unique. Use grilled chicken for a smoky taste or rotisserie chicken for a quick option. If you want to try something different, consider turkey. It pairs well with Alfredo sauce too. For a vegetarian option, replace chicken with mushrooms or zucchini. Both add great texture and flavor. You can also use chickpeas for a protein boost. Boosting the flavor of your flatbread is easy. Add spices like smoked paprika or cayenne pepper for heat. Fresh herbs such as thyme or oregano can make it even better. Incorporating vegetables is another smart way to enhance flavor. Try bell peppers, cherry tomatoes, or even artichokes. Each adds color and taste to your flatbread. Don't feel limited to Alfredo sauce. Pesto makes a fresh and zesty base. It pairs nicely with chicken and cheese. Marinara sauce is another tasty choice, bringing a rich tomato flavor. If you enjoy heat, consider a spicy Alfredo. Mix in red pepper flakes or hot sauce for an exciting twist. Each sauce option offers a new take on this dish. To keep your Chicken Alfredo Flatbread fresh, store it in the fridge. Wrap it tightly in plastic wrap or place it in an airtight container. This method helps prevent it from drying out. You can also use a foil cover for added protection. The flatbread stays fresh for 3 to 4 days in the fridge. When it's time to eat your leftovers, you want them warm and tasty. To reheat without drying out, use the oven. Preheat it to 350°F (175°C). Place the flatbread on a baking sheet and cover it with foil. This keeps the moisture in. Bake for about 10-15 minutes until heated through. You can also use the microwave for a quick reheat. Place the flatbread on a microwave-safe plate. Heat it for 30 seconds at a time, checking after each interval. This method is faster but may dry out the flatbread if overheated. Enjoy your delicious dish again! Can I make Chicken Alfredo Flatbread ahead of time? Yes, you can prepare this dish in advance. Assemble the flatbread and cover it with plastic wrap. Store it in the fridge for up to 24 hours. When ready, bake it straight from the fridge. This helps keep the flavors fresh without much fuss. What can I use instead of flatbread? If you don’t have flatbread, use pita bread or naan. Both options work well and bring their own unique flavor. You can even use tortillas for a fun twist. Just remember to adjust the baking time if needed. Is this recipe gluten-free? The recipe is not gluten-free as it uses flatbread made from wheat. However, you can use a gluten-free flatbread or a cauliflower crust. This allows you to enjoy the same great taste without gluten. Can it be made dairy-free? Yes, you can make a dairy-free version. Use dairy-free Alfredo sauce, like those made from cashews or almond milk. Replace the cheeses with dairy-free options, too. This way, everyone can enjoy the dish. How to make it spicy? To add some heat, sprinkle red pepper flakes on top before baking. You can also mix diced jalapeños into the chicken for a fiery kick. Adjust the spice level to suit your taste. Best cheeses for extra flavor? For added flavor, try using gouda or cheddar cheese. These cheeses melt well and offer a nice depth. Blending different cheeses can create a rich and tasty flatbread that excites your palate. This blog post explored making a delicious Chicken Alfredo Flatbread. We covered the main ingredients, tips for preparation, and variations to suit your taste. Remember, you can customize this dish with different proteins or sauces. It’s fun to experiment! By following the steps, you'll enjoy a tasty and satisfying meal. Don't forget to try new ingredients or serve it with a side that complements the flavors. Now, get cooking and enjoy your creation!

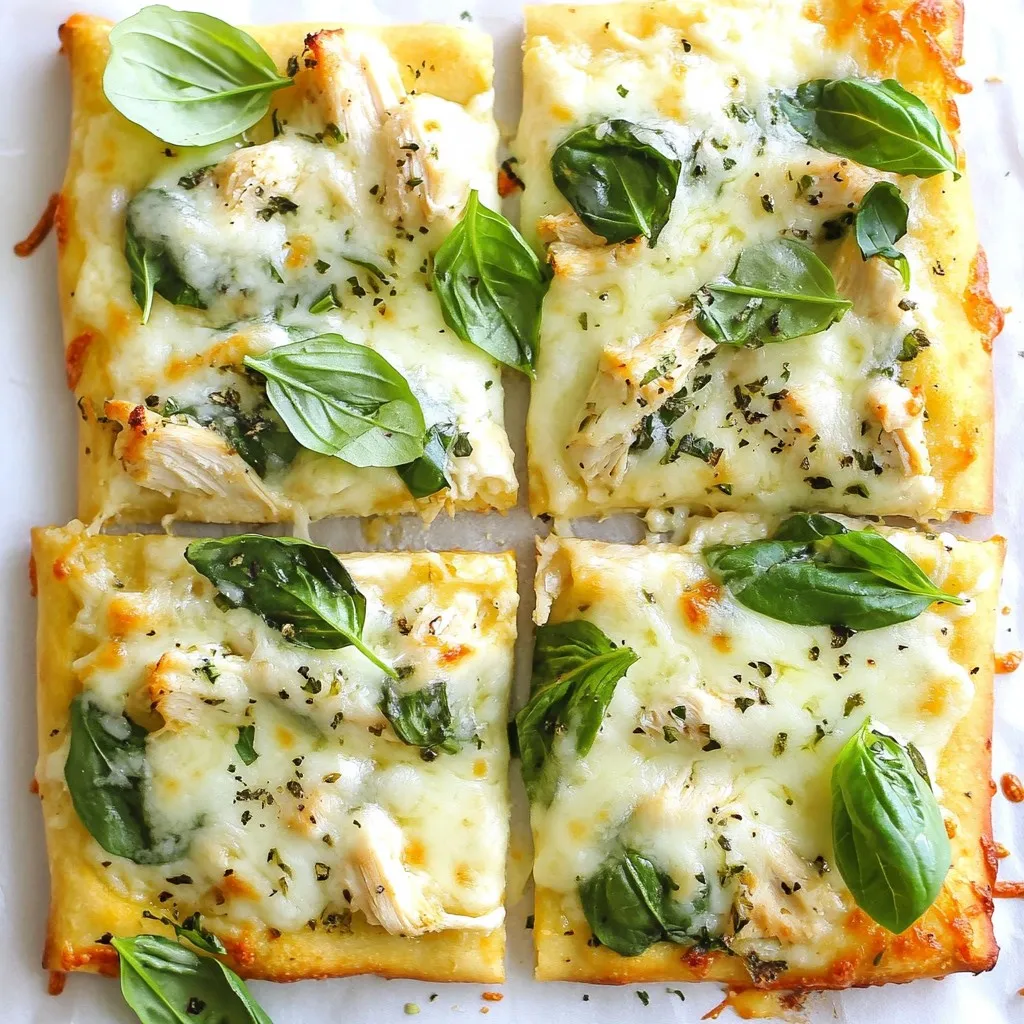
Get ready to enjoy a delightful meal with my Savory Chicken Alfredo Flatbread! This easy recipe blends creamy Alfredo sauce, tender chicken, and gooey cheese on a warm flatbread. Perfect …

Read more

Categories Dinner

Honey Garlic Salmon Bowls Simple and Healthy Recipe

January 5, 2026February 25, 2025 by Chef Owen
- 2 salmon fillets (approximately 6 oz each) - 3 tablespoons honey - 2 tablespoons soy sauce (or tamari for a gluten-free option) - 3 cloves garlic, finely minced - 1 teaspoon freshly grated ginger - 1 tablespoon olive oil - Salt and freshly cracked black pepper to taste The salmon is the star here. It brings flavor and healthy fats to the dish. The honey and soy sauce create a sweet and salty marinade. Garlic and ginger add depth. These ingredients combine to make the salmon delicious. - 2 cups cooked quinoa (white or tri-color for visual appeal) - 1 cup broccoli florets, steamed until bright green and tender - 1 cup shredded carrots (use a grater or food processor for ease) Quinoa is a great base. It is high in protein and fiber. You can use white or tri-color quinoa to add color. Broccoli adds crunch and nutrients. Shredded carrots give sweetness and a pop of orange. Together, they make the dish colorful and healthy. - ½ ripe avocado, thinly sliced - Sesame seeds, for garnishing - Chopped green onions (scallions), for garnishing Avocado adds creaminess and healthy fats. Sesame seeds give a nice crunch. Green onions add a fresh taste. You can also try other toppings like nuts or seeds for extra flavor. These garnishes make the bowls look pretty and taste even better. {{ingredient_image_2}} Preparation of the Marinade To make the marinade, mix three tablespoons of honey, two tablespoons of soy sauce, three minced garlic cloves, and one teaspoon of freshly grated ginger in a bowl. This mix gives the salmon a sweet and savory taste. Timing for Optimal Flavor Pat the salmon fillets dry with a paper towel. Add salt and pepper to both sides. Place the salmon in a shallow dish and cover it with the marinade. Let it sit for 15 to 20 minutes. This time helps the fish soak up all the flavors. Skillet Method Details Heat one tablespoon of olive oil in a non-stick skillet over medium heat. Once the oil is hot, add the salmon fillets, skin side down. Cook for about 4 to 5 minutes. Flip the fillets and cook for another 4 to 5 minutes. The salmon should easily flake with a fork when done. Tips for Perfectly Cooked Salmon Brush the salmon with leftover marinade in the last minute of cooking. This step adds more flavor and keeps it moist. Don’t overcook the salmon; it should be tender and juicy. Layering Ingredients While the salmon cooks, prepare the bowls. Start with a scoop of cooked quinoa as the base. Next, arrange steamed broccoli florets and shredded carrots around the quinoa. This will make each bowl colorful and healthy. Presentation Tips Carefully place a salmon fillet on top of the quinoa and veggies. It should look inviting. Add sliced avocado on top of the salmon. Finish with sesame seeds and chopped green onions for a fresh look. Preventing Overcooking To keep your salmon juicy, cook it on medium heat. I recommend checking it after 4-5 minutes on each side. Salmon is done when it flakes easily with a fork. If it looks too dry, it may be overcooked. Ensuring Even Cooking Make sure the salmon fillets are the same thickness. This helps them cook evenly. Also, let the salmon rest for a minute after cooking. This allows the juices to redistribute, making it even tastier. Adding Spice to the Marinade Want a kick? Add red pepper flakes or a pinch of cayenne to the marinade. This gives the dish a nice heat without overpowering the sweet honey flavor. Customizing with Different Sauces Feel free to experiment with sauces. Try teriyaki for a bold taste or a citrus-based sauce for a zesty twist. Each option brings a unique flavor profile to your bowls. Nutritional Benefits of Ingredients Salmon is rich in omega-3 fatty acids, which are great for heart health. Quinoa is a complete protein, packed with fiber. Broccoli and carrots add vitamins and minerals, making this dish nutrient-dense. Making it a Balanced Meal To create a balanced meal, include healthy fats and fiber. The avocado provides healthy fats, while quinoa offers fiber. This combination keeps you full and satisfied. Enjoy your meal knowing it’s good for your body! Pro Tips Marinate Longer for Depth: If time allows, marinate the salmon for up to 1 hour. This will enhance the flavors and keep the fish moist during cooking. Check for Freshness: When selecting salmon, look for firm, bright flesh with a fresh ocean scent. Avoid any fish that appears dull or has a strong fishy smell. Perfectly Cooked Salmon: To ensure your salmon is perfectly cooked, aim for an internal temperature of 145°F. This will give you tender, flaky fish without being dry. Customize Your Bowls: Feel free to add other vegetables or grains like bell peppers, edamame, or brown rice to diversify flavors and textures in your bowls. {{image_4}} You can switch salmon for chicken or tofu. Chicken thighs work well and stay juicy. Simply marinate the chicken in the same honey garlic mix. Cook it until it reaches 165°F. For a plant-based option, try tofu. Use firm or extra-firm tofu for the best texture. Press it to remove excess water, then marinate and cook it like salmon. If you love seafood, consider shrimp or scallops. Both cook quickly and soak up flavors well. Marinate them just like the salmon. Sauté shrimp for about 2-3 minutes per side. Cook scallops for 2-4 minutes until they turn golden brown. These options keep your meals fresh and fun. Instead of quinoa, you can use rice or couscous. Brown rice adds a nutty flavor and a chewy texture. Couscous cooks fast and gives a light, fluffy base. Adjust cooking time according to the grain you choose. You might explore farro, barley, or bulgur for added nutrition. These grains pack fiber and are filling. Cook them according to package directions. Mix and match grains to keep meals exciting and wholesome. Choose vegetables based on what is fresh and in season. In spring, use asparagus or snap peas. Summer brings zucchini and bell peppers. Fall is great for butternut squash and kale. Winter lets you enjoy hearty root veggies like carrots and parsnips. Don't toss leftover veggies! Chop and add them to your bowls. This reduces waste and boosts nutrition. Roasted or steamed vegetables can add great flavor and color. Be creative and use what you have on hand. It makes your meals unique and tasty. To keep your Honey Garlic Salmon Bowls fresh, follow these tips: - Refrigeration: Store the salmon in an airtight container. It stays good for up to 3 days. - Freezing: If you want to store it longer, freeze the salmon. Wrap it tightly in plastic wrap and foil. It can last up to 3 months in the freezer. - To Maintain Freshness: Keep the quinoa and veggies in separate containers. This keeps them fresh and prevents sogginess. When it's time to enjoy your leftovers, use these methods: - Microwave: Place the salmon on a microwave-safe plate. Heat for 30-second intervals until warm. - Skillet: Heat a small amount of oil in a skillet over medium heat. Add the salmon and cook for 2-3 minutes per side. - Ensuring Quality Upon Reheat: Always check the internal temperature. It should reach 145°F for safety and taste. Know how long you can store your dish. - How Long to Store: In the fridge, eat within 3 days. In the freezer, up to 3 months. - Signs of Spoilage: Look for a sour smell or any discoloration. If you see these signs, it’s best to throw it away. For the best flavor, I recommend marinating the salmon for 15-20 minutes. This time allows the salmon to absorb the honey garlic mixture well. If you marinate it longer, the fish might break down too much. Just enough time gives you a tasty and juicy result. Yes, you can use fresh garlic! Fresh garlic gives a stronger flavor compared to pre-minced garlic. If you use fresh cloves, you’ll want to chop them finely. This ensures they blend well in the marinade. I often prefer fresh garlic for its bold taste. I love to serve these bowls with healthy sides. Here are some ideas: - Steamed broccoli: Adds green color and nutrients. - Shredded carrots: They bring sweetness and crunch. - Cooked quinoa: It’s a great base for the bowls. - Sliced avocado: Adds creaminess and healthy fats. - Sesame seeds and green onions: They enhance the dish's look and flavor. These sides not only taste great but also make the meal balanced and colorful. This blog post covers how to make delicious Honey Garlic Salmon Bowls. You learned about the main ingredients, cooking steps, and tips to enhance flavor. I shared options for variation and storage. Try this recipe to impress anyone. It’s full of flavor and easy to make. You can customize it with your favorite vegetables or proteins. Enjoy these bowls as a healthy meal that everyone will love. Happy cooking!

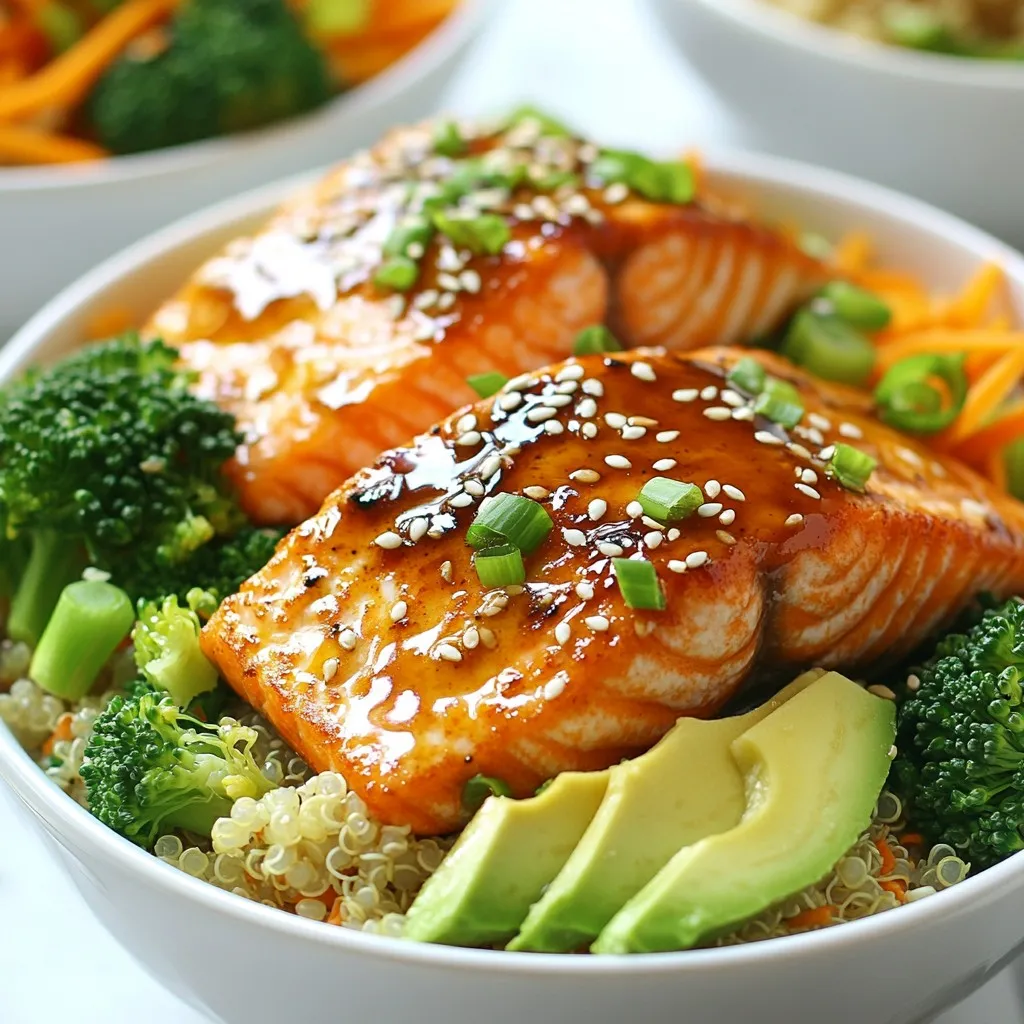
Are you ready to delight your taste buds with a simple and healthy recipe? Honey Garlic Salmon Bowls provide a delicious blend of flavors and nutrients that make dinner exciting. …

Read more

Categories Dinner

Five Minute Air Fryer Maple Chicken Delight Recipe

November 11, 2025February 25, 2025 by Chef Owen
To make the Five Minute Air Fryer Maple Chicken, you will need these simple ingredients: - 2 boneless chicken thighs - 2 tablespoons pure maple syrup - 1 teaspoon garlic powder - 1 teaspoon onion powder - 1/2 teaspoon smoked paprika - Salt and pepper to taste - Fresh parsley, chopped (for garnish) These ingredients create a sweet and savory flavor. The boneless chicken thighs are juicy and cook quickly. Maple syrup adds a sweet touch that pairs well with the spices. Garlic powder and onion powder give depth to the flavor. Smoked paprika adds a nice hint of smoke, enhancing the dish. Salt and pepper help to balance everything out. Finally, fresh parsley brings a pop of color and freshness. Gather these ingredients to start your cooking adventure. You can find most items at your local grocery store. Always choose high-quality maple syrup for the best flavor. This recipe is quick, tasty, and perfect for busy nights. Enjoy your cooking! {{ingredient_image_1}} First, you need to preheat your air fryer to 400°F (200°C). This takes about three minutes. Preheating is key. It helps the chicken cook evenly and stay juicy. A hot air fryer ensures a nice, crispy outside. In a small bowl, mix these ingredients: - 2 tablespoons pure maple syrup - 1 teaspoon garlic powder - 1 teaspoon onion powder - 1/2 teaspoon smoked paprika - Salt and pepper to taste Stir well until it’s smooth. This mix gives the chicken a sweet and savory flavor. Now, coat both sides of the chicken thighs with this marinade. Make sure every bit of chicken is covered well. This step is important for great taste. Place the marinated chicken in the air fryer basket. Lay them in a single layer for best results. Cook the chicken for 10 minutes. Flip it halfway through the cooking time. This helps it brown nicely on both sides. To check if the chicken is done, use a meat thermometer. The inside should reach 165°F (74°C). This ensures it is safe to eat. After cooking, let the chicken rest for two minutes before slicing. This keeps the juices in. Garnish with chopped fresh parsley for extra color. Enjoy your meal! To make your maple chicken shine, ensure maximum flavor absorption. Marinate the chicken well. Coat both sides with the marinade. Let it sit for a few minutes if you have time. This extra time helps the flavor soak in. Always check the internal temperature of the chicken. It should reach 165°F (74°C). Use a meat thermometer for accuracy. This step keeps your meal safe and tasty. Garnish your chicken with fresh parsley. This adds a nice color and freshness. You can also drizzle any leftover marinade on top. It enhances the flavor and looks great. Pair your maple chicken with vegetables or a salad. Steamed broccoli or a simple green salad works well. These sides add nutrition and balance to your meal. After cooking, clean the air fryer to keep it in good shape. Let it cool down first. Then, wipe the basket and the inside with a damp cloth. This helps remove any leftover bits. To prevent sticking next time, use a light spray of oil. This small step can make clean-up easier. Enjoy your cooking and keep your air fryer happy! Pro Tips Marinade Time: For even more flavor, let the chicken marinate for at least 30 minutes or up to overnight in the refrigerator. Internal Temperature: Always use a meat thermometer to ensure your chicken reaches an internal temperature of 165°F (74°C) for safe consumption. Resting Period: Allow the chicken to rest for a few minutes after cooking before slicing to retain its juices and flavor. Serving Suggestions: Pair with a refreshing side salad or steamed vegetables to create a balanced meal that complements the sweetness of the maple syrup. {{image_2}} You can use various cuts of chicken for this recipe. I recommend boneless chicken thighs for their juicy flavor. However, chicken breasts also work well. If you choose chicken tenders, reduce the cooking time slightly. This way, you will get tender chicken every time. Feel free to customize the flavors! You can add spices like cayenne pepper for heat or thyme for a fresh taste. Herbal flavors like rosemary or oregano can also enhance the dish. If you want to swap out maple syrup, honey or agave syrup are great alternatives. Each choice brings a new twist to the dish. While the air fryer is quick and easy, you can also cook this dish using an oven. Preheat your oven to 400°F (200°C). Place the marinated chicken on a baking sheet. Bake for about 20 minutes, flipping halfway through. If you prefer the stovetop, heat a skillet over medium heat. Cook the chicken for about 5-7 minutes on each side until fully cooked. Each method gives you delicious, juicy chicken! After you enjoy your Five Minute Air Fryer Maple Chicken, store any leftovers right away. Keep the chicken in the fridge. Use an airtight container to keep it fresh. You should eat the leftovers within three days for the best taste. When reheating, the air fryer works best. Set your air fryer to 350°F (175°C). Heat the chicken for about 5 minutes. This keeps it juicy and warm. To avoid dry chicken, don’t overcook it. Check it often to see if it’s ready. If you want to freeze the chicken, let it cool first. Wrap it tightly in plastic wrap. Then, place it in a freezer-safe bag or container. This helps prevent freezer burn. When you want to eat it, take it out. Thaw it in the fridge overnight before reheating. This keeps the chicken tender and tasty. Yes, you can use frozen chicken. Thaw the chicken first for best results. Place the frozen chicken in the fridge overnight to thaw. If you're short on time, use the cold water method. Seal the chicken in a bag and submerge it in cold water. Change the water every 30 minutes until thawed. This method usually takes 1-2 hours. To know if the chicken is done, check the internal temperature. Use a meat thermometer for accuracy. The chicken should reach 165°F (74°C). This ensures it's safe to eat. If you don't have a thermometer, cut into the chicken. It should be white with no pink inside. Juices should run clear. Maple chicken pairs well with many sides. Here are some tasty options: - Steamed vegetables like broccoli or green beans. - A fresh garden salad with mixed greens. - Mashed potatoes or sweet potato mash for comfort. - Rice or quinoa for a hearty meal. - Roasted Brussels sprouts for a crispy touch. These sides will complement the sweet and savory flavors of the chicken. Enjoy! This blog post shows how to make flavorful maple chicken in an air fryer. You learned about the ingredients, step-by-step cooking, and tips for perfecting the dish. I shared how to store leftovers and reheat them well. You can also explore variations with different chicken cuts and flavors. Enjoy your meal and impress friends and family! With simple steps, you can make this tasty recipe a regular at your table.

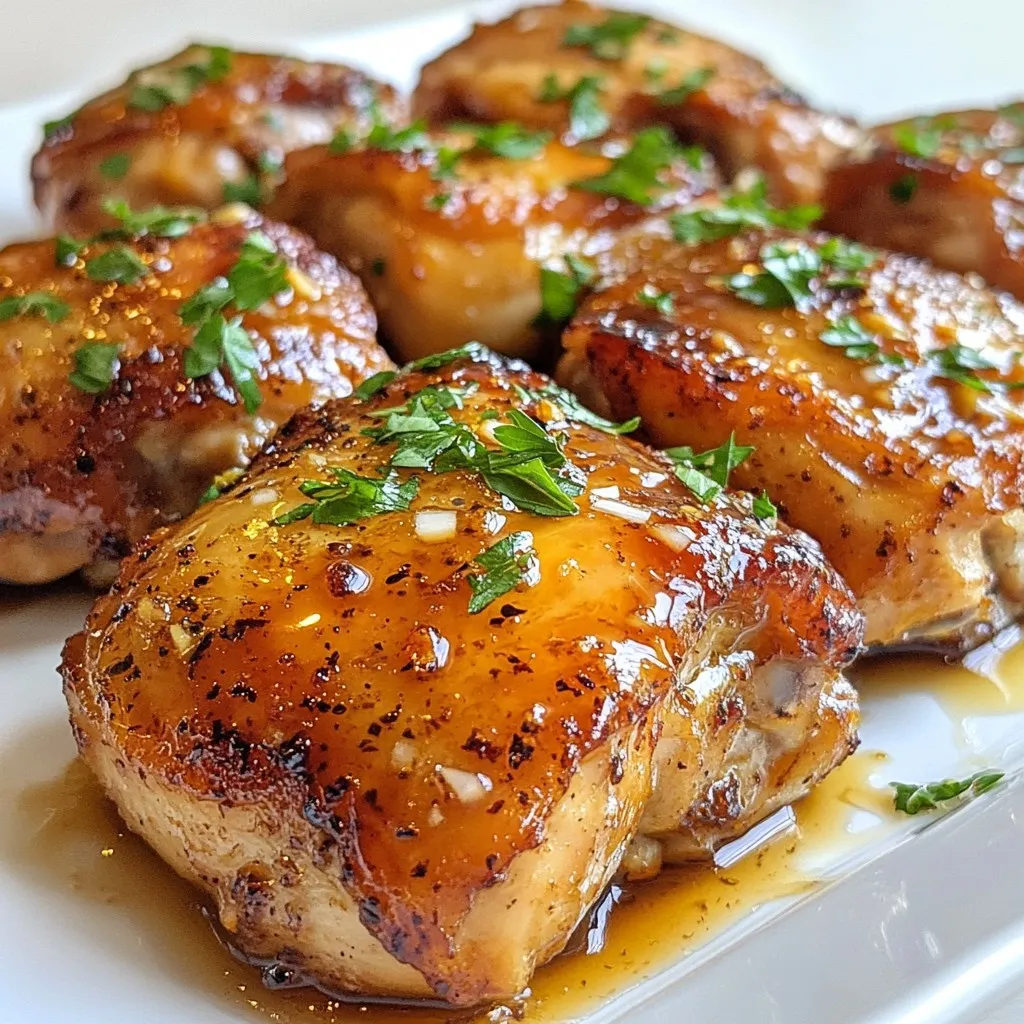
Are you ready to whip up a quick and tasty dinner? My Five Minute Air Fryer Maple Chicken Delight Recipe makes cooking easy and delicious! With just a few simple …

Read more

Categories Dinner

Cheesy Egg Toast Quick and Tasty Breakfast Dish

January 5, 2026February 21, 2025 by Chef Owen
To make cheesy egg toast, gather these simple ingredients. Each one adds flavor and texture to your dish. - 4 slices of whole grain bread - 4 large eggs - 1 cup shredded sharp cheddar cheese - 1/2 cup diced bell peppers (a mix of red, yellow, and green for vibrant color) - 1/4 cup finely chopped green onions - 1/4 teaspoon garlic powder - Sea salt and freshly ground black pepper, to taste - 2 tablespoons extra virgin olive oil - 1 tablespoon fresh parsley, finely chopped, for garnish These ingredients create a tasty blend of flavors. The whole grain bread gives a nice base. The eggs provide protein, while the cheddar cheese melts into gooey goodness. Bell peppers and green onions add crunch and color. Remember, fresh ingredients make the best meals! {{ingredient_image_2}} - Preheat oven to 375°F (190°C). - Heat a pan over medium heat. Add 1 tablespoon of olive oil. - Add 1/2 cup of diced bell peppers to the pan. - Sauté the peppers for about 3-4 minutes until tender and fragrant. - Take 4 slices of whole grain bread. - Use a spoon to make a small well in each slice. - Fill the wells with the sautéed bell peppers. - Crack 4 large eggs into a bowl. - Whisk the eggs until yolks and whites blend well. - Season with garlic powder, sea salt, and pepper. - Carefully pour the whisked eggs into each well. - Leave a little space near the edge to allow for cooking. - Sprinkle 1 cup of shredded cheddar cheese on top. - Drizzle a bit of olive oil on the toasts for added flavor. - Place the baking sheet in the oven. - Bake for 12-15 minutes until the egg sets and cheese melts. - After baking, remove the toasts from the oven. - Let them cool for a minute on the baking sheet. - Before serving, garnish with chopped green onions and parsley. You can make cheesy egg toast even better with different cheese types. Try mozzarella for a creamy melt. Feta adds a salty kick. Swiss cheese gives a nutty flavor. Each cheese adds a unique taste. Experimenting with spices also brings new flavors. A dash of paprika adds warmth. A pinch of cumin can add earthiness. Try fresh herbs like basil or chives for brightness. This simple change can elevate your dish. To achieve the perfect egg texture, keep a close eye on the cooking time. Bake until the egg is just set, not overcooked. The center should still be slightly soft. This will give you a nice, creamy bite. For crispier toast, use a thicker slice of bread. Whole grain works great for this. Drizzle olive oil on the bread before baking. You can also toast the bread for a few minutes first. This method adds extra crunch. When serving, use a rustic wooden board. This adds a cozy touch. Place the cheesy egg toasts in a circle on the board. Add colorful slices of avocado or cherry tomatoes around them. This not only looks great but also adds freshness. For creative plating, stack the toasts. Place one on top of the other. Garnish with parsley on top and around the plate. This simple touch makes your dish pop visually. Pro Tips Use Fresh Ingredients: Fresh bell peppers and eggs enhance the flavor and texture of your toasts. Choose organic eggs and seasonal veggies for the best taste. Experiment with Cheese: While sharp cheddar is delicious, try mixing in other cheeses like mozzarella or pepper jack for different flavor profiles. Perfectly Cooked Eggs: To achieve perfectly cooked eggs, monitor them closely while baking. Remove the toasts as soon as the eggs are set for a creamy texture. Add a Kick: For those who enjoy a bit of heat, sprinkle some red pepper flakes or add jalapeños to the sautéed peppers for an extra kick. {{image_4}} You can easily switch up the bread type. Try sourdough or rye for a new flavor. Want more protein? Add crispy bacon or diced ham. Both options give your cheesy egg toast a hearty boost. Herbs and spices can add depth. Fresh basil or thyme can elevate the taste. You might also add a pinch of paprika for a little heat. For veggies, consider spinach, mushrooms, or tomatoes. Each choice brings a unique twist to your dish. If you need gluten-free options, use gluten-free bread. It works well with the recipe. For vegan substitutes, you can try plant-based cheese and tofu instead of eggs. These swaps maintain a delightful taste while fitting your diet. To reheat cheesy egg toast, use an oven or toaster oven. Set it to 350°F (175°C). This method keeps the toast crisp. Avoid microwaving, as it makes the bread soggy. If you must use a microwave, heat it in short bursts. Check every 15 seconds to prevent overcooking. Store leftovers in the fridge within two hours of cooking. Place the toasts in an airtight container. You can also wrap them in plastic wrap. This keeps them fresh longer. For best results, eat the leftovers within two days. Yes, you can freeze cheesy egg toast! Wrap each piece in foil or plastic wrap. Place them in a freezer-safe bag. This prevents freezer burn. To reheat, bake directly from frozen. Increase the baking time to about 20-25 minutes. Enjoy your cheesy egg toast anytime! You can prepare cheesy egg toast in advance. First, make the toasts but do not bake them. Store the assembled toasts in the fridge for up to a day. When you’re ready to eat, just pop them in the oven. Bake them for about 15 minutes at 375°F (190°C). This keeps the bread fresh and the cheese melty. Yes, you can use egg substitutes. Silken tofu works well as a replacement. You can also try flaxseed meal mixed with water. Use 1 tablespoon of flaxseed with 2.5 tablespoons of water for one egg. Both options give a similar texture to the eggs, making your dish tasty. Cheesy egg toast goes great with many sides. You can serve it with fresh fruit like berries or sliced avocado. A light salad adds a nice crunch. You could also pair it with crispy bacon or sausage for a heartier meal. You can make cheesy egg toast on the stovetop. Use a pan with a lid. Toast the bread in the pan first. Add the peppers and egg mixture like in the oven method. Cover the pan and cook on low heat until the eggs set. This gives you a similar dish without baking. Each serving of cheesy egg toast has about 300 calories. It includes 15 grams of protein and 20 grams of fat. You also get about 30 grams of carbs and 3 grams of fiber. These numbers can change based on your ingredient choices. This blog post shared a simple, tasty way to make cheesy egg toast. We went through every step, from the ingredients to creative tips. You learned how to customize it and store leftovers. Try different cheeses and flavors to keep it fresh and fun. Remember, cooking is all about experimenting. Enjoy making your own version of this dish!

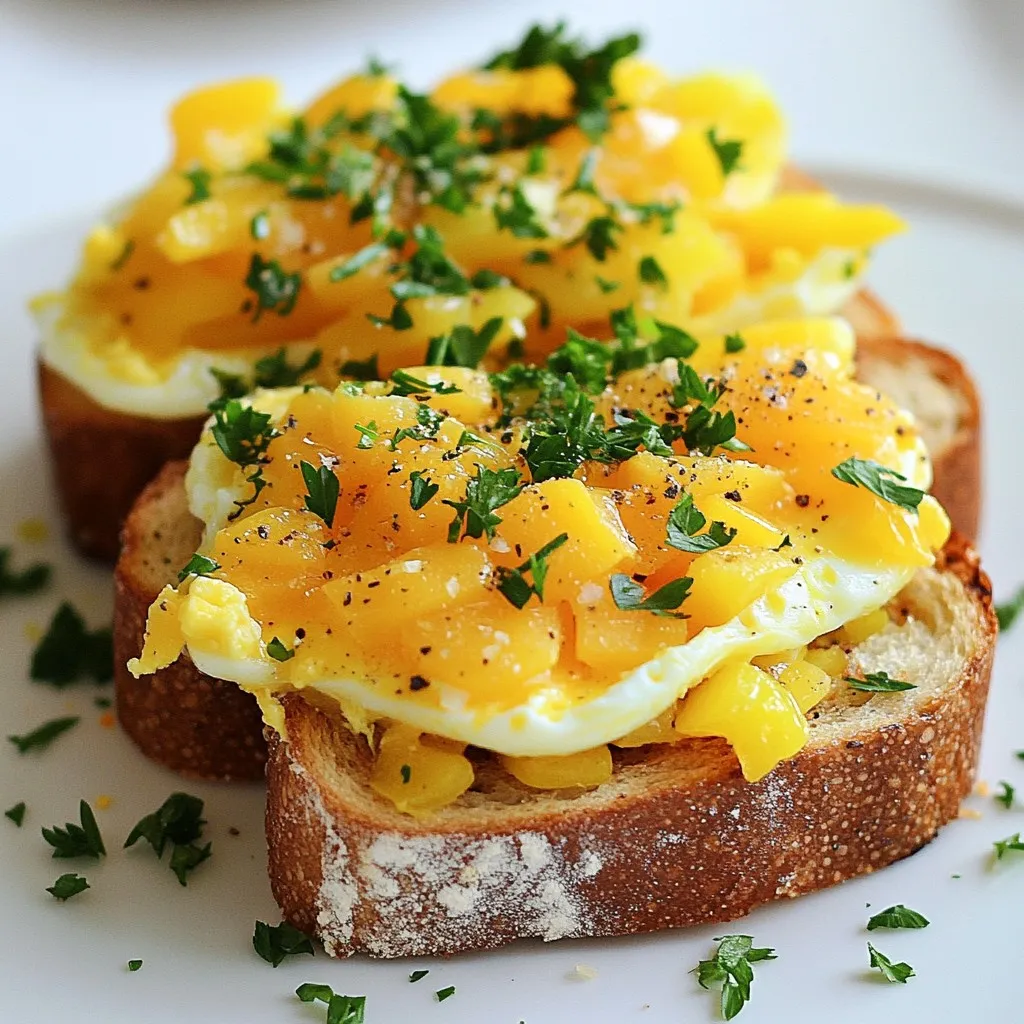
Looking for a quick and tasty breakfast idea? Cheesy Egg Toast is your answer! This delightful dish combines crispy bread, fluffy eggs, and melted cheddar cheese for a meal that’s …

Read more

Categories Breakfast
Older posts
Newer posts
← Previous Page1 … Page121 Page122 Page123 … Page125 Next →

THE RECIPE HATCH

Where tasty ideas take flight! 🚀🐣 Fresh, easy recipes hatched daily to make cooking simple and flavorful.

PAGES

Home About Contact Privacy Policy Terms & Conditions Cookie Policy GDPR Policy Copyright Policy Disclaimer

CATEGORIES

Appetizers Desserts Salads Breakfast Dinner

Contact

  • Pinterest
  • Mail
Copyright © 2026 The Recipe Hatch. All rights reserved.