Meaty Texas Trash Dip Savory and Easy Crowd Pleaser
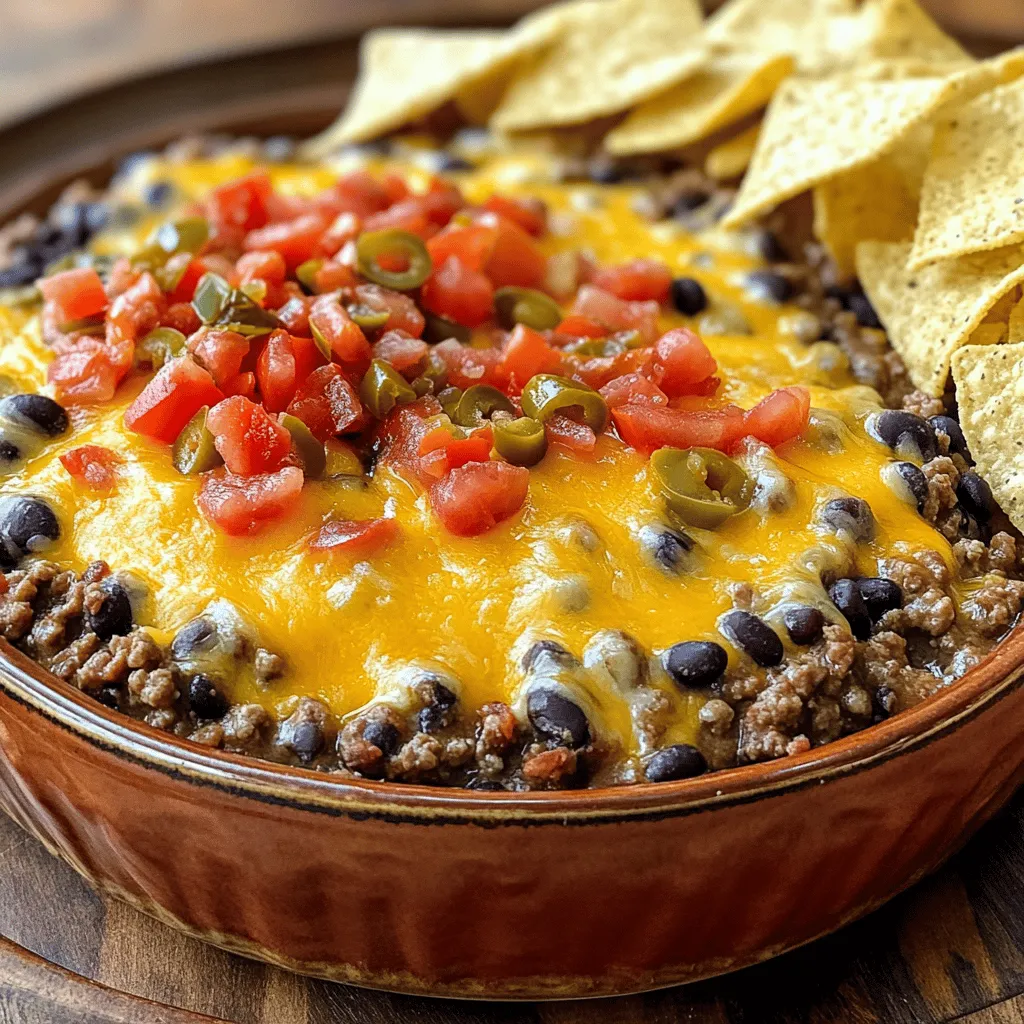
If you’re searching for the ultimate crowd-pleaser, look no further than Meaty Texas Trash Dip. This savory, cheesy dip combines rich flavors and easy-to-find ingredients. Perfect for game day or …

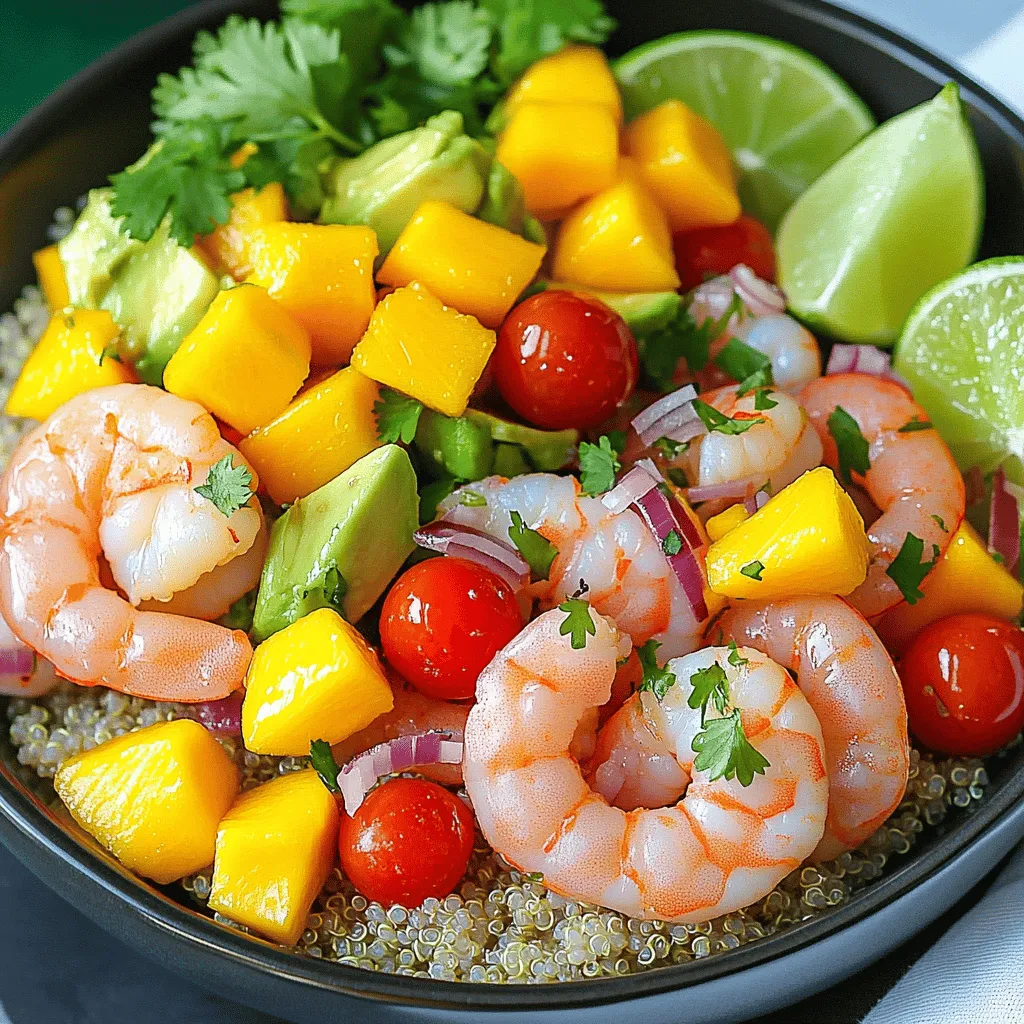
![To make a tasty High Protein BBQ Chicken Salad, you need fresh and healthy ingredients. Here’s what you will need: - 2 cups cooked chicken breast, shredded - 1 cup cooked quinoa - 1 cup cherry tomatoes, halved - 1 cup corn (fresh, frozen, or canned) - 1 avocado, diced - ½ red onion, finely chopped - ½ cup black beans, rinsed and drained - ½ cup BBQ sauce (choose a low-sugar variety for a healthier option) - 2 tablespoons lime juice - ¼ cup cilantro, chopped - Salt and pepper to taste - Optional: Crispy tortilla strips for garnish These ingredients blend well to give you a filling meal that is rich in protein. The shredded chicken adds lean protein, while quinoa offers a complete protein source. The beans and corn also boost protein content and add fiber. If you have allergies or want to change things up, you can easily swap some ingredients: - Instead of chicken, try shredded turkey or grilled tofu for a vegetarian option. - If you don’t like quinoa, you can use brown rice or farro. - For a different taste, substitute cherry tomatoes with diced bell peppers. - Swap lime juice with lemon juice if you prefer a different citrus flavor. - Use any beans you have on hand, like kidney beans or chickpeas. These substitutions keep the salad enjoyable and nutritious. This salad is not just tasty; it packs a protein punch. Here’s the breakdown: - Protein Content: Approximately 30 grams per serving. - Calories: Around 400 calories per serving, depending on portion sizes. - Fats: Healthy fats from the avocado and beans. - Fiber: A good source of fiber, thanks to the beans and quinoa. This High Protein BBQ Chicken Salad is perfect for a quick lunch or dinner. You get a balanced meal that fuels your body while being easy to prepare. For the complete recipe, check out the [Full Recipe]. Start by gathering your ingredients. You will need cooked chicken, quinoa, tomatoes, corn, avocado, onion, and black beans. In a large mixing bowl, add the shredded chicken. Next, add the cooked quinoa. Toss in the halved cherry tomatoes and corn. Then, add the diced avocado, finely chopped red onion, and rinsed black beans. Mix everything well. It should look colorful and fresh. In a separate small bowl, mix the BBQ sauce and lime juice. Use a whisk to blend them together. This sauce adds flavor and moisture to your salad. Make sure it's well combined. It should have a nice, smooth texture. You can choose a low-sugar BBQ sauce for a healthier dish. This choice helps keep your meal light and tasty. Pour the BBQ sauce over the chicken and vegetable mix. Gently toss the ingredients to coat them evenly. Add salt and pepper to taste. Don’t forget to fold in the chopped cilantro for extra flavor. Let the salad sit for about 10 minutes. This waiting time helps the flavors mix well. Serve the salad in bowls or on a large platter. For some crunch, add crispy tortilla strips on top. This gives your dish a fun twist! For the full recipe, check out the details above. Cooking chicken breast can be tricky. Start with fresh or thawed chicken. You want it to be juicy, not dry. Here’s my method: - Brine the chicken: Soak the chicken in saltwater for 30 minutes. This helps to keep it moist. - Use medium heat: Cook on medium heat in a skillet. This prevents burning while keeping it tender. - Check the temperature: Use a meat thermometer. Chicken should reach 165°F (75°C) for safe eating. - Rest the chicken: Let it sit for 5 minutes before shredding. This step locks in moisture. Following these steps will give you perfect chicken for your BBQ salad. This salad is all about you! Feel free to mix it up. Here are some ideas: - Add different veggies: Try bell peppers, cucumbers, or radishes for crunch. - Change the protein: Swap chicken for turkey, shrimp, or even tofu for a veggie twist. - Experiment with grains: Substitute quinoa with brown rice or farro for a different texture. - Include fruits: Add diced apples or peaches for a sweet touch. Customizing your salad makes it fun and unique to your taste. Dressing is key to flavor. Here’s how to make it shine: - Dress it at the right time: Add dressing just before serving. This keeps your salad crisp. - Use a light hand: Start with a small amount of dressing. You can always add more if needed. - Mix well: Toss the salad gently to coat all ingredients without crushing them. - Taste before serving: Make sure it’s just right. Adjust seasoning as needed. These tips will help you create a salad that bursts with flavor and freshness. For the complete recipe, check the [Full Recipe]. {{image_2}} You can switch up the protein in this salad for variety. Tofu is a great choice for a plant-based option. It soaks up flavors well. Just make sure to press the tofu first to remove excess water. Shrimp is another tasty alternative. Cook shrimp quickly in a pan until they turn pink. Each option keeps the salad high in protein while adding unique flavors. While I love using romaine lettuce, you can try other greens too. Spinach adds a mild flavor and great nutrients. Arugula brings a peppery kick that pairs well with BBQ. Kale is hearty and adds a nice crunch. Use any mix of greens you like. This keeps your salad exciting and fresh. You can enhance the flavor of your BBQ chicken salad easily. Try adding diced bell peppers for a sweet crunch. Jalapeños can spice things up if you like heat. For a creamy texture, add Greek yogurt or a dollop of sour cream. Nuts and seeds, like sunflower seeds or walnuts, add crunch and healthy fats. These simple tweaks can make your meal even more delicious. For the full recipe, check the High Protein BBQ Chicken Salad. To store leftovers, first let the salad cool. Use a clean, airtight container. Make sure to keep the BBQ chicken salad in the fridge. It stays fresh longer when sealed well. Avoid leaving it out for more than two hours. This helps keep it safe to eat later. When you’re ready to eat, you can reheat the chicken. Place it in a microwave-safe bowl. Heat it in short bursts, around 30 seconds. Stir in between to heat evenly. You can also warm it in a pan over low heat. Add a splash of water to keep it moist. The cooked chicken lasts about three to four days in the fridge. Quinoa can stay fresh for about a week. Fresh veggies like tomatoes and avocado are best eaten within two days. Black beans and corn can last up to five days if stored properly. Always check for signs of spoilage before eating. Yes, you can make this salad ahead of time. It stays fresh in the fridge for up to three days. Just keep the dressing separate until you are ready to eat. This keeps the salad crisp and tasty. If you don’t have quinoa, you can use brown rice or farro. Both add a nice texture and flavor. You can also try using couscous for a quicker option. Each choice brings its own taste but keeps the salad filling. Absolutely! This salad is great for meal prep. You can pack it in containers for easy lunches or dinners. Just remember to store the dressing separately. This way, your salad stays fresh and crunchy all week. For the full recipe, check the earlier sections. This blog covered everything you need for a tasty BBQ chicken salad. We explored key ingredients, substitutions, and nutritional benefits. Then, I provided step-by-step instructions for making your salad. You learned tips for cooking chicken, customizing flavors, and storing leftovers. There are also great variations for proteins and greens. Enjoy making this salad. Try it your way and have fun! Your meals can be healthy and delicious.](https://therecipehatch.com/wp-content/uploads/2025/05/0089c607-79c1-4b32-8ba6-4b0a08c0ce76.webp)


![To make Cheesy Penne with Garlic Butter Beef, gather these ingredients: - 2 cups penne pasta - 1 pound ground beef - 4 tablespoons unsalted butter - 4 cloves garlic, minced - 1 medium onion, finely chopped - 1 teaspoon dried oregano - 1 teaspoon dried basil - 1 cup beef broth - 1 cup heavy cream - 2 cups shredded mozzarella cheese - 1/2 cup grated Parmesan cheese - Salt and pepper to taste - Fresh parsley for garnish Choosing the right ingredients makes a big difference. Here are some tips to help you: - Pasta: Look for high-quality penne. Whole wheat options add fiber. - Beef: Choose fresh, lean ground beef. It will taste better and be healthier. - Butter: Use unsalted butter for better control of salt in your dish. - Garlic: Fresh garlic gives a strong, vibrant taste. Avoid pre-minced garlic. - Cheese: Use fresh mozzarella and Parmesan for the best melt and flavor. - Herbs: Fresh herbs can elevate the dish. If using dried, check for freshness. You can easily make swaps to fit your needs: - Pasta: Use gluten-free penne for a gluten-free option. - Beef: Ground turkey or chicken works well for a lighter meal. - Dairy-Free: Substitute heavy cream with coconut cream or cashew cream. - Cheese: Use vegan cheese if you want a dairy-free version. - Herbs: Fresh or dried herbs can be mixed. Adjust to your taste. For the full recipe, refer to the section above. First, fill a large pot with water. Add a good pinch of salt to it. Bring the water to a boil over high heat. Once boiling, add 2 cups of penne pasta. Cook the penne according to the package instructions until it is al dente. This usually takes about 8 to 10 minutes. After cooking, drain the pasta. Set it aside for later. In a large skillet, melt 2 tablespoons of unsalted butter over medium heat. Add 1 medium onion that you have chopped finely. Sauté the onion until it turns translucent, which takes about 3 to 4 minutes. Then, add 4 cloves of minced garlic and cook for another minute. Next, increase the heat to medium-high. Add 1 pound of ground beef to the skilled. Cook the beef until it is browned and no longer pink, about 5 to 7 minutes. Season it with 1 teaspoon of dried oregano, 1 teaspoon of dried basil, salt, and pepper to taste. Now, pour in 1 cup of beef broth and 1 cup of heavy cream. Stir everything together well. Bring this mixture to a gentle simmer. Let it cook for about 5 minutes. This helps the sauce thicken a bit. Once it is ready, lower the heat. Add the cooked penne pasta to the skillet. Stir in 2 cups of shredded mozzarella cheese and 1/2 cup of grated Parmesan cheese. Mix until the cheese melts and the pasta is creamy. In a separate small skillet, melt the remaining 2 tablespoons of butter over low heat. Add a bit more minced garlic and let it bubble for 1 to 2 minutes. Be careful not to burn it. Drizzle this garlic butter over the penne mixture. Gently combine it all together. Remove the skillet from heat. Garnish with fresh parsley and more cheese if you like. Serve your cheesy penne warm and enjoy! For the complete recipe, check out [Full Recipe]. To cook penne pasta just right, use a big pot. Fill it with water and add salt. Bring the water to a boil, then add the penne. Stir it often. Cook until it's al dente, about 9 to 11 minutes. Check the package for exact times. Drain the pasta, but save some cooking water. It helps make the sauce smooth later. Garlic butter brings big flavor to your dish. Start by melting butter in a small pan over low heat. Add minced garlic and cook for 1-2 minutes. Keep an eye on it so it doesn't burn. Once it’s ready, drizzle this garlic butter over the penne mixture. This step makes each bite tasty and rich. There are a few easy mistakes to watch for. Don't overcook the pasta; it should have a slight bite. Also, avoid skipping the garlic butter. It adds a key flavor. Lastly, don’t forget to taste your sauce. Adjust salt and pepper as needed. These small steps can make a big difference in your dish. For the complete recipe, check the Full Recipe section. {{image_2}} You can boost this dish with vegetables. Adding veggies makes it colorful and healthy. Try spinach, mushrooms, or bell peppers. - Add 1 cup of fresh spinach for extra greens. - Sauté 1 cup of sliced mushrooms with the onion. - Mix in 1 cup of diced bell peppers for crunch. These veggies cook quickly and blend well with the cheesy penne. They also add flavor and texture. If you want to switch up the protein, you have great choices. Ground turkey or chicken works well instead of beef. - Use 1 pound of ground turkey for a leaner meal. - Swap the beef for 1 pound of cooked sausage for a spicy kick. You can also try shrimp or tofu for a seafood or vegetarian twist. Just adjust the cooking time as needed. For those who love heat, you can spice things up. Adding chili flakes or jalapeños makes it exciting. - Mix in 1 teaspoon of red pepper flakes when cooking the beef. - Add diced jalapeños to the sauce for a bold flavor. These spicy add-ons create a fun twist on the classic recipe. You can enjoy your Cheesy Penne with Garlic Butter Beef in a whole new way. For the full recipe, check out the earlier section. Store any leftover cheesy penne in an airtight container. Let it cool to room temperature first. This helps keep the flavor fresh. Place it in the fridge. It will stay good for about three to four days. Make sure to label the container. This way, you know when to eat it! To reheat, use a skillet over low heat. Add a splash of beef broth or cream for moisture. Stir often to heat evenly. This keeps the dish creamy and tasty. You can also use the microwave. Place it in a bowl, cover it, and heat in short bursts. Stir in between to avoid hot spots. You can freeze cheesy penne for longer storage. Use a freezer-safe container. Make sure to leave some space at the top for expansion. It can last for up to three months in the freezer. When ready to eat, thaw it in the fridge overnight. Reheat it gently, and enjoy! Check the [Full Recipe] for more tips. It takes about 30 minutes to make Cheesy Penne with Garlic Butter Beef. You spend 10 minutes prepping and 20 minutes cooking. It’s quick and easy, perfect for a busy night. Yes, you can make this dish ahead of time. Cook the penne and beef, then store them separately. When you are ready to eat, reheat and combine them. This keeps everything fresh and tasty. You can serve this dish with a simple green salad or garlic bread. A side of steamed vegetables also works well. These options add color and balance to your meal. This recipe blends Italian and American flavors. Penne pasta is popular in Italy, while garlic butter beef adds a savory twist. It’s a tasty fusion that many home cooks love. For the full recipe, check out the details above. This blog post showed you how to make Cheesy Penne with Garlic Butter Beef. We covered key ingredients and tips for choosing the best ones. I shared step-by-step instructions for cooking the dish, along with tips for success. You learned variations to suit your taste and how to store leftovers. In closing, enjoy making this dish your own. With the right tips and ingredients, you can create a tasty meal everyone will love.](https://therecipehatch.com/wp-content/uploads/2025/05/82b52eb8-792c-4afb-aca7-8f0a4ac3d78a.webp)
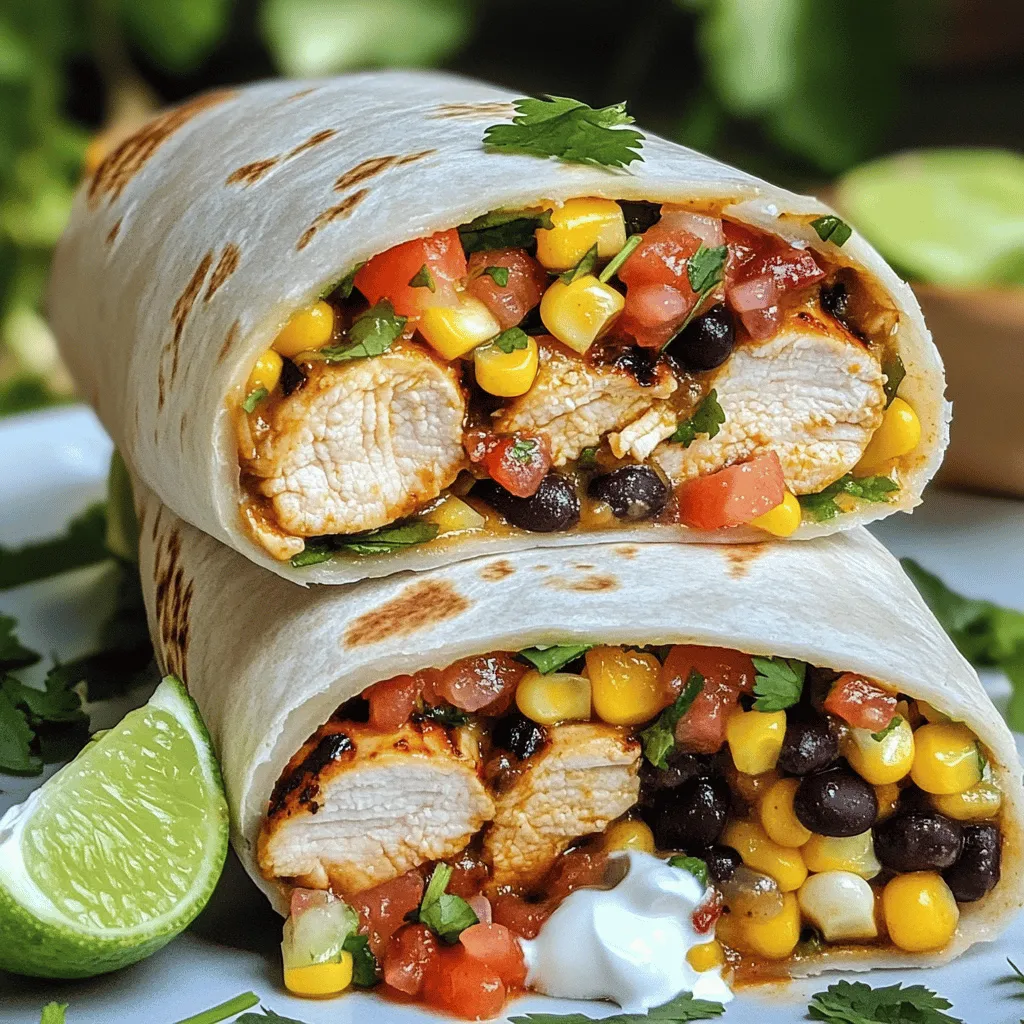
![To make a tasty grilled cheese burrito, gather these main ingredients: - 2 large flour tortillas - 1 cup shredded sharp cheddar cheese - 1 cup shredded Monterey Jack cheese - 1 large avocado, sliced - 1 small jalapeño, sliced (for heat) - 1/2 cup black beans, drained and rinsed - 1/2 cup fresh baby spinach - 2 tablespoons butter - Salt and pepper to taste These ingredients create a creamy and crunchy dish. The combination of cheddar and Monterey Jack gives a great melt. The avocado adds creaminess, while the spinach brings freshness. Want to kick it up a notch? Consider these optional ingredients: - Chopped cilantro for brightness - Sliced tomatoes for added juiciness - A sprinkle of cumin for warmth - A drizzle of hot sauce for spice These extra flavors can make your burrito even more exciting. Mix and match to find your favorite combination. To create your grilled cheese burrito, you will need a few simple tools: - A non-stick skillet - A mixing bowl - A spatula for flipping - A sharp knife for slicing - A cutting board for prep Having the right tools makes cooking easier and more fun. With these items, you’ll be ready to assemble and cook your delicious burrito. For the full recipe, check out the Grilled Cheese Burrito section! To start, I combine the cheeses in a bowl. I use one cup of sharp cheddar and one cup of Monterey Jack. This mix creates a creamy, rich filling. You can adjust the amount based on your taste. If you want more cheese, go for it! Next, I lay out a large flour tortilla on a clean surface. I spread the cheese mixture on one half of the tortilla. You want to cover it well. Then, I add slices of avocado, jalapeño, black beans, and fresh spinach on top. A pinch of salt and pepper adds flavor. Finally, I fold the tortilla in half, making a half-moon shape. Now it’s time to cook! I heat a non-stick skillet over medium heat. I melt one tablespoon of butter in the skillet. Once it’s hot, I place the folded burrito in the pan. I let it cook for 3-4 minutes until golden and crispy. Then, I flip it carefully. I add the other tablespoon of butter and cook for another 3-4 minutes. This gives it a crunchy crust. I know it’s done when the cheese melts inside. You can check out the Full Recipe for all details. To get that gooey, melty cheese, use a mix of sharp cheddar and Monterey Jack. These cheeses melt well together. Make sure you spread the cheese evenly on the tortilla. This helps it melt perfectly. Heat your skillet over medium heat to avoid burning. Cooking too fast can lead to a crispy outside and unmelted cheese inside. Add layers of flavor with fresh ingredients. Sliced avocado adds creaminess, while jalapeños give heat. Black beans add a nice texture and protein. Don’t forget to season with salt and pepper. This simple step can enhance all the flavors in your burrito. You can also try adding a sprinkle of taco seasoning to the filling for a fun twist. One common mistake is overfilling the burrito. Too much filling can lead to messy cooking. Make sure to fold the tortilla tightly. This keeps everything inside during cooking. Another mistake is cooking on too high heat. This can burn the outside before the cheese melts. Always check the heat and flip carefully to avoid spills. Follow these tips to make your Grilled Cheese Burrito a hit! For the full recipe, check out the [Full Recipe]. {{image_2}} For a tasty vegetarian option, use fresh veggies. You can add bell peppers, mushrooms, or zucchini. These will add great flavor and texture. Swap the black beans for pinto beans or lentils for variety. You can also try adding corn for sweetness. Top it all with some fresh cilantro for a bright finish. If you love meat, you can pack your burrito with protein. Consider adding cooked chicken, ground beef, or pulled pork. These meats pair well with the cheese and beans. You can even mix in some crispy bacon for extra crunch. Don’t forget to season your meat with spices for extra flavor. Want to spice things up? Add sliced jalapeños or a drizzle of hot sauce. You can also try chipotle sauce for a smoky kick. For a gourmet twist, use truffle oil or aioli. These toppings will elevate your burrito to a whole new level. Try serving it with a side of salsa or guacamole. Explore these variations to make your grilled cheese burrito your own. The Full Recipe gives you a great base to start! To store leftover grilled cheese burritos, let them cool first. Wrap each burrito in foil or plastic wrap. Place them in an airtight container. This keeps them fresh and tasty for later. Stored this way, they can last up to three days in the fridge. To reheat your burritos, use an oven for the best taste. Preheat your oven to 350°F (175°C). Place the burritos on a baking sheet. Heat them for about 10-15 minutes. This method keeps the burritos crispy. If you are in a hurry, you can use the microwave. Heat them for 1-2 minutes, but they may not be as crispy. You can freeze grilled cheese burritos for longer storage. Wrap each one tightly in plastic wrap, then in foil. This helps prevent freezer burn. They can last up to three months in the freezer. When you're ready to eat, thaw them in the fridge overnight. Then, follow the reheating guidelines to enjoy their cheesy goodness again. To make a Grilled Cheese Burrito from scratch, you need some simple steps. First, gather your ingredients: tortillas and cheese. The cheese should be a mix of sharp cheddar and Monterey Jack for the best flavor. 1. Heat a skillet on medium. 2. Mix the cheeses in a bowl. 3. Spread cheese on one half of a tortilla. 4. Add your fillings, like avocado, jalapeño, black beans, and spinach. 5. Fold the tortilla in half. 6. Cook it in the skillet with butter until golden brown. This process creates a cheesy, crispy delight. The best cheese for a Grilled Cheese Burrito is a combination of sharp cheddar and Monterey Jack. Sharp cheddar gives a strong taste, while Monterey Jack melts well. You can also add pepper jack for extra spice. Mixing these cheeses creates a creamy texture and rich flavor. You can find Grilled Cheese Burritos at many fast food places and food trucks. Some grocery stores sell frozen versions, too. However, making them at home is easy and fun. Plus, you can control the ingredients and flavors. Yes, you can customize the fillings of your Grilled Cheese Burrito! Try adding ingredients like chicken, bacon, or different veggies. You can also switch up the cheeses. Consider adding herbs or spices for more flavor. This way, you make a dish that fits your taste perfectly. You learned how to make a tasty Grilled Cheese Burrito. We started with key ingredients, essential tools, and step-by-step cooking methods. I shared tips for an ideal melt and ways to avoid mistakes. There are many fun variations, too, from vegetarian to spicy. Finally, I covered how to store and reheat leftovers. Now you can enjoy a delicious burrito that fits your taste. Go ahead and try it, and enjoy every bite!](https://therecipehatch.com/wp-content/uploads/2025/05/b2866079-9d6c-4e86-8faa-66412fe1e9a7.webp)