Irresistible Chicken and Broccoli Alfredo Bake Recipe
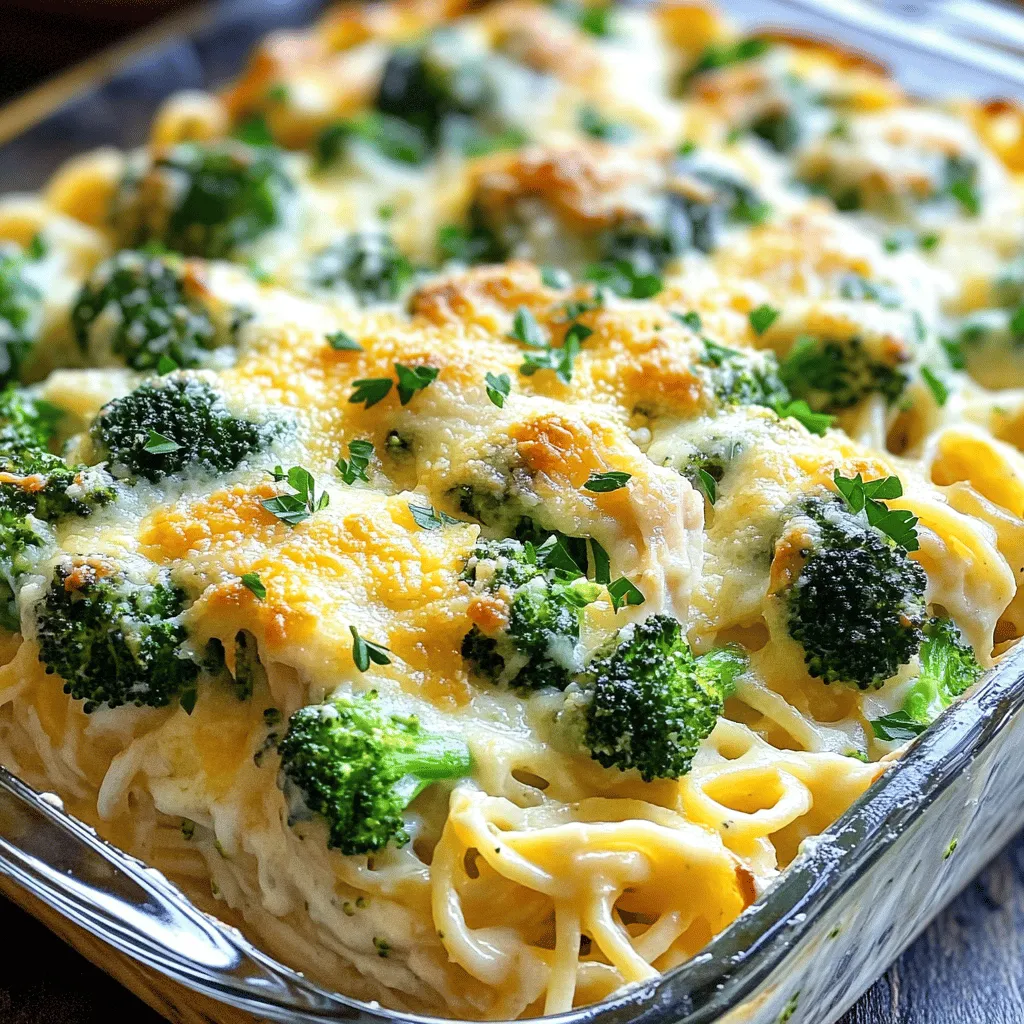
Do you crave a creamy, cheesy dish that’s easy to make? This Irresistible Chicken and Broccoli Alfredo Bake hits the spot every time! With tender chicken, fresh broccoli, and rich …
Do you crave a creamy, cheesy dish that’s easy to make? This Irresistible Chicken and Broccoli Alfredo Bake hits the spot every time! With tender chicken, fresh broccoli, and rich …
![- 12 ounces cheese tortellini - 8 ounces ribeye steak, thinly sliced - 1 tablespoon olive oil - 1 medium onion, sliced - 1 green bell pepper, sliced - 2 cloves garlic, minced - Salt and pepper to taste - 1 cup heavy cream - 1 cup provolone cheese, shredded - 1 tablespoon Worcestershire sauce - Fresh parsley, chopped (for garnish) When I make Cheesesteak Tortellini in Rich Provolone Sauce, I love how simple the ingredients are. The cheese tortellini gives a soft, cheesy base. Ribeye steak adds a rich flavor. I use olive oil to cook the steak, which helps it brown nicely. For the veggies, I slice a medium onion and a green bell pepper. Sautéing them brings out their natural sweetness. I add minced garlic for a punch of flavor and season with salt and pepper. The sauce is what makes this dish shine. Heavy cream gives it a rich texture. Provolone cheese melts into a creamy delight that coats everything well. Worcestershire sauce adds depth. Finally, I sprinkle fresh parsley for a burst of color and flavor. Using these ingredients, you can create a meal that feels gourmet yet is easy to make. For the complete process, refer to the full recipe. - Prepare pasta according to package instructions. - Drain and set aside. Cooking tortellini is simple. Boil water in a large pot. Add a pinch of salt to enhance flavor. Cook the cheese tortellini until al dente. This usually takes about 3 to 5 minutes. Checking the package will give you the right time. Once cooked, drain the tortellini and set it aside. - Heat olive oil in a skillet over medium-high heat. - Cook sliced ribeye until browned, then set aside. For the steak, take a large skillet and heat olive oil. Make sure the oil shines but does not smoke. Add your thinly sliced ribeye. Season with salt and pepper. Cook for about 3 to 4 minutes. You want it browned but still juicy. Once done, remove the steak from the skillet and set it aside. - Sauté onions and bell peppers until caramelized. - Add minced garlic and cook briefly. In the same skillet, add sliced onions and bell peppers. Sauté them until they turn soft and caramelized, about 5 to 6 minutes. This adds so much flavor! After that, add minced garlic and cook for just one more minute. The garlic should smell great but not burn. - Add heavy cream and simmer. - Gradually stir in provolone cheese until melted. Now it's time to make the sauce. Lower the heat and add heavy cream to the skillet with the veggies. Stir well and let it simmer gently. After a minute or two, start adding the shredded provolone cheese. Stir continuously until the cheese melts and the sauce is smooth. - Return cooked steak and tortellini to the skillet. - Mix everything until well coated with sauce. Next, return the cooked steak and tortellini to the skillet. Gently toss everything together. You want each piece coated with that creamy provolone sauce. Taste the mix and adjust seasoning as needed. - Garnish with fresh parsley before serving. Finally, remove the skillet from the heat. Garnish with chopped fresh parsley for a pop of color. It looks great and adds freshness to the dish. You can now serve your cheesesteak tortellini in rich provolone sauce. Enjoy every bite! You can find the full recipe at the top of this section. - Use fresh tortellini for better texture. Fresh pasta gives a delightful bite. - Ensure tortellini is cooked al dente to maintain bite. This means it should be firm to the tooth. - Select ribeye or sirloin for optimal flavor. Ribeye is rich and tender, while sirloin is leaner. - Consider marbling for juicier steak. Marbling adds fat, which keeps the meat moist and tasty. - Add extra cheese for a richer flavor. You can mix in more provolone or try mozzarella. - Use a splash of red wine for depth. A little wine can brighten the sauce's taste and aroma. These tips will help you create the best cheesesteak tortellini in rich provolone sauce. For the full experience, check out the Full Recipe. Enjoy cooking! {{image_2}} You can easily make this dish vegetarian. Just swap the steak for mushrooms. Portobello or shiitake mushrooms work best. You can also use a plant-based protein. This gives you a hearty meal without meat. Want to boost your meal's nutrition? Mix in some fresh spinach. You can also add sun-dried tomatoes or artichokes. These ingredients add color and flavor. They also make your dish look more appealing on the plate. If you want to change the flavor, try different cheeses. You can swap provolone for mozzarella or fontina. Each cheese brings a unique taste and texture. Experiment with what you like best for a fun twist on this recipe. For the full recipe, check out the [Full Recipe]. Store leftovers in an airtight container for up to 3 days. This keeps the flavors fresh. Make sure to cool the dish before sealing it. Freeze in portions for up to 2 months. It’s best to use freezer-safe containers. Before reheating, thaw the portions in the fridge overnight. This helps the texture stay nice. Reheat on the stove with a splash of cream or milk. This helps retain creaminess and flavor. Stir gently to warm everything evenly. Enjoy your delicious Cheesesteak Tortellini in Rich Provolone Sauce again! You can find the Full Recipe for more tips. - Yes, frozen tortellini works well; just add extra cooking time. - Mozzarella, gouda, or Monterey jack are excellent alternatives. - Add crushed red pepper flakes or Italian seasoning for extra flavor. - Yes, it's ideal for meal prep; just store portions separately before mixing. This blog post covered a delicious cheese tortellini dish with ribeye steak. You learned about the key ingredients and how to prepare them step-by-step. I also shared tips for perfecting the dish and ideas for variations. These insights make it easy to get creative. Whether you choose to stick with the original recipe or make your own twists, enjoy your cooking. This dish is simple yet flavorful, perfect for any occasion. Happy cooking!](https://therecipehatch.com/wp-content/uploads/2025/06/cd39353b-bf86-4db2-8d29-a5c6f0d0a9ad.webp)
Are you ready to elevate your dinner game? Today, I’ll show you how to make Cheesesteak Tortellini in Rich Provolone Sauce. This hearty dish combines tender tortellini, juicy ribeye steak, …
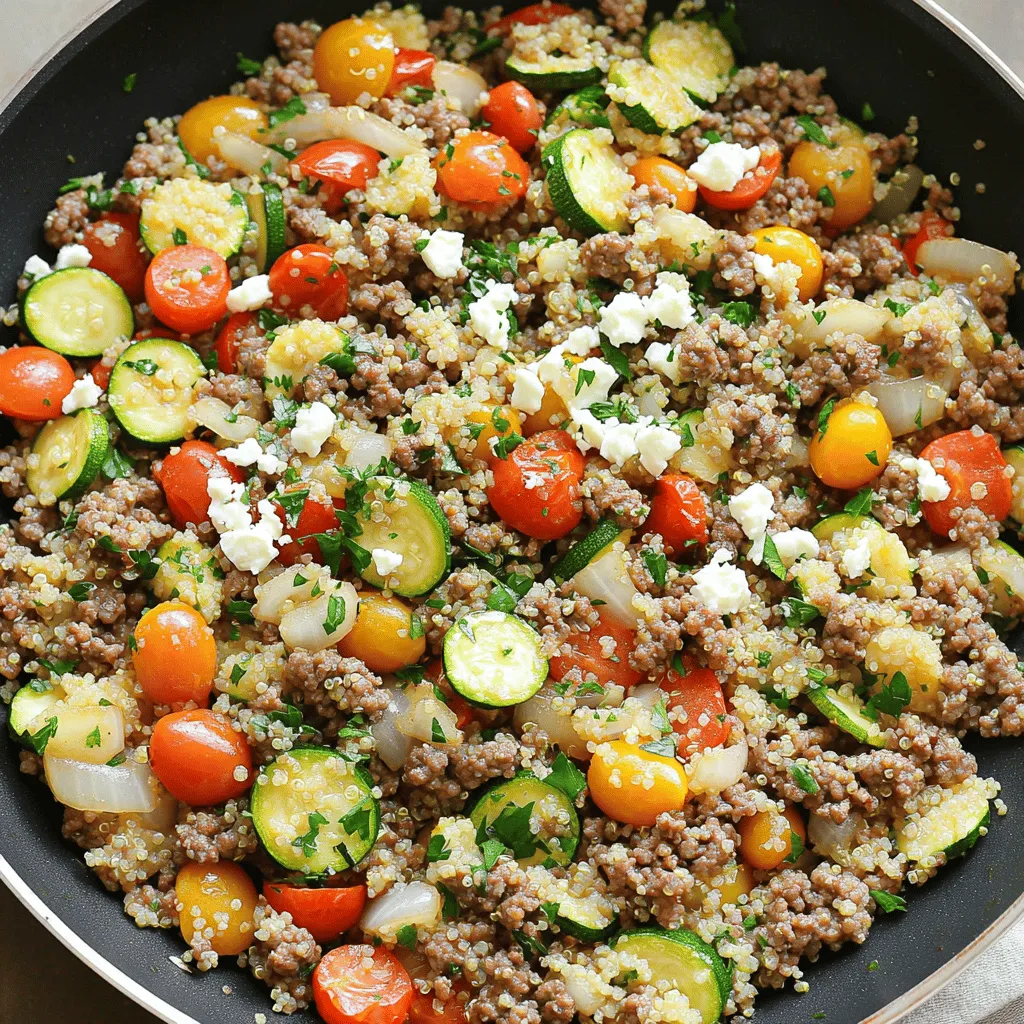
Looking for a quick and tasty meal? Try my Mediterranean Ground Beef Stir Fry! This dish combines fresh veggies and bold flavors, making it a winner for busy days. You’ll …
![This Ground Beef Potato Bake is a warm and filling dish. It brings together layers of tender potatoes, flavorful beef, and rich cheese. This bake is easy to make and perfect for family meals or gatherings. - 1 lb ground beef - 4 large russet potatoes, thinly sliced - 1 medium onion, diced - 2 cloves garlic, minced - 1 cup shredded cheddar cheese - 1 cup sour cream - 1 cup beef broth - 1 teaspoon smoked paprika - 1 teaspoon dried oregano - Salt and pepper to taste - Fresh parsley, chopped (for garnish) The ground beef gives this dish its heartiness. Choose a lean variety for less fat. The russet potatoes hold their shape and add a nice texture. The onion and garlic bring depth and flavor. The cheese melts beautifully, creating a creamy top. Sour cream adds tang and richness, while beef broth keeps everything moist. Smoked paprika and oregano enhance the flavor profile without overpowering the dish. Don’t forget salt and pepper; they balance the flavors. Top it with fresh parsley for color and freshness. With these ingredients, you create layers of comfort and taste in every bite. Check the [Full Recipe] for detailed cooking steps. 1. Preheat the oven and cook the ground beef: Start by preheating your oven to 375°F (190°C). This step is key to ensure even cooking. In a large skillet, add 1 pound of ground beef. Cook it over medium heat until it turns brown, which takes about 5 to 7 minutes. If there is extra fat, drain it. 2. Sauté onions and garlic: Next, add 1 medium diced onion and 2 minced garlic cloves to the skillet. Sauté them for about 5 minutes. You want the onion to become soft and clear. This adds depth to your dish. 3. Combine and layer ingredients in the baking dish: In a big mixing bowl, combine your sliced potatoes with the beef mixture. Toss until the potatoes get coated with the beef and spices. Layer half of this mixture in a greased 9x13 inch baking dish. Spread half of 1 cup of sour cream over it. Then, top with half of 1 cup of shredded cheddar cheese. 4. Baking time and technique: Pour half of 1 cup of beef broth over the layers. Repeat this with the rest of the mixture, sour cream, and cheese. Finally, pour the remaining beef broth on top. Cover the dish tightly with aluminum foil and bake for 45 minutes. After that, remove the foil and bake for another 15 minutes. You want the top to be golden and the potatoes to be tender. 5. Cooling and garnishing the dish: Once done, take the dish out of the oven and let it cool for a few minutes. This makes it easier to serve. Before serving, sprinkle some fresh chopped parsley on top. This adds color and freshness to your hearty meal. This recipe offers a simple way to make a warm, comforting meal. For the full recipe, check below. To avoid a watery bake, drain excess fat after cooking the beef. Use a slotted spoon to remove any liquid. This keeps the bake firm and flavorful. Another way is to layer the potatoes and beef well. This helps to absorb moisture. For tender potatoes, slice them thinly. Thin slices cook faster and soak up flavors. You can also soak them in cold water for 30 minutes. This removes extra starch and helps them stay firm while baking. To boost flavor, try adding spices like cumin and thyme. These can add depth to the dish. Fresh herbs like rosemary or basil work well too. Mix them into the beef or sprinkle on top before serving. Cheddar cheese is great, but feel free to mix in mozzarella or gouda for a twist. Each cheese brings its own taste, making each bite fun. For a rustic style, serve the bake right from the dish. This invites everyone to dig in. If you want a fancier look, scoop portions onto plates. Add a sprinkle of fresh parsley on each plate for a pop of color. You can also drizzle some sour cream on top before serving. This adds creaminess and looks nice. A side salad can also add freshness to the meal. {{image_2}} You can swap ground beef for other meats. Ground turkey or chicken works well. They give a lighter flavor but still taste great. If you want a vegan option, try crumbled tofu or lentils. Use a dairy-free cheese and sour cream for a fully plant-based dish. You can make this dish in a slow cooker. Brown the meat first, then layer everything in the slow cooker. Cook on low for 6 to 8 hours. For a quicker option, use an Instant Pot. Cook the beef first, then layer the ingredients. Seal the pot and cook on high pressure for 10 minutes. Quick and easy! This bake pairs well with simple sides. A fresh green salad adds crunch and color. Roasted vegetables bring out the dish's flavors. For drinks, serve with sparkling water or light red wine. These options balance the hearty meal perfectly. To keep your Ground Beef Potato Bake fresh, store leftovers in an airtight container. Let the dish cool to room temperature before sealing it. Place the container in the fridge. This way, it stays good for about 3 to 4 days. If you want to store it longer, consider freezing it instead. When it's time to enjoy your leftovers, the best method is to use the oven. Preheat your oven to 350°F (175°C). Place the bake in an oven-safe dish and cover it with foil. Heat for about 20 to 30 minutes. This helps maintain the texture and flavor. You can also microwave individual portions. Just be careful, as it may heat unevenly. To freeze your Ground Beef Potato Bake, make sure it’s completely cool. Then, cut it into portions. Wrap each piece tightly in plastic wrap and then in aluminum foil. This prevents freezer burn. You can store it in the freezer for up to 3 months. When ready to eat, thaw it overnight in the fridge before reheating. This keeps the taste fresh and delicious. Can I use other types of potatoes? Yes, you can use other potatoes. Yukon golds or red potatoes work well. They add a nice flavor and texture. How do I know when the bake is done? The bake is ready when the top is golden. You can also check if the potatoes are tender by poking them with a fork. Can I prepare this dish ahead of time? Absolutely! You can assemble it a day ahead. Just cover and store it in the fridge. Bake it when you're ready. This dish has about 450 calories per serving. It’s filling and great for a hearty meal. If you're watching fat intake, use lean ground beef. What to do if the potatoes are undercooked? If the potatoes are undercooked, cover and return the dish to the oven. Bake for an extra 10-15 minutes. Check again for tenderness. How to make it spicier? To add spice, mix in some cayenne pepper or red pepper flakes. You can also use spicy sausage instead of ground beef for a kick. For the complete recipe, check the Full Recipe. This blog post provided a complete guide for a tasty layered bake. We covered ingredients, detailed instructions, and helpful tips to make it great. Remember, you can modify the recipe with different meats or cooking methods to suit your taste. Whether you're storing leftovers or reheating, I shared the best practices to keep your dish fresh. Embrace the idea of experimenting and making this recipe your own. Enjoy creating a flavorful meal that everyone will love!](https://therecipehatch.com/wp-content/uploads/2025/06/4d571824-4df8-4800-bb8f-82b5a2d15476.webp)
If you’re craving a meal that warms both your heart and tummy, try my Ground Beef Potato Bake. This dish combines juicy ground beef, tender potatoes, and gooey cheese for …
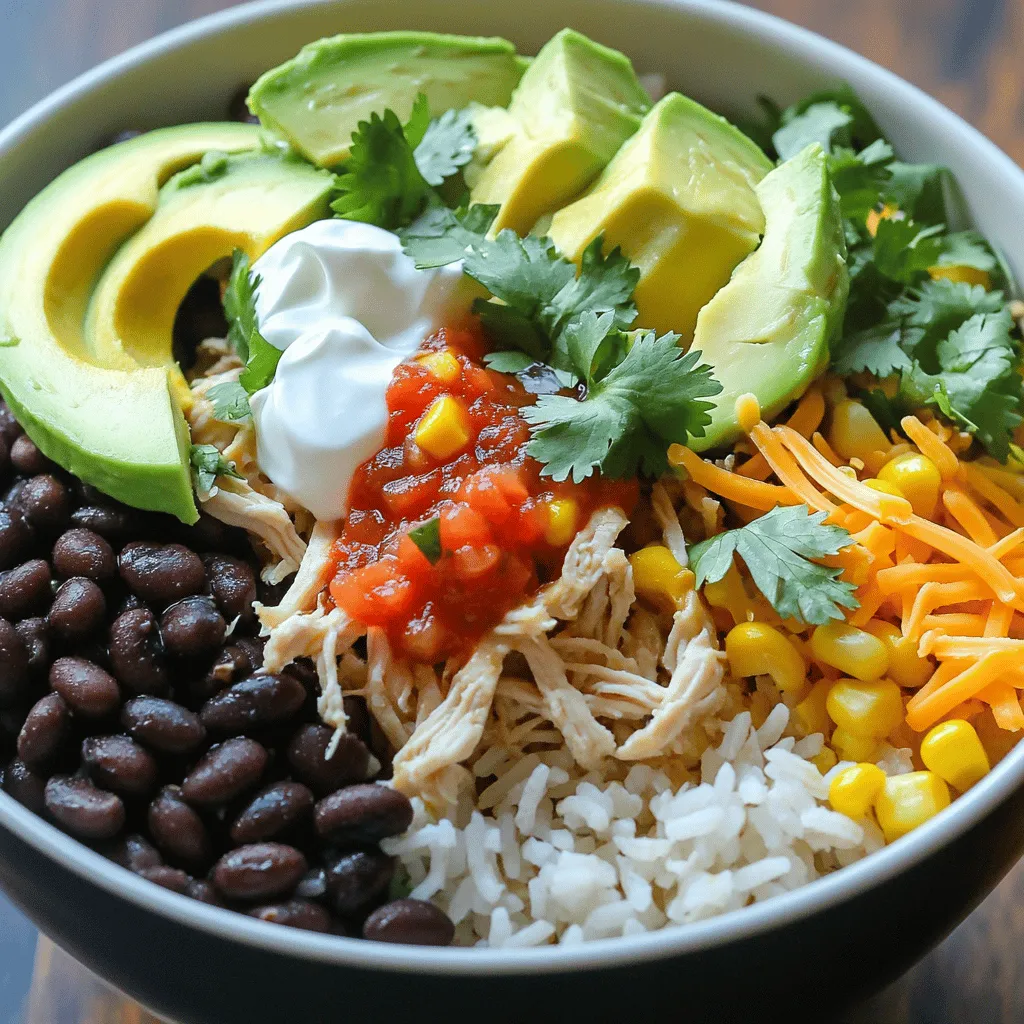
Looking for an easy, delicious meal that will please the whole family? My Slow Cooker Chicken Burrito Bowl is the answer! With simple steps and real ingredients, you can create …

Looking for a quick and tasty snack? Chicken Cranberry Pinwheels are your answer! They mix savory chicken with sweet cranberries, making every bite delightful. In this post, I’ll share easy …
![- 1 cup unsalted butter - 1 cup granulated sugar - 1/2 cup packed brown sugar - 1 large egg - 1 teaspoon vanilla extract - 2 cups all-purpose flour - 1 teaspoon baking powder - 1/2 teaspoon baking soda - 1/4 teaspoon salt - 1 cup cream cheese - 1 cup fresh strawberries, diced - 1/2 cup white chocolate chips (optional) - 1/2 cup crushed graham crackers (for topping) For these Strawberry Cheesecake Cookies, using fresh ingredients makes a big difference. The butter should be soft but not melted. This helps create a light cookie. The cream cheese adds a nice touch of richness. If you can, use ripe strawberries for a sweeter taste. You might not have cream cheese. Try using Greek yogurt instead. It keeps a creamy texture and adds a bit of tang. For a gluten-free option, you can swap all-purpose flour with a gluten-free blend. This keeps the cookies soft and chewy. If you want fewer calories, you can use a sugar alternative like coconut sugar or stevia. These options give sweetness without too many extra calories. You can find all these ingredients at your local grocery store. Look for fresh strawberries in the produce section. If you prefer shopping online, many stores deliver fresh ingredients right to your door. It’s easy to get what you need without leaving home. For the [Full Recipe], check out the rest of the article! 1. Preheat the oven to 350°F. 2. Prepare the baking sheet with parchment paper. 1. In a large bowl, cream the softened butter with granulated and brown sugars. Mix until light and fluffy. 2. Incorporate one large egg and one teaspoon of vanilla extract. Beat until well combined. 1. In another bowl, whisk together two cups of all-purpose flour, one teaspoon of baking powder, one-half teaspoon of baking soda, and one-fourth teaspoon of salt. 2. Gradually mix the dry ingredients into the wet ingredients. Stir until just combined. 1. Gently fold in one cup of softened cream cheese and one cup of diced fresh strawberries. Add white chocolate chips if you like. 2. Form the cookie dough into balls. 1. Drop dough balls onto the prepared baking sheet, about two inches apart. 2. Bake for 10-12 minutes. The edges should be lightly golden, and the centers may look slightly underbaked. Enjoy the process of making these Strawberry Cheesecake Cookies! For detailed steps, refer to the Full Recipe. To make these cookies great, start with room temperature ingredients. Softened butter and cream cheese mix better. They blend smoothly, making your dough creamy. If your ingredients are cold, the dough can be lumpy. Next, do not overmix the dough. Mix just until everything is combined. Overmixing adds air and makes cookies tough. Gently fold in your strawberries and cream cheese. This keeps the cookies soft and chewy. Want to enhance the flavor? Add lemon zest for a bright, citrusy kick. It pairs well with strawberries and cream cheese. Just a teaspoon can make a big difference. You can also try different types of chocolate. Instead of white chocolate chips, use dark or milk chocolate. Each type brings a unique taste. Experiment and find your favorite! To avoid spreading, chill your dough for about 30 minutes before baking. This helps the cookies hold their shape. You can also use a cookie scoop for even portions. For even baking, rotate your baking sheet halfway through. Ovens can have hot spots. This simple step ensures all cookies bake evenly. Keep an eye on them to prevent overbaking. You want golden edges and soft centers. For the full recipe, check out the [Full Recipe]. {{image_2}} You can change up the fruit in these cookies to fit your taste. Try using blueberries for a twist. Blueberry cheesecake cookies bring a fresh burst of flavor. The sweet blueberries mix well with the creamy cheesecake base. Raspberries are another great choice. Raspberry cheesecake cookies are tart and sweet. They add a nice contrast to the creamy filling. Both options are simple to make. Just swap the strawberries for your chosen fruit. You can also play with the size and shape of your cookies. Mini cookies are a fun option. They are cute and perfect for sharing. You can use a smaller scoop to make bite-sized treats. Bar cookies are another great choice. Instead of scooping dough, spread it in a baking pan. Bake until golden, then cut into squares. This method is quick and easy. You can enjoy the same great taste in a different form. If you need a vegan version, it is possible! Use plant-based butter and cream cheese. Substitute the egg with a flax egg or applesauce. Your cookies will still taste amazing without the animal products. For a low-sugar or keto-friendly option, swap regular sugar for a sugar substitute. You can use almond flour instead of all-purpose flour. These changes keep the cookies tasty while fitting your diet needs. For the complete recipe, check the Full Recipe link. To keep your Strawberry Cheesecake Cookies fresh, use an airtight container. This type of container will prevent air from making your cookies stale. You can stack them gently, but avoid crushing them. At room temperature, these cookies last about five days. If you notice they become soft, just pop them in the fridge for a firmer bite. Freezing cookie dough is a great way to save time. Scoop the dough into balls and place them on a baking sheet. Freeze them for about an hour. Once frozen, transfer the dough balls to a freezer bag. This keeps them fresh for up to three months. When you want to bake, take out how many you need and let them thaw in the fridge overnight. Bake them as usual. You may need to add a minute or two to the baking time if they are still a bit cold. For any unused cream cheese, wrap it tightly in plastic wrap or place it in an airtight container. It keeps well in the fridge for about a week. Always check for any changes in smell or texture before using it again. Fresh strawberries should be stored in the fridge, too. Keep them in a container with air holes to let them breathe. They stay fresh for about three to five days. Remember to wash them only before you use them to avoid mold. Strawberry Cheesecake Cookies last about one week at room temperature. Store them in an airtight container. This keeps them soft and fresh. For longer storage, place them in the fridge. They can stay good for up to two weeks there. If you freeze them, they last up to three months. To keep cookies fresh, avoid exposing them to air. Yes, you can use frozen strawberries. They work well in these cookies. However, they may change the texture. Frozen berries have more water. This can make your cookies a bit softer. To avoid this, drain any excess liquid before using. You can also chop them smaller. This way, the flavor remains strong and delicious. If you want to make these cookies egg-free, there are great options. You can use unsweetened applesauce. Use 1/4 cup for each egg. Mashed banana is another choice. Use the same amount as applesauce. Silken tofu is also a great option. Blend it until smooth, then use 1/4 cup. Each substitute gives a nice texture to the cookies. Yes, you can make gluten-free Strawberry Cheesecake Cookies. For this, use a good gluten-free flour blend. Look for one that can replace all-purpose flour. Some brands work well for baking. You can also add a bit of xanthan gum to help with texture. This will make your cookies just as tasty as the original ones. This blog post covered key ingredients for Strawberry Cheesecake Cookies and how to make them. You learned about alternatives for key ingredients and where to buy them. Step-by-step, you saw the preparation, mixing, and baking process. We explored tips for the best texture and flavor, along with fun variations that fit different diets. In conclusion, whether you stick to the classic recipe or try something new, these cookies are sure to satisfy. Happy baking!](https://therecipehatch.com/wp-content/uploads/2025/06/487adf55-795a-477c-8bb5-1565ef289af3.webp)
Looking for a sweet twist on classic cookies? These Strawberry Cheesecake Cookies are your answer! With creamy cheese, fresh strawberries, and a hint of vanilla, you’ll get a delightful taste …
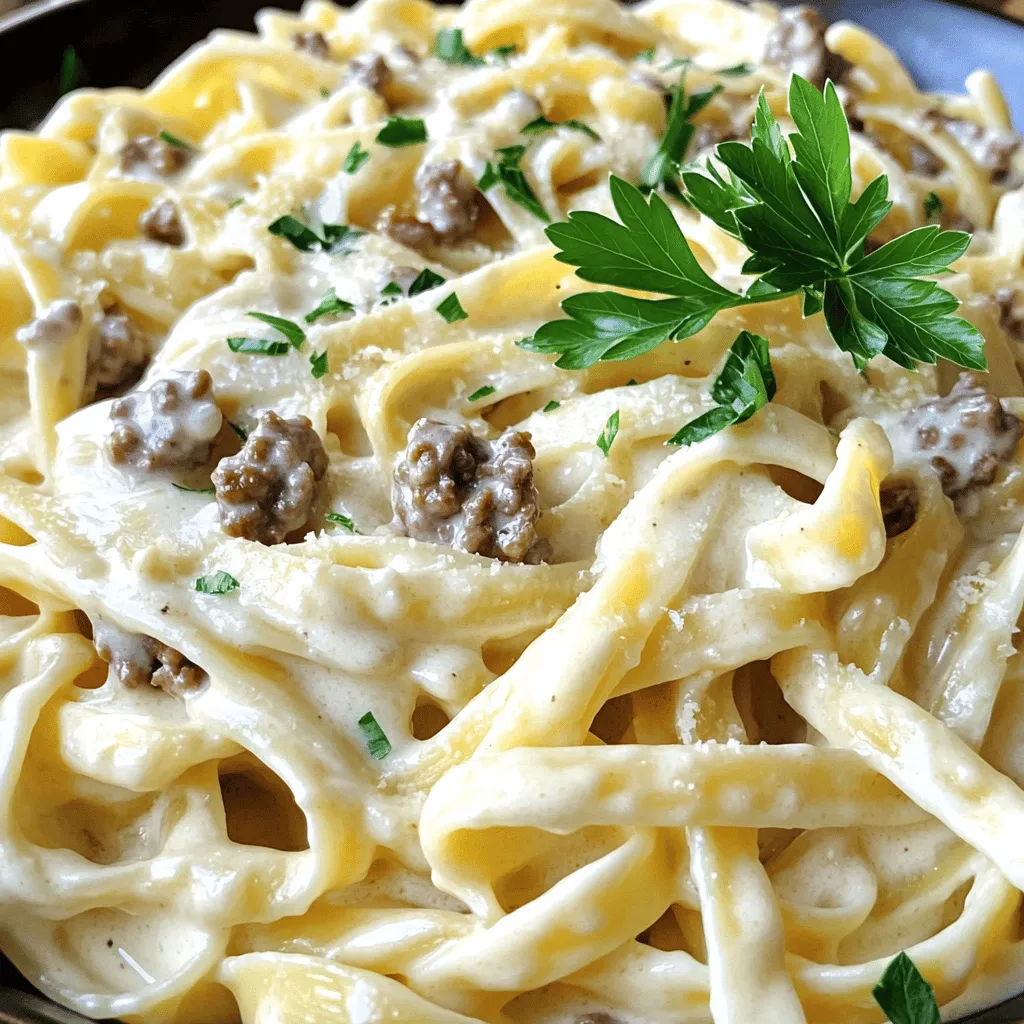
Looking for a quick and tasty meal? Creamy Ground Beef Alfredo Pasta is the answer! This dish combines savory ground beef with a rich, creamy sauce. It’s sure to become …

If you love sweet treats that pack a protein punch, you’re in the right place! My Cinnamon Roll Protein Muffins are not just tasty; they’re nutritious and easy to make. …

Craving a snack that’s both crispy and packed with flavor? Look no further than Parmesan Potato Stacks! These delicious bites combine the comforting taste of potatoes with rich cheeses and …