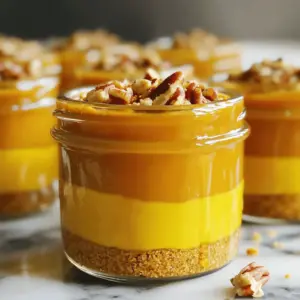
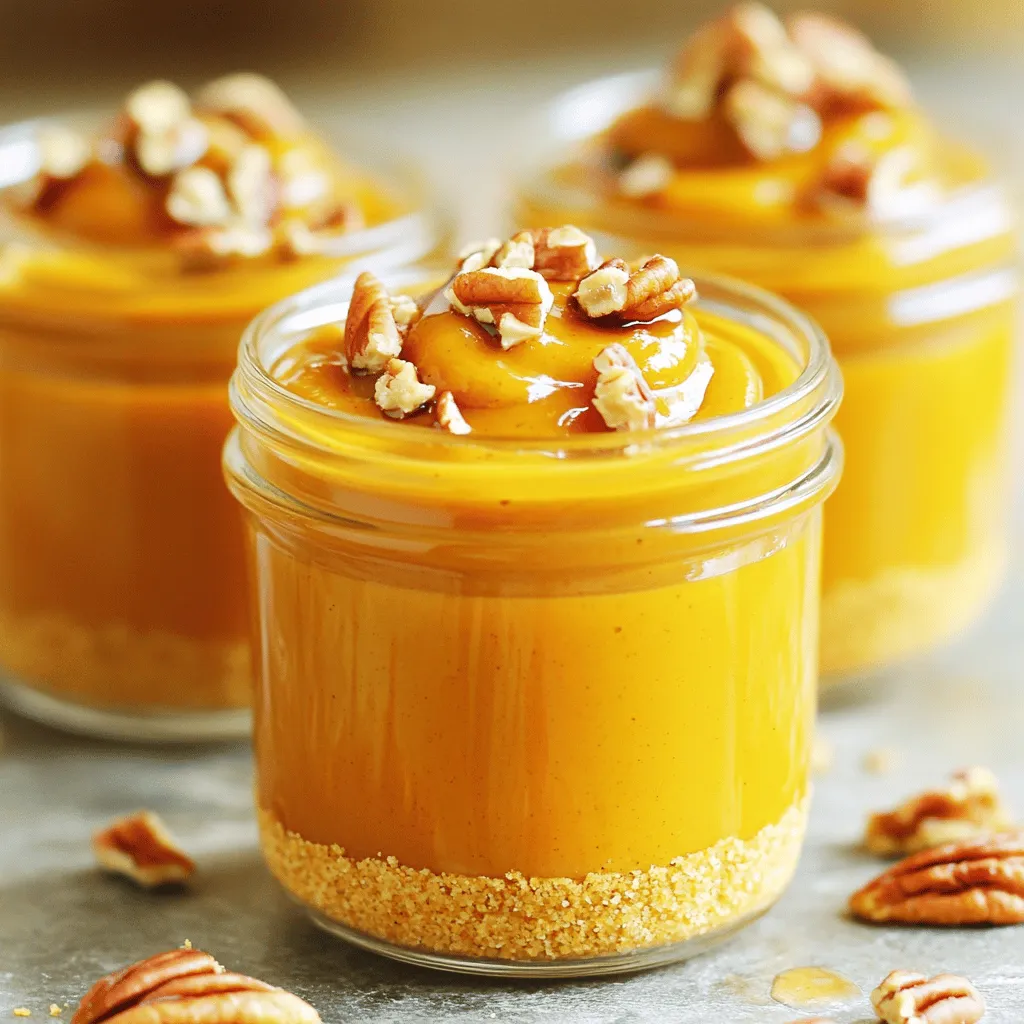
Are you ready to enjoy a creamy and delicious treat this fall? These No-Bake Pumpkin Pie Cups are simple, fun, and full of flavors that capture the season. With just a few ingredients like pumpkin puree, cream cheese, and cozy spices, you’ll have a dessert that impresses everyone. Let’s dive into these easy cups and make your autumn gatherings sweet and memorable!
Ingredients
Main Ingredients
– 1 cup pumpkin puree
– 1/2 cup cream cheese, softened
– 1/2 cup whipped topping
The main ingredients create a rich and creamy filling for your no-bake cups. Pumpkin puree gives a warm, earthy flavor. Cream cheese adds a tangy twist, balancing the sweetness. Whipped topping brings a light, airy texture.
Flavor Enhancers
– 1/3 cup maple syrup
– 1 teaspoon vanilla extract
– 1 teaspoon pumpkin pie spice
– 1/2 teaspoon ground cinnamon
These flavor enhancers make the filling shine. Maple syrup sweetens the mix with a hint of caramel. Vanilla extract adds depth, enhancing the overall taste. Pumpkin pie spice and cinnamon bring that classic fall flavor, making each bite cozy.
Graham Crust Components
– 1 cup graham cracker crumbs
– 1/4 cup unsalted butter, melted
– 1/4 cup crushed pecans (for topping)
The graham crust provides a delightful crunch. Graham cracker crumbs create a sweet and buttery base. Melted butter binds the crumbs, forming a sturdy layer. Crushed pecans on top add extra texture and flavor, making these cups feel gourmet.
Step-by-Step Instructions
Preparation of Pumpkin Mixture
First, grab a mixing bowl. Add the pumpkin puree and softened cream cheese. Whisk them together until smooth. Next, pour in the maple syrup, vanilla extract, pumpkin pie spice, and ground cinnamon. Mix it well to combine all the flavors. This creamy pumpkin mixture is the heart of your cups.
Now, gently fold in the whipped topping. This step adds lightness to the filling. Make sure the whipped topping blends in fully. Set this delicious mixture aside while you work on the crust.
Preparing the Graham Cracker Crust
In another bowl, combine the graham cracker crumbs with melted butter. Stir until all the crumbs are coated well. This mixture gives your cups a crunchy base.
Take small dessert cups or mini mason jars. Layer the bottom with about two tablespoons of the graham cracker mixture. Press it down slightly to create a firm crust.
Assembling the No-Bake Cups
Now, it’s time to layer! Spoon the pumpkin filling over the graham cracker crust. Fill each cup until it is about three-quarters full.
If you use larger cups, you can add another layer. Repeat the process with more graham cracker mixture and then more pumpkin filling. This extra layer makes it extra special.
Chilling and Serving
After assembling the cups, refrigerate them. Let them chill for at least two hours. This step helps the layers set perfectly.
Before serving, sprinkle crushed pecans on top for added crunch. This finishing touch enhances both flavor and texture. Then, enjoy your delightful No-Bake Pumpkin Pie Cups!
Tips & Tricks
Best Practices for a Creamy Filling
Using softened cream cheese is key for a smooth filling. Cold cream cheese will create lumps. Leave it out at room temperature for about 30 minutes before mixing. This small step makes a big difference!
When you fold in the whipped topping, do it gently. Use a spatula and scoop from the bottom. This helps keep the mixture light and airy.
Customizing Your No-Bake Cups
You can switch up the flavors in your cups! Try adding chocolate for a rich twist. Simply mix in cocoa powder or melted chocolate. Maple adds a lovely sweetness too. Just swap some maple syrup for part of the pumpkin.
For toppings, think outside the box! You can add whipped cream, chocolate shavings, or even a drizzle of caramel. Personalize each cup to suit your taste.
Ensuring Perfect Layers
Layering is all about patience. Start with a firm base of graham cracker crumbs. Press them down well to avoid a soggy crust. Use a spoon to evenly layer the pumpkin filling on top.
If you use larger cups, repeat the layers. This builds a beautiful look and adds depth of flavor. Remember, the key is to keep those layers distinct.
Variations
Alternative Crust Options
You can switch things up by using chocolate graham crackers. They add a rich taste that pairs well with pumpkin. Just crush them like you would regular graham crackers. Mix with melted butter and layer as usual.
For those who need gluten-free options, try using gluten-free graham crackers. They work just as well. The taste stays delicious without any gluten.
Flavor Variations
To enhance the flavor, consider adding spices like nutmeg or allspice. A pinch can elevate the taste. Mix in these spices when you combine the pumpkin puree and cream cheese.
You can also incorporate layers of caramel or chocolate. These flavors blend nicely with the pumpkin filling. Drizzle them between the layers for a sweet surprise.
Dietary Modifications
If you want vegan options, swap out the cream cheese and whipped topping. Use coconut cream or a vegan cream cheese instead. This keeps the dessert rich and creamy without dairy.
For a sugar-free version, replace maple syrup with a sugar-free sweetener. Options like stevia or erythritol work well here. They help keep the sweetness without the extra sugar.
Storage Info
Best Practices for Refrigeration
Store your No-Bake Pumpkin Pie Cups in the fridge. They last up to four days. Use airtight containers or cover each cup tightly with plastic wrap. This keeps them fresh and tasty.
Freezing Options
Yes, you can freeze No-Bake Pumpkin Pie Cups! Just make sure to cover them well. Use freezer-safe containers or wrap each cup in foil. They can stay frozen for up to two months. To thaw, place them in the fridge overnight. Serve them cold for the best flavor and texture.
Serving Suggestions
These cups are perfect for fall gatherings or holiday parties. They make a fun dessert for Thanksgiving. Pair them with hot drinks like spiced cider or coffee. You can also serve them with whipped cream or a sprinkle of extra cinnamon. Enjoy the festive vibes!
FAQs
Can I use homemade whipped topping instead of store-bought?
Yes, you can use homemade whipped topping. Homemade is often fresher and creamier. It allows you to control the sweetness and flavor. Store-bought is quick and easy, but may contain preservatives.
To make your own whipped topping, follow these steps:
1. Chill a mixing bowl and beaters for about 15 minutes.
2. Add 1 cup of heavy cream to the chilled bowl.
3. Whip on medium speed until soft peaks form.
4. Gradually add 2 tablespoons of powdered sugar and 1 teaspoon of vanilla.
5. Continue whipping until stiff peaks form.
This topping pairs perfectly with pumpkin pie cups.
What’s the best way to soften cream cheese quickly?
You can soften cream cheese in a few simple ways. The fastest method is to cut it into small cubes. Place the cubes in a microwave-safe bowl. Heat in the microwave for about 10 seconds. Check the texture and repeat if necessary.
Another way is to leave the cream cheese out at room temperature for 30 minutes. This method also keeps the texture smooth. Avoid overheating, as this can cause it to melt.
Can I double the recipe for a larger gathering?
Yes, you can easily double the recipe. This will give you twelve cups instead of six. Adjust all ingredient amounts accordingly.
For larger servings, use bigger cups. You may need to increase chilling time to ensure they set properly. Remember to mix and layer carefully to keep the texture right.
To wrap up, we explored how to create delicious No-Bake Pumpkin Pie Cups. You learned about key ingredients like pumpkin puree and cream cheese, plus spices for flavor. We covered step-by-step instructions for mixing and assembling these treats, along with tips to get creamy filling and perfect layers. You also discovered variations, like gluten-free crusts and flavor tweaks. Finally, we discussed storage tips to keep your cups fresh. These tasty cups are easy to make and perfect for any gathering. Enjoy bringing this treat to your table!