Refrigerator Dilly Beans Perfect for Your Pantry

WANT TO SAVE THIS RECIPE?

Looking to spice up your pantry with a delightful, crunchy treat? Refrigerator dilly beans are the perfect solution! In just a few simple steps, you’ll create a zesty snack packed with flavor. With fresh green beans, garlic, and a blend of spices, these dilly beans will brighten any meal. Join me as I guide you through this fun and simple pickling adventure! Your taste buds will thank you.

Ingredients

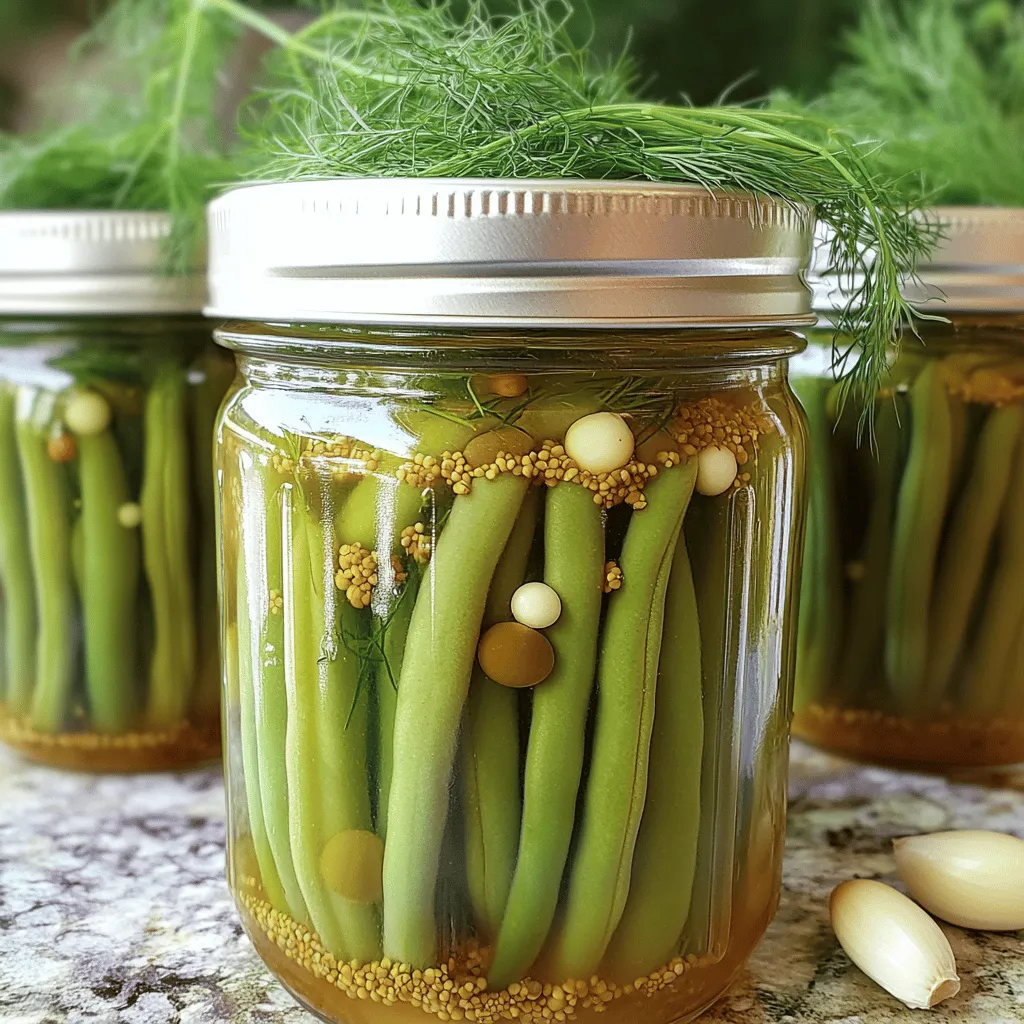
Fresh Ingredients Needed

– 1 pound fresh green beans, trimmed

– 3 cloves garlic, peeled and smashed

Pickling Liquid Components

– 1 cup distilled white vinegar

– 1 cup water

– 2 tablespoons kosher salt

Flavor Boosters

– 1 tablespoon dill seeds

– 1 teaspoon red pepper flakes

– 1 teaspoon black peppercorns

– 2 bay leaves

– 1 teaspoon mustard seeds

When you make Refrigerator Dilly Beans, you want fresh and crisp ingredients. Green beans are the star here. Choose bright, firm green beans. Trim off the ends for a clean look and bite. Next, garlic adds depth. Smash the cloves to release flavor.

For the pickling liquid, vinegar brings the tang. Use distilled white vinegar for a clean taste. Water balances the sharpness. Kosher salt plays a key role in flavor and preservation. It helps the beans stay crunchy too.

Now, for the flavor boosters! Dill seeds give that classic dill taste. Red pepper flakes add a kick. Adjust the amount if you prefer less heat. Black peppercorns and mustard seeds add extra spice. Bay leaves bring a subtle earthiness.

This mix gives your beans a punch! Together they create a delightful crunch in every bite. For the full recipe, check out the Crunchy Refrigerator Dilly Beans section. Enjoy the process of pickling, and let the flavors shine!

Step-by-Step Instructions

Preparing the Green Beans

Step 1: Blanch the green beans

Fill a large pot with salted water and bring it to a boil. Add 1 pound of trimmed green beans. Cook them for 2-3 minutes until they turn bright green and feel slightly tender. This step helps keep the beans crunchy.

Step 2: Transfer to ice water

Once the beans are blanched, quickly move them to a bowl filled with ice water. This stops the cooking and keeps them crisp. Let them cool for about 5 minutes. After cooling, drain the beans and set them aside.

Creating the Pickling Liquid

Step 3: Combine vinegar, water, and salt

In a medium saucepan, mix 1 cup of distilled white vinegar, 1 cup of water, and 2 tablespoons of kosher salt. Heat this mixture over medium heat. Stir it until the salt dissolves, which takes just a couple of minutes.

Step 4: Add spices and simmer

Once the pickling liquid is boiling, add 3 smashed garlic cloves, 1 tablespoon of dill seeds, 1 teaspoon of red pepper flakes, 1 teaspoon of black peppercorns, 2 bay leaves, and 1 teaspoon of mustard seeds. Let this mixture simmer for about 5 minutes. The spices will blend beautifully, creating a tasty liquid.

Packing and Storing

Step 5: Pack green beans in jars

Take two clean quart-sized jars. Tightly pack the blanched green beans inside, leaving some space at the top of each jar.

Step 6: Pour hot liquid and seal jars

Carefully pour the hot pickling liquid over the beans in each jar. Make sure the beans are fully submerged. You might need to press them down gently. Seal the jars with lids and let them cool to room temperature. After they cool, place them in the refrigerator.

These beans will be ready to enjoy after 24 hours, but they taste best after a week. For the full recipe, you can check the earlier section. Enjoy your crunchy refrigerator dilly beans!

Tips & Tricks

Perfecting the Crunchy Texture

To get that perfect crunch in your refrigerator dilly beans, blanching is key. Blanching means briefly boiling the beans then cooling them quickly. This step helps keep their bright color and crisp bite.

After blanching, immediately place the beans in an ice bath. This method halts the cooking, locking in the crispness. Keep them in the ice water for about five minutes. Drain them well before packing into jars.

Adjusting Spice Levels

You can easily adjust the spice levels in your dilly beans. If you like it hot, add more red pepper flakes. Start with one teaspoon, then taste. You can always add more later.

Feel free to explore other herbs and spices too. Try adding fresh dill or some mustard seeds for extra flavor. These simple tweaks can make your dish unique and perfectly suited to your taste.

Quick Storage Recommendations

For best results, seal your jars tightly. This keeps air out and flavors in. Use clean, dry jars to prevent spoilage.

Store your dilly beans in the fridge. They will taste best after at least 24 hours. For optimal flavor, enjoy them within two weeks. The longer they sit, the more flavor they absorb! Check out the Full Recipe for detailed steps.

Variations

Classic vs. Spicy Dilly Beans

You can easily adjust the spice in your dilly beans. For heat lovers, add more red pepper flakes. Start with an extra half teaspoon. If you want more heat, try different chili types. Jalapeños or serranos work great. Just slice them thin and add to the jars. Remember to taste as you go. This way, you find the perfect heat level for your family.

Herb Additions

Fresh herbs can change the flavor of your dilly beans. Try adding thyme or oregano for a unique twist. Just a few sprigs can brighten the taste. You can mix different herbs too. For example, dill and thyme together create a fresh profile. Experimenting with herbs makes your beans special and fun. Use what you have on hand. Your pantry can inspire new flavors.

Using Different Types of Beans

You don’t have to stick with green beans. Wax beans or purple beans work well too. Just remember, thicker beans may need more blanching time. Check the texture after boiling. You want them tender but still crisp. This way, your pickles stay crunchy. Different beans can also give new colors to your jars. It makes them more appealing when served. Feel free to mix and match beans to create your own signature dilly beans.

Storage Information

Refrigerator Storage Guidelines

The best temperature for refrigerator pickles is between 34°F and 40°F. This range keeps your dilly beans crisp and flavorful. I recommend placing them on a middle shelf, away from the door. This spot maintains a steady temperature. For the best taste, enjoy your dilly beans within two months. After that, they may lose crunch and flavor.

Long-term Storage Options

You can freeze dilly beans, but they will lose some crunch. If you choose to freeze, blanch the beans first. Then, pack them in airtight containers. Label each container with the date. Refrigerating is ideal for short-term use, while freezing is great for long-term storage. Always use clean, dry jars for storing in the fridge.

Signs of Spoilage

Check your dilly beans for any signs of spoilage. Bad pickles may show mold, off smells, or a cloudy brine. If you see any of these signs, discard the beans. Generally, refrigerator dilly beans last up to two months. After that, their taste and texture may decline. Always trust your senses—if it seems off, it probably is.

FAQs

How long do refrigerator dilly beans last?

Refrigerator dilly beans last about 2 to 4 weeks in the fridge. They taste best within the first week after pickling. After that, the flavor may change, but they will still be safe to eat. Always check for any signs of spoilage, like off smells or mold, before enjoying them.

Can I reuse the pickling liquid?

You can reuse the pickling liquid, but it may lose some flavor. The first batch will be the most flavorful. If you choose to reuse it, strain it well to remove any bits of beans or spices. However, make sure to heat it to a boil again to kill any bacteria. This step is important for safety.

What can I serve with refrigerator dilly beans?

Refrigerator dilly beans are great as a crunchy side dish. Pair them with grilled meats, sandwiches, or salads. They make a fun snack straight from the jar! You can also serve them on a cheese board or with dips for a party. They add a nice tangy crunch to many meals.

Are refrigerator dilly beans gluten-free?

Yes, refrigerator dilly beans are gluten-free. The ingredients used in the recipe, like vinegar and spices, do not contain gluten. However, always check your spice labels to avoid cross-contamination. If you’re very sensitive, use certified gluten-free products to be safe. Enjoy these beans worry-free!

We explored how to make refrigerator dilly beans, from fresh ingredients to pickling tips. You learned the right steps for blanching, packing, and creating a crunchy texture. Adjusting spice levels and trying variations can make each batch unique. Remember to store your pickled beans correctly for the best taste. With these methods, you can enjoy your pickled beans for weeks. Try this simple recipe to add flavor to your meals!

- 1 pound fresh green beans, trimmed - 3 cloves garlic, peeled and smashed - 1 cup distilled white vinegar - 1 cup water - 2 tablespoons kosher salt - 1 tablespoon dill seeds - 1 teaspoon red pepper flakes - 1 teaspoon black peppercorns - 2 bay leaves - 1 teaspoon mustard seeds When you make Refrigerator Dilly Beans, you want fresh and crisp ingredients. Green beans are the star here. Choose bright, firm green beans. Trim off the ends for a clean look and bite. Next, garlic adds depth. Smash the cloves to release flavor. For the pickling liquid, vinegar brings the tang. Use distilled white vinegar for a clean taste. Water balances the sharpness. Kosher salt plays a key role in flavor and preservation. It helps the beans stay crunchy too. Now, for the flavor boosters! Dill seeds give that classic dill taste. Red pepper flakes add a kick. Adjust the amount if you prefer less heat. Black peppercorns and mustard seeds add extra spice. Bay leaves bring a subtle earthiness. This mix gives your beans a punch! Together they create a delightful crunch in every bite. For the full recipe, check out the Crunchy Refrigerator Dilly Beans section. Enjoy the process of pickling, and let the flavors shine! - Step 1: Blanch the green beans Fill a large pot with salted water and bring it to a boil. Add 1 pound of trimmed green beans. Cook them for 2-3 minutes until they turn bright green and feel slightly tender. This step helps keep the beans crunchy. - Step 2: Transfer to ice water Once the beans are blanched, quickly move them to a bowl filled with ice water. This stops the cooking and keeps them crisp. Let them cool for about 5 minutes. After cooling, drain the beans and set them aside. - Step 3: Combine vinegar, water, and salt In a medium saucepan, mix 1 cup of distilled white vinegar, 1 cup of water, and 2 tablespoons of kosher salt. Heat this mixture over medium heat. Stir it until the salt dissolves, which takes just a couple of minutes. - Step 4: Add spices and simmer Once the pickling liquid is boiling, add 3 smashed garlic cloves, 1 tablespoon of dill seeds, 1 teaspoon of red pepper flakes, 1 teaspoon of black peppercorns, 2 bay leaves, and 1 teaspoon of mustard seeds. Let this mixture simmer for about 5 minutes. The spices will blend beautifully, creating a tasty liquid. - Step 5: Pack green beans in jars Take two clean quart-sized jars. Tightly pack the blanched green beans inside, leaving some space at the top of each jar. - Step 6: Pour hot liquid and seal jars Carefully pour the hot pickling liquid over the beans in each jar. Make sure the beans are fully submerged. You might need to press them down gently. Seal the jars with lids and let them cool to room temperature. After they cool, place them in the refrigerator. These beans will be ready to enjoy after 24 hours, but they taste best after a week. For the full recipe, you can check the earlier section. Enjoy your crunchy refrigerator dilly beans! To get that perfect crunch in your refrigerator dilly beans, blanching is key. Blanching means briefly boiling the beans then cooling them quickly. This step helps keep their bright color and crisp bite. After blanching, immediately place the beans in an ice bath. This method halts the cooking, locking in the crispness. Keep them in the ice water for about five minutes. Drain them well before packing into jars. You can easily adjust the spice levels in your dilly beans. If you like it hot, add more red pepper flakes. Start with one teaspoon, then taste. You can always add more later. Feel free to explore other herbs and spices too. Try adding fresh dill or some mustard seeds for extra flavor. These simple tweaks can make your dish unique and perfectly suited to your taste. For best results, seal your jars tightly. This keeps air out and flavors in. Use clean, dry jars to prevent spoilage. Store your dilly beans in the fridge. They will taste best after at least 24 hours. For optimal flavor, enjoy them within two weeks. The longer they sit, the more flavor they absorb! Check out the Full Recipe for detailed steps. {{image_2}} You can easily adjust the spice in your dilly beans. For heat lovers, add more red pepper flakes. Start with an extra half teaspoon. If you want more heat, try different chili types. Jalapeños or serranos work great. Just slice them thin and add to the jars. Remember to taste as you go. This way, you find the perfect heat level for your family. Fresh herbs can change the flavor of your dilly beans. Try adding thyme or oregano for a unique twist. Just a few sprigs can brighten the taste. You can mix different herbs too. For example, dill and thyme together create a fresh profile. Experimenting with herbs makes your beans special and fun. Use what you have on hand. Your pantry can inspire new flavors. You don’t have to stick with green beans. Wax beans or purple beans work well too. Just remember, thicker beans may need more blanching time. Check the texture after boiling. You want them tender but still crisp. This way, your pickles stay crunchy. Different beans can also give new colors to your jars. It makes them more appealing when served. Feel free to mix and match beans to create your own signature dilly beans. The best temperature for refrigerator pickles is between 34°F and 40°F. This range keeps your dilly beans crisp and flavorful. I recommend placing them on a middle shelf, away from the door. This spot maintains a steady temperature. For the best taste, enjoy your dilly beans within two months. After that, they may lose crunch and flavor. You can freeze dilly beans, but they will lose some crunch. If you choose to freeze, blanch the beans first. Then, pack them in airtight containers. Label each container with the date. Refrigerating is ideal for short-term use, while freezing is great for long-term storage. Always use clean, dry jars for storing in the fridge. Check your dilly beans for any signs of spoilage. Bad pickles may show mold, off smells, or a cloudy brine. If you see any of these signs, discard the beans. Generally, refrigerator dilly beans last up to two months. After that, their taste and texture may decline. Always trust your senses—if it seems off, it probably is. Refrigerator dilly beans last about 2 to 4 weeks in the fridge. They taste best within the first week after pickling. After that, the flavor may change, but they will still be safe to eat. Always check for any signs of spoilage, like off smells or mold, before enjoying them. You can reuse the pickling liquid, but it may lose some flavor. The first batch will be the most flavorful. If you choose to reuse it, strain it well to remove any bits of beans or spices. However, make sure to heat it to a boil again to kill any bacteria. This step is important for safety. Refrigerator dilly beans are great as a crunchy side dish. Pair them with grilled meats, sandwiches, or salads. They make a fun snack straight from the jar! You can also serve them on a cheese board or with dips for a party. They add a nice tangy crunch to many meals. Yes, refrigerator dilly beans are gluten-free. The ingredients used in the recipe, like vinegar and spices, do not contain gluten. However, always check your spice labels to avoid cross-contamination. If you're very sensitive, use certified gluten-free products to be safe. Enjoy these beans worry-free! We explored how to make refrigerator dilly beans, from fresh ingredients to pickling tips. You learned the right steps for blanching, packing, and creating a crunchy texture. Adjusting spice levels and trying variations can make each batch unique. Remember to store your pickled beans correctly for the best taste. With these methods, you can enjoy your pickled beans for weeks. Try this simple recipe to add flavor to your meals!

Refrigerator Dilly Beans

Discover the delicious crunch of refrigerator dilly beans with this simple and flavorful recipe! Made with fresh green beans and a zesty blend of spices, these pickles are the perfect addition to your meals or a delightful snack on their own. In just 15 minutes of prep time, you can create a tangy treat that gets even better with time. Click through to explore the full recipe and elevate your pickling game!

Ingredients
  

1 pound fresh green beans, trimmed

1 cup distilled white vinegar

1 cup water

2 tablespoons kosher salt

3 cloves garlic, peeled and smashed

1 tablespoon dill seeds

1 teaspoon red pepper flakes (adjust for spice preference)

1 teaspoon black peppercorns

2 bay leaves

1 teaspoon mustard seeds

Instructions
 

Start by blanching the green beans. Bring a large pot of salted water to a boil. Add the trimmed green beans and cook for 2-3 minutes until bright green and slightly tender.

    Immediately transfer the green beans to a bowl of ice water to halt the cooking process. Let them cool for about 5 minutes, then drain and set them aside.

      In a medium saucepan, combine the distilled white vinegar, water, and kosher salt. Bring the mixture to a boil, stirring until the salt has dissolved.

        Once the pickling liquid is boiling, add the smashed garlic, dill seeds, red pepper flakes, black peppercorns, bay leaves, and mustard seeds. Let the mixture simmer for about 5 minutes.

          In two clean quart-sized jars, pack the blanched green beans tightly, leaving some space at the top.

            Pour the hot pickling liquid over the beans, ensuring they are fully submerged. You may need to press down on the beans slightly to keep them below the liquid.

              Seal the jars with lids and allow them to cool to room temperature.

                Once cooled, place the jars in the refrigerator. Let the beans pickle for a minimum of 24 hours before enjoying; they’ll be best after about a week.

                  Prep Time, Total Time, Servings: 15 minutes | 1 hour (including cooling) | 2 quart-sized jars

                    - Presentation Tips: Serve these vibrant dill-infused beans as a crunchy side dish or appetizer at a picnic or barbecue. You can also garnish the jars with a sprig of fresh dill before serving for an added pop of color!

                      WANT TO SAVE THIS RECIPE?